Install
- Navigate to https://tomcat.apache.org/download-90.cgi
- Select 32-bit/64-bit Windows Service Installer (pgp, sha512)
- Open the installer from downloads either in the browser or file explorer.
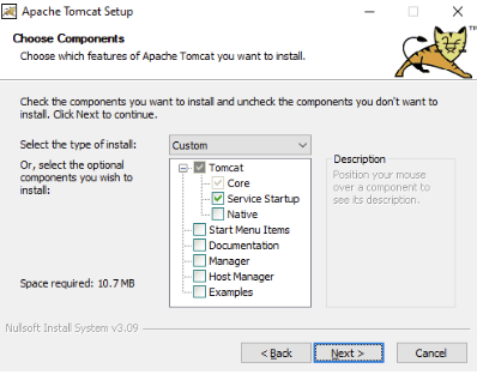
- Click through the Apache Tomcat Setup Welcome and Licensing pages. On the Choose Components page, click the + (expansion button) next to the Tomcat item to reveal more options. Check the Service Startup option. Click Next to continue.
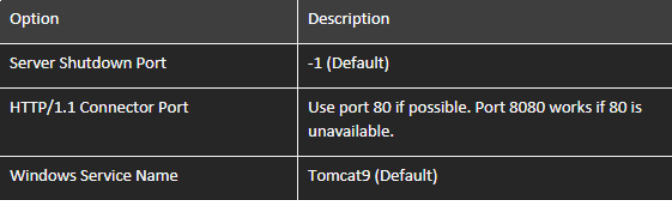
- On the Apache Tomcat Setup: Configuration Options window, configure the following then click Next to continue:
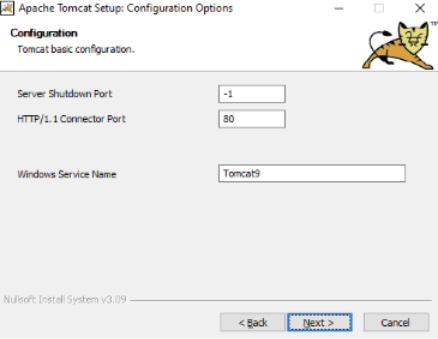
- Define the file path where the Java Virtual Machine is found.
Default path C:\Program Files\Eclipse Adoptium\jdk-x.x.xxx.x-hotspot\bin
- The Tomcat installation will automatically find the best possible Java Runtime location available. After the right Java location is detected, click Next:
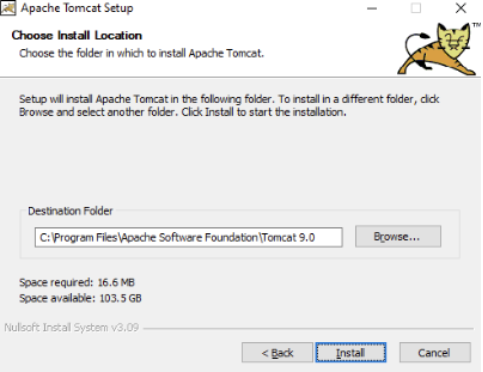
- On the Choose Install Location dialog box, define the installation directory. The default location is C:\Program Files\Apache Software Foundation\Tomcat 9.0 for ease of management. However, based on the institution’s preference, a different location may be used. Once the desired installation directory is chosen, click Install:
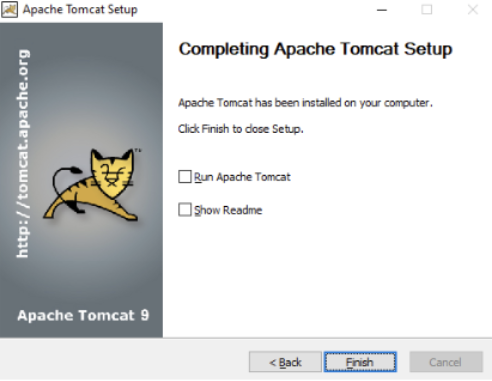
- When the installation process has completed, deselect the Run Apache Tomcat and Show Readme checkboxes and click Finish:
Update
- Navigate to the existing Tomcat directory. By default, this is “C:\Program Files\Apache Software Foundation\Tomcat 9.0”
- From this directory, copy the progenyconfig folder, the root.war file (this is within the webapps folder), as well as the server and web.xml files (this is within the conf folder) to the desktop
- If the client uses their own images within Progeny as a logo, also copy the png folder within the root folder: Tomcat 9.0\webapps\ROOT\png
- Open Task Manager and end task on the current Tomcat instance, typically this will be under the processes tab named “Apache Commons Dameon Service Runner”
- This is recommended from task manager rather than services as sometimes the Tomcat process will get hung up when stopping the service itself. Ending task will avoid this delay.
- Open the start menu and type ‘services’. Open the services window.
- Find “Apache Tomcat”, right click it, and select “properties”. From here, change the “Startup type” from automatic to “Manual” or “Disabled”
- Download the latest 32-bit/64-bit Windows Service Installer version of tomcat 9 from https://tomcat.apache.org/download-90.cgi
- Run the downloaded executable
- On the components page uncheck everything other than Tomcat, click the + next to Tomcat and check on service startup
- On the configuration page, change the default “8080” to “80” unless otherwise directed
- The Java Virtual Machine page should automatically redirect to the Java folder if it was installed prior to the Tomcat install.
- If Java wasn’t installed, install Java now, then use the 3 dots to navigate to the jre folder. This is typically something like “C:\Program Files\Java\jre1.8.0_421” although the final digits are reliant on the version of Java that was installed.
- If the client is using OpenJDK you will need to instead manually point this to the jre folder within the OpenJDK directory.
- You may redirect the destination install folder if requested
- Run the install
- Uncheck “Run Apache Tomcat” and “Show Readme” and hit finish
- Navigate to the newly created Apache Tomcat directory. By default, this is in the “C:\Program Files\Apache Software Foundation” directory, where you would open the folder of the newly installed version of Apache Tomcat.
- Copy the new server and web.xml files within the conf folder into a separate, newly created folder named “old” in the conf folder.
- Copy the server and web.xml files you saved from step 2 into the conf folder. If prompted, overwrite the existing files.
- Move the progenyconfig folder you saved from step 2 into the bin folder
- Navigate to the new webapps folder and delete the “ROOT” folder there. Move the root.war file that you saved from step 2 into the newly empty webapps folder
- If you saved the png folder, this be added in following the next step
-
For any versions of Tomcat 9.0.90 or later, navigate to “C:\Program Files\Apache Software Foundation\Tomcat 9.0\bin\” and locate the Tomcat executable ending in “w.exe”
- Double click the .exe file and navigate to the “Java” tab
- Update the “initial memory pool” to be 1024
- Update the “Maximum memory pool” to be 2048 (for some customers 2048mb may not be enough, so this number could go higher.)
- Hit apply, then OK
- Close and reopen task manager. Start up the new version of Tomcat from the services menu. This will take some time to deploy, keep an eye on the CPU usage of Apache tomcat under the processes menu of Task Manager. Once this reaches 0 and remains there for a moment you are OK to proceed.
- This is where you will be able to copy the png folder into the root folder in the new Tomcat directory “C:\Program Files\Apache Software Foundation\Tomcat 9.0.XX\webapps\ROOT”. Once this is complete, restart Tomcat again from the Task Manager by ending the task in processes and then starting it back up in services.
- Search for and open “Windows Defender Firewall with Advanced Security” from the windows search bar
- Under inbound rules find the entry for Tomcat and double click it
- In the new window, navigate to the Programs and Services tab and click “browse” next to the “This program” toggle option
- In the new window, navigate to the bin folder of the new Tomcat version directory (example “C:\Program Files\Apache Software Foundation\Tomcat 9.0_Tomcat9.0.105\bin”) and double click the executable without a w.
- Hit apply then OK.
- Navigate to the client’s config page. By default this is http://localhost/CONFIG?id=162d2827-d57f-45c3-b385-49060d087fa0&UTYPE=INTERNAL
- Log in using the credentials. If the client has left these unchanged the defaults are:
Username – config
Password – internal
- If upon logging in you are not prompted to enter the port and password and you can confirm that the database is still pointed to under the Database Connection Configuration tab (4th down on the left), your upgrade was successful and you should be able to log in to the progeny front end via localhost.
Reboot
- Open Task Manager
- Select Services tab
- Find Tomcat, right click and select Restart
- If the service fails to restart from here, instead navigate to the processes tab first and end task on “Apache Commons Daemon” from the processes list, then return to the Services tab, right click Tomcat and select “Start”