Select the questionnaire in which you want to add/update automatic reminders.
Go to the Email Settings tab.
Check the box next to Turn on Automated Reminders.
Two different kinds of automatic reminders can be set up. You can use one or both. Both will send the reminder email format already setup.
Remind every (x) days/week for a maximum number of reminders
Reminders will be sent the number of days/weeks after the invitation is sent for a maximum number of times.
Remind once (x) day/weeks before a date in the field
A reminder will be sent just one time the number of days/week before a date that is in a date field in the database. If you store a date in your database then this option can use that field. For example, Appointment date is often used.
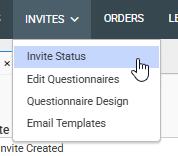
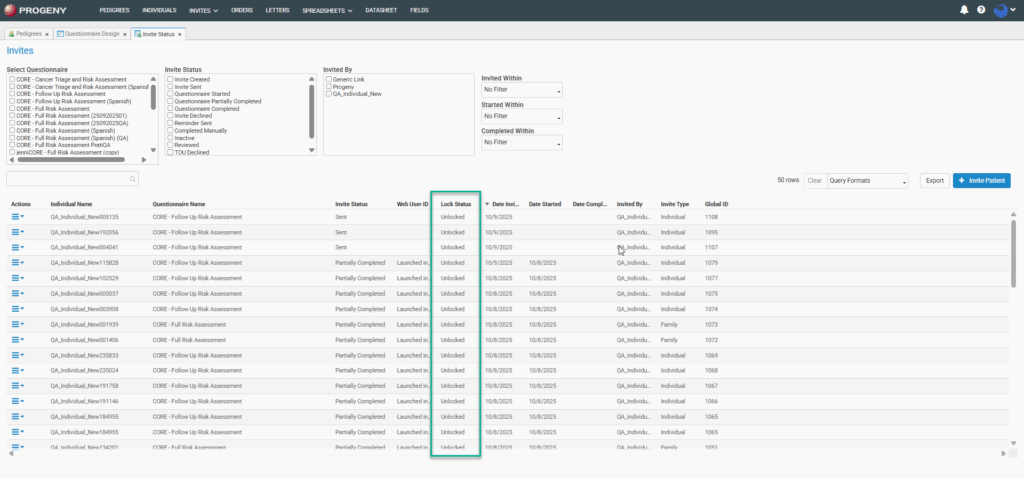
Navigate to the Invites module and choose Invite Status.
Select the name of questionnaire for which you need to access the invites
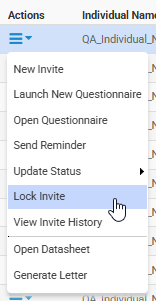
Find the invitation for the patient that needs their questionnaire unlocked, click the Actions menu on the left of that individual and select Unlock Invite.
Similarly to step 4, find the invitation for the patient that needs their questionnaire locked, right-click and select Lock Invite.
Create a Yes/No field to be used as the consent field
Create an IDS format that will be the page(s) of the consent. You can have multiple tabs and use skip logic – setup skip logic in the Progeny Web Configuration, just as you would setup skip logic for any other IDS format.
Web Client configurations
Login to Progeny Web Configuration back-end.
Go to Web Data Capture Configuration.
Select the configuration folder from the top drop-down.
In the Configurable Options section to the right, select Consent checkbox field and browse to the location of the checkbox field in the database that will be used for the consent.
Click Add and then close out and click Save.
Progeny Web
Login to Progeny Web.
Navigate to the Invites module and select Edit Questionnaires.
Select a questionnaire and go to the Consent Page tab.
Check the box Add Consent Page.
You can rename this page using the Consent Page title field. The default is Consent form.
Select the IDS format that you created above.
Go to the Summary Page tab.
In the Empty Summary Page Instructions, include the instructions that a patient will see if they do NOT check the box to consent.
Patients will have to click Next after the consent page in the questionnaire and then they will see the information in the Empty Summary Page Instructions. They can then click Submit to submit their questionnaire as declined.
For the below steps, you must be logged in to the server as an admin or have admin credentials for the server readily available. The client will also need to have the information for step 6 readily available as well as someone to generate the certificate from the csr file generated in step 8.
1. Open an Elevated Command Prompt
Right-click on Command Prompt and select Run as administrator.
2. Verify Java Path
Type path and press Enter.
If the output includes the Java bin directory (e.g., C:\Program Files\Java\…), proceed to Step 4.
If not, follow the steps below to add it:
Add Java to System Path
Search for Environment Variables in the Windows search bar.
Click Edit the system environment variables.
In the System Properties window, click Environment Variables.
Under System variables, select Path and click Edit.
Click New and add the Java bin path (e.g., C:\Program Files\Java\jrex.x.x_xxx\bin or C:\Program Files\Eclipse Adoptium\jdk-xx.xx.xxx.x-hotspot\bin).
3. Create Working Directory
Create a folder on the C: drive (e.g., C:\SSL).
In the command prompt, navigate to this folder using the below command
cd C:\SSL
4. Generate Keystore
Run the following command, replacing placeholders with your values:
Provide the .csr file to the client for submission.
Wait for the validated SSL certificate to be returned.
7. Prepare Certificate Files
Save all received certificate files (including the server, intermediate, and root certificates) in the same folder as your keystore (e.g., C:\SSL).
Ensure all certificates are in Base-64 encoded format with .cer or .crt extensions.
Extract Root and Intermediate Certificates (if needed)
If your certificate authority provided a single bundled certificate file, follow these steps to extract the Root and Intermediate/Chain certificates:
A. Open the Server Certificate
Double-click the server certificate file (e.g., server.crt) to open it.
Navigate to the Certification Path tab.
Select the certificate you want to export (e.g., Intermediate or Root).
Click View Certificate.
B. Export the Selected Certificate
In the new window, go to the Details tab.
Click Copy to File.
In the Certificate Export Wizard:
Choose Base-64 encoded X.509 (.CER) format.
Save the file with a clear name (e.g., intermediate.cer, root.cer).
8. Import Certificates into Keystorecd
Save all received certificate files (including root and intermediate) in the same folder as the keystore.
Ensure certificates are in .cer or .crt format.
You may need to open the server certificate and pull the Root and Intermediate/Chain certificates out into their own file
Open the server certificate by double clicking it
Navigate to the “Certification Path” tab and select the file you would like to export on its own (Root or Intermediate). Click View Certificate
In the new window, select the “Details” tab and click “Copy to File”
Make this a base 64-encoded file with a name you can recognize and distinguish between root and intermediate/chain
Repeat the above steps for any other certificates you need to export
Import Intermediate/Root Certificates
Repeat the following command for the Root and Intermediate/Chain certificates, creating a new unique alias for each (default is to use Root/Intermediate/Chain)
Use port 443 if HTTP is on port 80, or 8443 if HTTP is on port 8080.
Start Tomcat and test both HTTP and HTTPS access to the site.
10. Configure HTTP to HTTPS Redirection
Open web.xml in the conf directory.
Add the following block at the end of the document just before </web-app>:
<security-constraint>
	<display-name>RPC Request Encryption</display-name>
	<web-resource-collection>
		<web-resource-name>RPCRequests</web-resource-name>
 		<description>RPC Requests</description>
		<url-pattern>/*</url-pattern>
		<http-method>GET</http-method>
 		<http-method>POST</http-method>
	</web-resource-collection>
	<user-data-constraint>
		<description>Encrypt all RPC request data destined for server</description>
		<transport-guarantee>CONFIDENTIAL</transport-guarantee>
	</user-data-constraint>
</security-constraint>
3. Restart Tomcat and verify automatic redirection from HTTP to HTTPS.
PFX Importing into a keystore (Optional)
Pulling the wildcard cert whole with private key intact and exporting as .pfx
Using cmd and pathing to java, run the below command to generate a new .jks off of the wildcard cert: keytool -importkeystore -srckeystore mypfxfile.pfx -srcstoretype pkcs12 -destkeystore clientcert.jks -deststoretype JKS
Run the command below and note the alias listed next to the server cert: keytool -v -list -keystore /path/to/keystore
Pull a 2nd copy of the certificate as a .cer in whole without the private key
Pull the chain and root certificates out of the .cer server certificate
Trust the chain and root file to the newly made .jks file, do not trust the server certificate
Update the server.xml in the Tomcat directory to point to the new .jks file
If it isn’t already present, add a new line below the .jks password line that reads the below, with the alias noted in step 3 added in between the quotes: certificateKeyAlias=””
Restart Tomcat
PEM alternative workflow (Optional)
Navigate to the Tomcat Conf directory (by default C:\Program Files\Apache Software Foundation\Tomcat 9.0\conf)
If the client has already used a pem file in the past, create a copy of the server.xml file here on the desktop as a backup then move to step 3 otherwise:
Place the tcnative-1.dll file in the Tomcat9.0 bin folder
Open the server.xml file within C:\Program Files\Apache Software Foundation\Tomcat 9.0\conf and control + f search for .pem. You will find a section that contains 3 lines specifying .pem
certificateKeyFile – Enter the file path to the client’s .pem encoded private key file.
certificateFile – Enter the file path to the client’s server certificate .pem encoded file.
certificateChainFile – Enter the file path to the client’s .pem encoded chain certificate file.
Uncomment the section around the .pem files (the below connector a few lines below the .pem file specifications)
If this is the client’s first time using an SSL certificate, update the web.xml file within the conf folder following the steps from the SSL guide on the learning center.
Restart Tomcat
Confirm you can access the front end page. If so, click the lock icon to the left of the URL. You should see a new window that states “Connection is secure” at the top, click that and then in the new window you should see a certificate icon at the top right next to the close button. Click the certificate button and verify that the date matches what the client is expecting.
Updating Existing .Cer SSL Certificate
Back up the existing SSL folder in C drive.
Run command prompt as administrator.
Type cd C:\SSL (or the folder the SSL certificate/javakeystore are located in) and hit enter.
Type keytool -list -v -keystore <keystorefilename>.jks and hit enter
Replace <keystore> with the name of the client’s .jks file.
This produces a long result, scroll through and confirm aliases. There are three aliases listed, document all three elsewhere for the following steps.
The aliases will be listed on a command line labelled ‘Alias:’.
The aliases are typically formatted with the names “root”, “chain” or “intermediate”, and “progeny”.
Extract root and chain from the server certificate (the following steps will need to be completed twice, once for root, second for chain).
Open the Server Certificate.
Double-click the server certificate file (e.g., server.csr) to open it.
Click on the Certification Path tab.
Click the certificate that needs to be exported (e.g., Chain/Intermediate or Root).
Click View Certificate.
In the new window, go to the Details tab.
Click Copy to File.
In the Certificate Export Wizard:
Choose Base-64 encoded X.509 (.CER) format.
Save the file with a clear name (e.g., intermediate.cer/chain.cer or root.cer).
Remove the existing aliases from the keystore file for root and chain to ensure no issues arise in step 7 (The following steps will need to be completed twice, once for root, second for chain. DO NOT USE ON SERVER CERT).
Type keytool -delete -alias <alias_name> -keystore <keystore_filename> -storepass <password> and hit enter
Import the root, intermediate/chain, and server certificate.
Return to command prompt
Import root and then intermediate/chain certs in that order (the following steps will need to be completed twice, once for root, second for intermediate/chain)
Type keytool -import -trustcacerts -file <CERTIFICATE FILENAME>.cer -alias <CREATE NEW ALIAS> -keystore <CERTNAME>.jks –storepass <PASSWORD> and hit enter
Importing Server Certificate
Type keytool -import -trustcacerts -file <SERVER_CERTIFICATE>.cer -alias <ALIAS> -keystore <CERTNAME>.jks -storepass <PASSWORD> and hit enter
Restart Tomcat
This can be done by opening Task Manager, clicking the Services tab, locating the Tomcat instance and right-click, Restart.
Open Chrome/Edge and go to https://localhost and hit enter to confirm progeny webpage opens. This will likely produce a “Not Secure” error.
View the certificate by clicking “not secure” to the left of the URL, then clicking the warning, and finally clicking the certificate button at the upper right hand corner of the new window.
When viewing the certificate, confirm that the “Validity Period” appears with the dates as expected
Finally, have the client navigate to the expected end user webpage on a local machine (not on the server itself) and confirm that they arrive at the progeny login page without receiving a “not secure” error. Follow step 10 here again to confirm the validity period is accurate.