
User Profile
Users in Progeny can manage their basic user profile. On the upper right side of the page, click the drop-down arrow next to the image and select Profile or you can also click the image.

If a name and email have already been entered into a user account, it will then be displayed. Users should sign out of Progeny by clicking Logout.

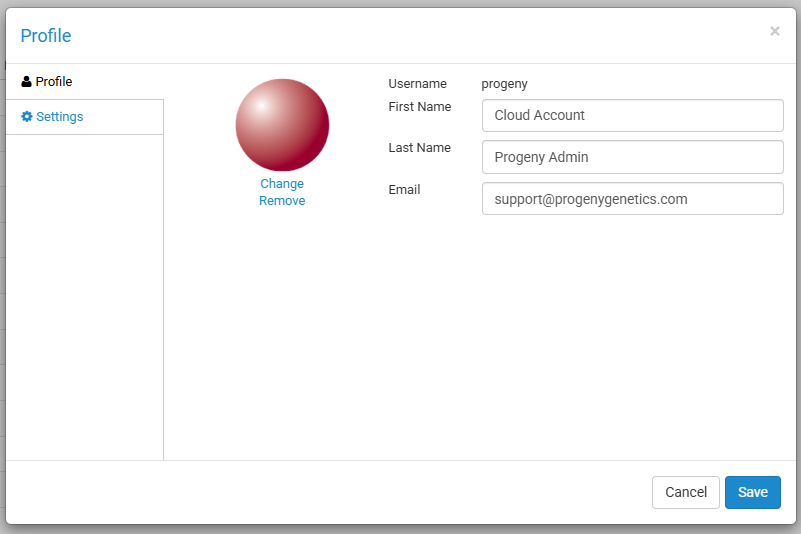
Profile opens another window with the profile information. Here the user can view/edit their first and last name, email address, and their profile picture. Users can also change their password by entering their Current password, New password, and Confirm new password.
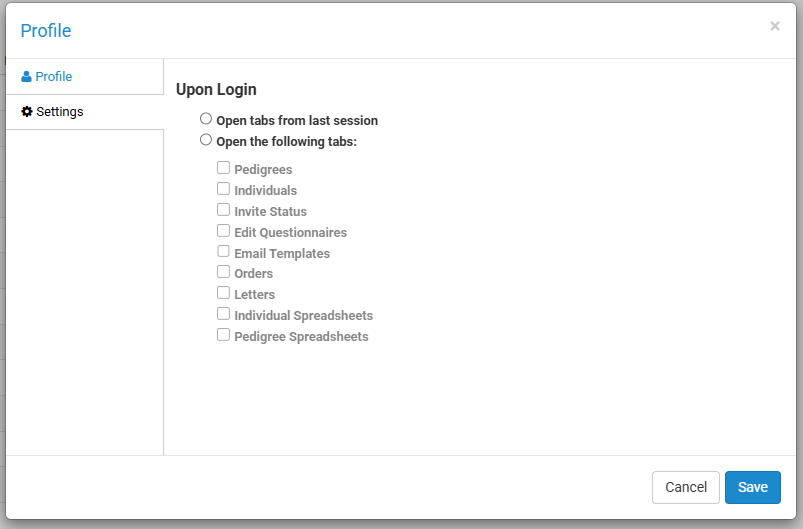
Under the Settings tab, the user can select which Progeny tabs open by default when the user logs in. We recommend you select the tabs you use most often.
Help
If you need additional assistance with using Progeny, there is a help button next to the login logo that can be clicked which then opens the Progeny Learning Center website. From there you can view helpful articles, videos, PDFs, and other reference information.

Navigation Bar
The different modules in Progeny are displayed on the top of the page. Access to certain modules will only be available depending on your institution’s licensing with Progeny as well as the user permissions for your user account. Use the toolbar by clicking on a module to open the tab to that specific module. Some modules will have a drop down to click so that additional actions pertaining to that model can be displayed.

- Pedigrees – opens the Pedigrees module to review pedigrees in the database.
- Individuals – opens the Individuals module to review individuals in the database.
-
Invites
- Invite Status – opens the Invites module to review invitations.
- Edit Questionnaires – opens the Edit Questionnaires module to customize the FHQs (FHQ3)*
- Email Templates – opens the Email Templates module to edit the FHQ email templates.*
- Questionnaire Design – opens the Questionnaire Design module to customize the FHQs (FHQ4)*
- Orders – opens the Orders module to review the order status for Ambry genetic tests.
- Letters – opens the Letters module to create and edit letter templates.
-
Spreadsheets
- Individual Spreadsheets – opens the Individual Spreadsheets module to create and load spreadsheets for the individual level.
- Pedigree Spreadsheets – opens the Pedigree Spreadsheets module to create and load spreadsheets for the pedigree level.
- Datasheets – opens the Datasheet Builder to create and edit Pedigree, Individual, and Table Datasheets*
- Fields – opens the Fields module to create and edit database Fields*
*=administrative or end-user administrator functionality
Window Panes
Progeny has three main window panes. The left vertical pane displays the folder organization for a particular functional area in a Windows Explorer-style structure [1]. Click on a folder in the pane to open the folder. As folders and sub-folders are opened in this pane, detailed information about the folder’s content is displayed in the upper and lower horizontal panes on the right [2, 3] (information is displayed in the bottom pane when an item is highlighted in the upper pane).
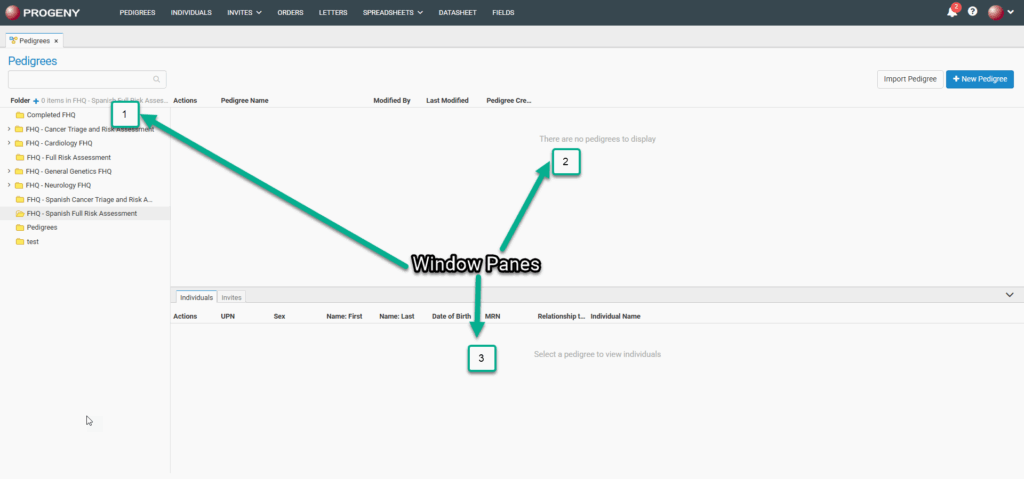
The folders displayed in the left pane will correspond with the module selected (pedigrees or individuals). The panes to the right correspond to parent items on top and sub-items below. For example, if the user is in the Pedigrees module and highlights a pedigree in the upper-right pane, all of the individuals and invites attached to that pedigree are displayed in the lower-right pane. Likewise, if the user is in the Individuals module and highlights an individual then all invites attached to that individual are displayed in the lower-right pane.
Smart List
The Smart Lists feature allows you to select which columns (fields, circled in green) you wish to display in the selected module. They are used to quickly search the database from the smart search field (circled in yellow). The search results only display the data found in the selected columns (fields). You can sort the results by clicking any of the column headings.
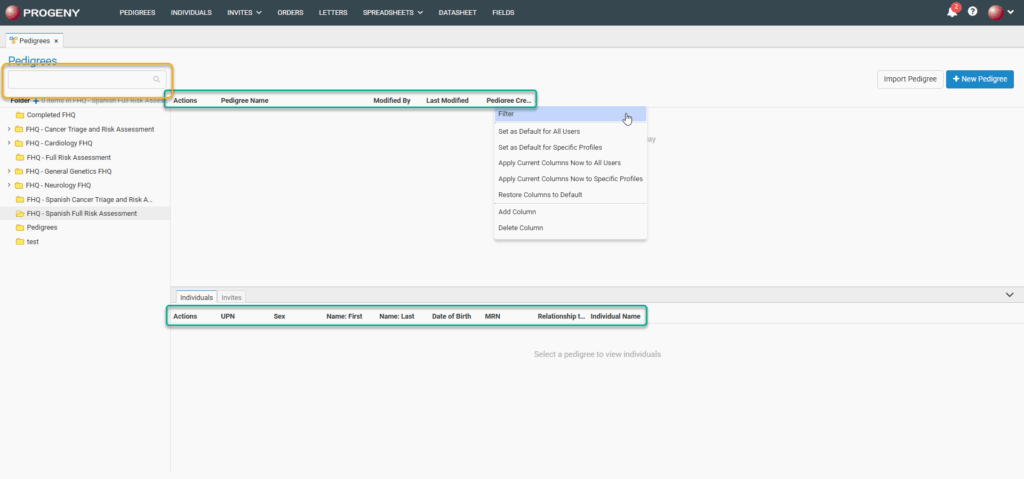
- Filter – filters the view of any field in the smart list so that you can specify the type of filter for that column. As in the picture below, you can choose to only show results that are either equal to, not equal to, less than, and so on.
- Clear Filter – resets any sorting that was activated.

- Set as Default for All Users* – sets the current smart list configuration as default for all users
- Set as Default for Specific Profiles* – sets the current smart list configuration as default for users who are in a specific Profile Format
- Apply Current Columns Now to All Users* – applies the current smart list configuration immediate to all users
- Apply Current Columns Now to Specific Profiles* – applies the current smart list configuration immediate to users who are in a specific Profile Format
- Restore Columns to Default – restores columns to default for current user
- Add Column – smart list allows you to add any field to the database to this quick view list.
- Delete Column – deletes any column from the list.
*=requires administrator or end-user administrator access
Smart Search
Searches the smart list database fields (displayed columns) of the module level (pedigree or individual). The search is limited to the exact order of the characters in the string.

Actions Menus
The Pedigrees Actions Menu provides quick access to functions within the pedigree module for your clinical workflow.
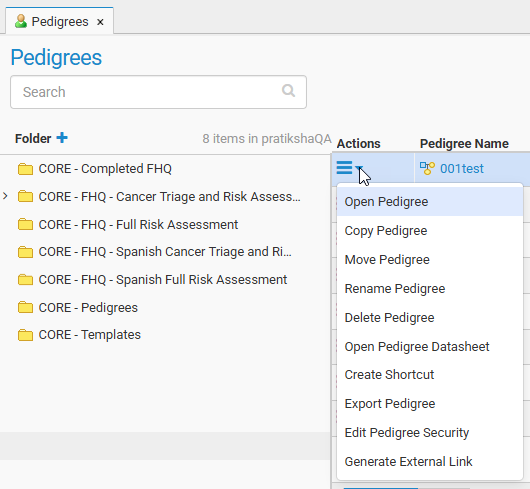
- Open Pedigree – opens the pedigree canvas for that pedigree.
- Copy Pedigree – creates a copy of the pedigree in the specified folder.
- Move Pedigree – moves the pedigree to another folder.
- Rename Pedigree – renames the pedigree with the additional option to rename individuals.
- Delete Pedigree – deletes a pedigree and the individuals in that pedigree from the database.
- Open Pedigree Datasheet – opens the pedigree datasheet based on the default datasheet for that pedigree.
- Create Shortcut – creates a shortcut of the specified pedigree in a specified location so that changes can be made to the shortcut to reflect on the original pedigree with an additional option to open the shortcut pedigree once saved.
- Export Pedigree – exports the pedigree to a XML file.
- Edit Pedigree Security – allows for individual pedigree security configuration.
- Generate External Link – generates an external link to view the pedigree.
The Individuals Actions Menu provides quick access to functions within the individual module for your clinical workflow.
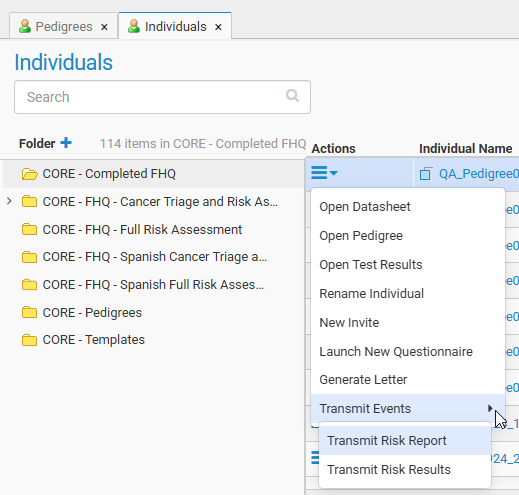
- Open Datasheet – opens the individual datasheet for individual
- Open Pedigree – opens the pedigree canvas for pedigree in which individual lives.
- Open Test Results – opens the Test Results module for individual
- Rename Individual – renames the individual
- New Invite – creates new FHQ invite for individual
- Launch New Questionnaire – launches new FHQ for individual
- Generate Letter – generates new letter for individual
-
Transmit Events
- Transmit Risk Report – transmits risk report to EHR for individual
- Transmit Risk Results – transmits risk results to EHR for individual