Please note, LIMS is only available in Progeny 10 and older versions of Progeny, which are EOL.
Author Archives: Anthony Rizzo
Managing Genotypes
Please note, LAB is only available in Progeny 10 and older versions of Progeny, which are EOL.
The Genotypes Module
- The left pane displays the genotype import folders, which hold all the genotypes that have been imported into the database.
- The upper right pane displays the Genotype Import list. This is a list of all the imports that are contained in a specific genotype import folder. The pane displays the following information for an import:
- Import Name
- Date – Import date.
- Marker Set – The name of the Marker set used for comparison and error checking the import.
- Total – The total number of Markers in the set
- Imported – Total number of Markers imported
- MM – Total number of missing Markers (MM) in the import.
- ZA – Total number of zero alleles (ZA) in the import.
- ME – Total number of Mendelian errors (ME) in the import.
- DE – Total number of discrepancies in the import.
- CE – Total number of control errors (CE) in the import.
- RJ – Total number of data lines rejected from the import.
- The middle right pane displays the Rerun Import list, which is a list of all the imports that were rerun for an original import. The pane displays the same information for a rerun as the top pane displays for an original import.
- The Error Check pane displays expanded information for each error check that was carried out for an original import or a rerun. To view the results of a specific type of error check for an import or rerun, select the import or rerun in the appropriate pane of the Genotypes window, and then open the needed tab in the Error Check pane.
To Import Genotypes
- On the navigation bar, click the Genotypes button to open the Genotypes module.
- Select the folder in which to store the imported genotypes.
- On the Genotypes module toolbar, click the New Import button to open the Genotype Import dialog box.


- In the top pane of the dialog box, select the folder in which to import the genotype data.
- In the Import text field, enter a name for the genotype import.
- On the Marker Set dropdown list, select the Marker set against which the genotype data is to be verified. Progeny verifies the imported genotype data by matching the Markers that are contained in the import against the Markers that are listed in the selected Marker Set. All error checking that is carried out on the import is based on this selected Marker set. For example, Markers that are defined in the Marker set, but are not found in the import file, are flagged as missing Markers.
- Indicate the level at which the genotype information is to be stored – Individual Level, Sample Level, or Both Sample and Individual.NOTE: If you select Both Sample and Individual, you are duplicating the genotype data in the database. The recommended option is Sample
- Select the type of error checking that is to be carried out – Missing Markers, Zero Alleles, Mendelian Errors, Discrepancies, and/or Control Errors.
- Continue to one of the following:
- To complete a standard import
- Select one of the following standard import formats: Standard Import Format, Illumina Final Report Format, Affymetrix CHP File, Affymetrix GDAS Text Output Format, or Affymetrix GTYPE Text Output Format.NOTE: If you are using an Affymetrix Library, then you must also specify the Library Path by clicking Browse to open the browse for folder dialog box and browsing to the folder for the library.


- Click Browse… to browse to and select the genotype import files.
- Click Import. A dialog box opens, indicating the progress of the import. When the process is complete, a message opens indicating that the import was successfully completed.
- Click OK to close the message and the dialog box. You return to the Genotypes module. The import is listed in the top pane of the Genotypes module.
- To view the results of a specific type of error check for the import, select the import in the top pane of the Genotypes module, and then open the appropriate tab in the Error pane.
- Select one of the following standard import formats: Standard Import Format, Illumina Final Report Format, Affymetrix CHP File, Affymetrix GDAS Text Output Format, or Affymetrix GTYPE Text Output Format.NOTE: If you are using an Affymetrix Library, then you must also specify the Library Path by clicking Browse to open the browse for folder dialog box and browsing to the folder for the library.
- To complete a custom import.
- Select Custom Import Format for the file type.
- Click Browse to browse to and select the genotypes import file. An Import dialog box opens. The imported file is displayed in the Import Preview pane (bottom pane) of the dialog box.


- Indicate the File Format of your custom file.
- Select the File Delimiter that is used for the data in the import file. If you select Other, you must specify the character that is used for the delimiter.
- Indicate the Allele Format for the allele calls in the file.
- Two columns per call—Each allele call is in a separate column.
- One column per call—Both allele calls are in the same column.
- Optionally, do one or both of the following:
- Alleles delimited by – Specify the delimiter.
- Custom Allele Values -Enter the appropriate allele values.
- Start import at row – Specify the starting row for the import.
- In the Import Preview pane (the bottom pane of the Import dialog box), for each field, right-click in the column header and manually assign the appropriate heading.
- One row per call – Requires a Sample Name column and a Marker Name column. If Two columns per call is selected, you must indicate the Allele A and Allele B columns. If One Column per call is selected, you must indicate the Allele AB column.
- One row per sample – Requires a Sample Name If Two columns per call is selected, you must indicate the Allele A and Allele B columns. If One Column per call is selected, you must indicate the Allele AB column.
- One row per Marker – Requires a Marker Name. If Two columns per call is selected, you must indicate the Allele A and Allele B columns. If One Column per call is selected, you must indicate the Allele AB column.
- Click Import. A dialog box opens, indicating the progress of the import. When the process is complete, a message opens indicating that the import was successfully completed.
- Click OK to close the message and the dialog box. You return to the Genotypes module. The import is listed in the top pane of the Genotypes module.
- To view the results of a specific type of error check for the import, select the import in the top pane of the Genotypes module, and then open the appropriate tab in the Error Check (bottom) pane.
- To complete a standard import
Manually Entering Genotype Data
Instead of importing genotype data into a Progeny database, you can manually enter data.
NOTE: If you manually enter genotype data, no error checking of the data is automatically carried out.
Four options are available for manually entering genotype data:
- You can enter genotype data using icon Markers on a pedigree.
- You can enter genotype data into the Marker fields on a datasheet for an individual.
- You can enter genotype data directly into the Marker fields in a spreadsheet for an individual. For example, select the pedigree on the Pedigrees module and then on the toolbar, click the Indiv SS Select the system fields of Pedigree Name and UPN and the appropriate Marker fields, and then run the spreadsheet. The Marker field is automatically split into two fields representing the paternal allele in a1 and the maternal allele in a2.
- You can import data from a text file into the Marker fields in a spreadsheet for an individual. For example, select a field that matches the individuals in the spreadsheet to the individuals in the text file such as Patient ID # and the appropriate Marker fields and then run the spreadsheet. The Marker field is automatically split into two fields representing the paternal allele in a1 and the maternal allele in a2. After running the spreadsheet, import the Marker data.
Importing Genotype Formats
Progeny Lab provides functionality for importing genotype files in one of three ways:
- Using a Standard Import format.
- Using one of the following third-party formats—Illumina or Affymetrix.
- Using a Custom Import format.
The Custom Import Format is the preferred option because you can specify the exact layout of the file you are importing, which includes designating the data that is contained in each column of the file to ensure compatibility.
Standard Import format
A Standard Import format must be a tab-delimited text file with a specific structure.
- Column 1 – The sample name. All alphanumeric characters are allowed and there is no limit to the number of characters.
- Column 2 – The Marker name. All alphanumeric characters are allowed and there is no limit to the number of characters.
- Column 3 – The value for allele 1. For microsatellites, there are no restrictions on the data that can be displayed in this column. For SNPs, the value can be either an A, B, C, G, or T.
- Column 4 – The value for allele 2. For microsatellites, there are no restrictions on the data that can be displayed in this column. For SNPs, the value can be either an A, B, C, G, or T.
Illumina Final Report Format
The Illumina Final Report Format is an output format that is generated by the Illumina platform. Because of the number of iterations that can cause compatibility issues with the Progeny application, Progeny strongly recommends that you use the Custom Import Format instead. By using the Custom Import Format, you can specify the file layout and import the data as indicated in the file.
Affymetrix files
The Affymetrix CHP file, the GDAS Text Output Format, and the GTYPE Text Output Format are output formats that are generated by the Affymetrix platform.
Each Affymetrix CHP file contains a single sample. The Affymetrix file name is either the exact name of the sample name or it can also contain an underscore with additional text, such as 223339_axt3343. If the file contains an underscore with additional text, Progeny ignores this additional text during the import. For instance, 223339_axt3343 is imported as 223339.
Because of the number of iterations that can cause compatibility issues with the Progeny application, Progeny strongly recommends that you use the Custom Import Format in lieu of either the Affymetrix GDAS Text Output Format or the Affymetrix GTYPE Text Output Format. By using the Custom Import Format, you can specify the file layout and import the data as indicated in the file.
Custom import file format
A custom genotype file can have one of three formats:
- One row per call—Calls in a row, with the following columns: Unique ID, Marker Name, Allele 1, and Allele 2.
- One row per sample—Samples in rows with Markers in columns.
- One row per Marker—Markers in rows with samples in columns.
To Rerun a Genotypes Import
On the Genotypes module, in the Import List pane, select the original import that is to be rerun, and then on the window toolbar, click the Rerun button to open the Rerun Genotype Import dialog box.
- The Marker Set that was used for the original import is automatically selected for the rerun and you cannot change this value.
- The Error Checking options that were selected for the original import are also automatically selected, however, you can change these selections.
- The File Type that was used for the original import is automatically selected for the rerun, however, you can change this selection.
- The files that were used for the original import are displayed in the lower pane of the dialog box. You can change this list of files, if needed, including deleting files and selecting new files.
- After you have made all the necessary modifications for the rerun, click Rerun Import. A dialog box opens, indicating the progress of the import. When the process is complete, a message opens indicating that the import was successfully completed.
- Click OK to close the message and the dialog box. You return to the Genotypes module. The import is listed in the middle pane of the Genotypes module. Any discrepancies between the original import and the rerun are listed on the Discrepancies
Clearing Genotype Data
- On the Genotypes module toolbar, click the Clear Genos The Clear Genotype dialog box opens.


- In the Database Folders pane, select the folder that contains the pedigrees for which the genotype data is to be cleared.
- In the Pedigrees and Individuals pane, select the pedigree (CTRL-click to select multiple pedigrees) for which the genotype data is to be cleared. The individuals that are contained in a selected pedigree are displayed in the right middle pane of the dialog box. By default, the UPN is the identifier used for the individuals.
- Drag the selected pedigrees to the Selected Pedigrees and Individuals
- Do one of the following:
- Include all selected individuals – Deletes the genotype data for all individuals in all selected pedigrees.
- Query within selected individuals – Deletes the genotype data for only those individuals who meet a specific criterion. Click the … button to open the Specify query dialog box and define a new query or load a saved query format.


- Open the Markers tab, and then do one of the following:
- To clear an entire Marker set, drag the Marker set from the Sets pane to the Selected Markers
- To clear all the Markers for a specific chromosome, drag the chromosome from the Chromosomes pane to the Selected Markers
- To clear only specific Markers, select the Marker (CTRL-click to select multiple Markers) from the top right pane to the Selected Markers
- Click on the Pedigrees tab, and then click OK on the tab. A message opens, asking you if you are sure that you want to clear the genotype data.


- Click Yes to close the message. A dialog box opens, indicating the status of clearing the genotype data.


- When the status is complete, click Close to close the dialog box and return to the Genotypes module.
Error Checks for Genotype Imports
Progeny Lab provides functionality for importing genotypes directly from supported file formats such as Illumina, Affymetrix, ABI, Sequenom, as well as other formats. When you import genotypes, an option is available for carrying out specific error checks—Missing Markers, Zero Alleles, Mendelian errors, Discrepancies, Control Errors, and Rejected—on the data. Error Check results are displayed in the bottom pane of the Genotypes module. To view the results of a specific type of error check for an import, select the import in the top pane of the Genotypes module, and then open the appropriate tab in the Error Check pane.
Some tabs will have a range of columns to display and will have the Run and Jump to page buttons. To change the view on the tab, enter new values for the beginning and ending range and then click the run button. You can click the Jump buttons at either end of the filter to update the display according to the range that you specified.

Missing Markers tab
When you import genotypes, you must select a Marker set to compare the import file against. In a Missing Markers error check, Progeny compares the Markers that are contained in the import file against the Markers that are listed in the selected Marker set. All error checking that is carried out on the import is based on this selected Marker set. For example, Markers that are defined in the Marker set, but are not found in the import file, are flagged as missing Markers.
Zero Alleles tab
In a Zero Alleles error check, Progeny checks each sample for all Markers and identifies any Markers that contain zero alleles, which occurs when the value of a microsatellite cannot be determined. As a result, a zero is displayed for the Marker value. The Zero Alleles tab displays the sample name and the corresponding Marker that contains a zero allele.
Mendelian Errors tab
In a Mendelian Errors check, Progeny compares the data for each allele against the relationship structure of the pedigree and verifies the compatibility. Any discrepancies are identified as Mendelian errors and are displayed on the Mendelian Errors tab.
The first four columns in this tab, Pedigree, Individual Name, Conflict Type, and Marker are system- generated fields and therefore, are not editable. The final three columns, A1, A2, and Comment are editable fields. You can change the value of either A1 or A2 to resolve any conflicts as well as enter comments in the Comment field for record keeping purposes. You can edit a Mendelian error directly on the Mendelian Errors tab, or you can edit the Mendelian error directly in the pedigree.
Edit a Mendelian Error
To edit a Mendelian error on the Mendelian Errors tab
- Select the error that you want to be corrected on the Mendelian Errors
- Edit the value as needed, and then right-click on the edited value, and on the context menu that opens, click Save Changes. Repeat Step 1 and Step 2 to correct all the Mendelian errors.
- Select a row for which you corrected the Mendelian error (CTRL-click to select multiple rows), right-click on any of the selected rows, and then on the context menu that opens, click Rerun Mendelian Checks on All Selected Rows. The Mendelian checks are rerun for all the rows to ensure that the error was properly corrected. A message opens, indicating that the Mendelian error rerun was successfully completed. It also indicates the number of errors that were corrected, and that the corrected rows have been disabled.
- Click OK to close the message to return to the Mendelian Errors
- Optionally, to delete a disabled row, select the row (CTRL-click to select multiple rows), right-click on any selected row, and on the context menu that opens, click Delete All Selected Rows.
To edit a Mendelian error in the pedigree
- On the Mendelian Errors tab, right-click on the error that you are editing, and on the context menu that opens, click Open Error to Pedigree. The pedigree that contains the individual with the Mendelian error opens. The specific Marker is loaded in the pedigree, and the allele information is displayed as a haplotype for the affected individual.
- To edit the value, click on the allele value and enter the correct value.
- Close the pedigree, making sure to answer the prompt about saving the changes. After you correct the error in the pedigree, you return to the Mendelian Errors The row that contained the error is disabled.
- Right-click on any corrected error row, and on the context menu that opens, click Rerun Mendelian Checks on All Selected Rows. The Mendelian checks are rerun for all the row to ensure that the error was properly corrected. A message opens, indicating that the Mendelian error rerun was successfully completed. It also indicates the number of errors that were corrected, and that the corrected rows have been disabled.
- Click OK to close the message to return to the Mendelian Errors
- Optionally, to delete a disabled row, select the row (CTRL-click to select multiple rows), right-click on any selected row, and on the context menu that opens, click Delete All Selected Rows.
Discrepancies tab
The Discrepancies tab lists any discrepancies that were found between an original genotype import and a rerun of the import. The first three fields on the tab, Type, Item ID, and Marker are system fields and are not editable. The next four fields display the original value for A1, the new value for A1, the original value for A2, and the new value for A2. When the tab first opens, the original values for A1 and A2 are the values that are stored in the database. You can resolve these discrepancies from the Discrepancies tab, or you can resolve these discrepancies from the pedigree. You can also export the information that is displayed on the Discrepancies tab to a text file.
To resolve discrepancies from the Discrepancies tab
- To resolve the discrepancy for an allele, click on the new value for the allele. The new value for the allele is now highlighted in yellow, indicating this is the value that is to be stored for the allele in the database, and the original value now has no background color (white), indicating that the original value is to be rejected.
- After you have determined which values to store in the database and which values to reject for both A1 and A2 for each Marker, select a row (CTRL-click to select multiple rows), and then right-click on any selected row and on the context menu that opens, click Resolve Selected Discrepancies. The selected discrepancies are removed from the Discrepancies tab and the changes that you made are saved. The selections that you made are used when data is exported for analysis.
To resolve discrepancies from the pedigree
- Right-click on the discrepancy on the Discrepancies tab, and on the context menu that opens, click Open Pedigree to Error. The pedigree is displayed onscreen.
- Make the changes directly in the displayed pedigree.
- Close the pedigree to return to the Discrepancies
- Select the changed value in either the A1 New or A2 New The new value for the allele is now highlighted in yellow, indicating this is the value that is to be stored for the allele in the database, and the original value now has no background color (white), indicating that the original value is to be rejected.
- After you have you have determined which values to store in the database and which values to reject for both A1 and A2 for each Marker, select a row (CTRL-click to select multiple rows), and then right-click on any selected row and on the context menu that opens, click Resolve Selected Discrepancies. The selected discrepancies are removed from the Discrepancies tab and the changes that you made are saved. The selections that you made are used when data is exported for analysis.
To export discrepancies to a text file
- Right-click on any row on the Discrepancies tab, and on the context menu that opens, click Export to File.
- Specify the name and location for the export file. The exported file contains all the discrepancies, including the original call and the change that was committed to the database.
Control Errors tab
The Control Errors Tab lists any controls where the expected value for A1 and A2 is different than what was returned in the genotype file that was imported. The expected calls are listed in the columns A1 Control and A2 Control. The returned incorrect calls are listed in A1 and A2 columns. To export the control errors to a text file, right-click anywhere on the tab, and on the context menu that opens, click Export to File. After a control is identified as an error, all the data for the Marker in the genotype import will be rejected. The resulting rejected Markers are listed on the Rejected tab with the reason “Entire Marker invalid due to control error.”
Rejected tab
The Rejected tab lists all the data in the genotype import file that was rejected for one of the following reasons:
- There is no match in the database with a sample name that appears in the genotype import. The sample name must exist in the database to store the genotype information.
- There is no match in the database with a Marker that appears in the genotype import. The Marker must exist in the database to store the genotype information.
- If duplicate Markers and samples are contained in the genotype import, and the values for both are zero, the second Marker/sample entry is rejected.
- If the expected Allele A value or Allele B value is not stored for a given SNP or Marker in the Markers module, then the SNP or Marker is rejected.
- If a field cannot be updated during the import process (for example, another user is updating a Sample Name field during your import process), then the data that references the field is rejected.
- If any database error occurs during the import process, then the field that failed to record data is listed on the Rejected tab along with the value that could not be recorded.
None of the fields on this tab is editable. The first three columns, File, Line Number, and Sample, list the file that contained the rejected data, the line number where the error check occurred in the file, and the sample that contained the error. The remaining three columns, Marker, Reason, and Count, list the Marker that contains the error, the reason for the rejection, and the count for multiple error rows, respectively.
View/Print FHQ Data
There are 3 ways you can view/print the patient data entered into a questionnaire.
- From the Patient Entered Data tab of the patient’s Primary IDS datasheet format.


- Selecting the datasheet format for the questionnaire you wish to print.


- Creating a letter template in the Letter Generation module with the data you wish to print.
Individual Datasheet (IDS)
Individual Datasheets
Individual Datasheets (IDS) allows for input and viewing of field data for individuals. They can be created, customized and saved as an IDS format, and edited from within the Progeny Desktop client. From within the Progeny Web client, you can only enter data or select one of the previously created IDS formats.
Within the IDS tab, you can perform the following tasks using the menu buttons above the datasheet.
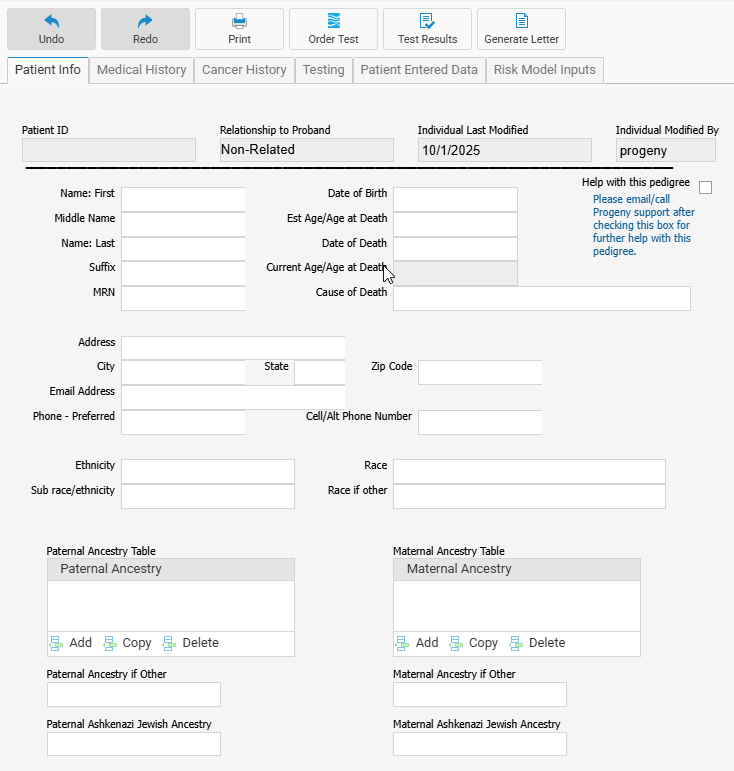
- Undo – Undo the last operation.
- Redo – Redo the last operation.
- Print – Print the datasheet.
- Order Test – Order individual genetic test(s) through Ambry.
- Test Results – View genetic test results for the individual.
- Generate Letter – Generate a letter using the individual’s data.
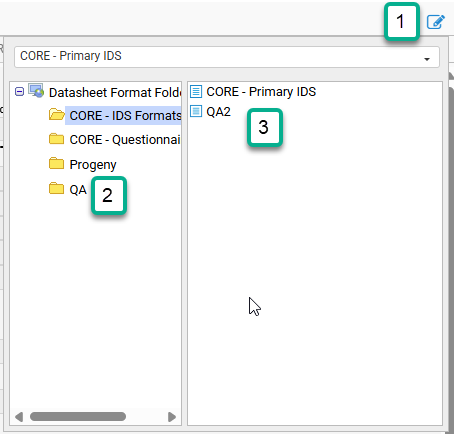
Switching Individual Datasheet Formats
To select a different IDS format click the icon in the upper right corner of the IDS tab (1), navigate for (2) and select (3) the desired IDS format, and once selected, it will be loaded.
Genetic Testing Results
Progeny software now includes a Genetic Testing Results (GTR) table which integrates your patient’s genetic testing results into your Progeny database, improving the efficiency of oncology testing workflows. After ordering genetic tests through the Ambry Order button within Progeny, the results are automatically loaded into the GTR.

Test results from other labs can also be entered manually into these tables. Once the test is selected, the gene panel will be populated automatically with the genes on that panel.

Notifications
When tests are completed or canceled, a red number will appear on the bell icon on your Progeny navigation bar indicating how many unread messages are in the list. Click the bell icon (#1 below) to reveal a summary list (#2 below) of notifications naming the patient, the test status and name, and the notification date.

You can select a notification to open a list of the patient’s tests or click the x to remove it from the summary list.
Click Dismiss All to clear the entire notifications summary list.
From the Orders module, you can track the status of Ambry tests.

This does require you configure Progeny with AP2 credentials. You can register for AP2 credentials at http://www.progenygenetics.com/support/ambryorder. For Progeny Cloud customers, this is configured automatically. For Progeny on-site customers, a support representative will contact you afterward to help configure your Progeny application. Free training will also be provided.
Once Ambry ordered test results are completed, they are automatically loaded into the Progeny GTR table and viewable as PDF documents.

The results are stored in the Progeny database and summarized as system level (uneditable) fields. They can be used throughout Progeny when running queries, generating letters, or generating summary reports.
Accessing the Genetic Testing Results Table within Progeny
For your convenience, the GTR table can be accessed from four different menus in Progeny:
- The Pedigrees module main screen
- The Individuals module main screen
- The pedigree canvas toolbar
- The Orders module
Pedigree Module Main Screen
- Pedigrees module.
- Select a pedigree.
- Then in the Individuals pane at the lower part of the screen, select the Actions drop-down menu to the left of an individual then select Open Test Results.

Individuals Module Main Screen
- Individuals module.
- Select the Actions drop-down menu to the left of an individual then select Open Test Results.

Pedigree Canvas Toolbar
From the pedigree canvas, select an individual on the pedigree then click the Test Results menu button at the top of the screen.

Orders Module
From the Orders module, click the Actions drop-down menu, then select Open Test Results.

Manually Inputting Genetic Test Results
When manually entering the genetic test data, the data can be entered into the GTR table when ordering the test from the lab, or after the genetic test results have been received. As previously mentioned, genetic test results are added automatically when ordered from Ambry Genetics, increasing productivity and reducing chances of human error.
To begin adding genetic test data manually, click the + New Test button on the genetic testing results page.

This opens the Test Details window where you will manually enter the appropriate data for the genetic test. Once entered, the data can be used throughout Progeny like other fields.

Fields in the Test Details Window
- Lab: From the drop-down list, select the lab where the results are from.
- Test: Select the genetic test and Progeny will auto-populate the list of genes on the right pane of the Test Details.
- Submitted Date: Select the date that the test was submitted to the lab, using the date picker.
- Reported Date: Select the date that the test results were reported back to you, using the date picker.
- Reclass Date: Enter the date the variant definition changed using the date picker.
- Status: Select the test status, either In Progress, Reported, or Cancelled, using the drop-down menu.
- Result: This field summarizes significant results (all non-negative results) from the Classification column in the right pane of the Test Details.
- Document: The upload icon on this field allows you to navigate your computer and upload multiple files/documents associated with this test. A link to these documents will appear in the Test Results window under the document column.
- Notes: You can enter notes related to this test. The notes will also show on the Test Results.
- Gene: This column lists the genes in the panel selected from the Test field to its right.
- Variant: The actual name of the gene mutation, the polymorphism, the variant, or the alteration is entered here.
- Classification: Choose either Pathogenic, Likely Pathogenic, VUS, Likely Benign, or Negative.
- Prior Classification: Choose either Pathogenic, Likely Pathogenic, VUS, Likely Benign, or Negative.
- Add Row: Allows you to add another row to the table in order to add another gene.
- Delete Row: Delete a single or multiple rows by selecting the check-box to the right of the row(s) then click Delete Row.
- Cancel: Click this button to exit the Test Details windows without saving any information you entered.
- Save: Click this button to save the data entered into your database.
Customizing Panels
If you wish to add or remove genes from panels, for example, to match a test order placed, or to create a panel not listed in the Test drop-down field, use the Add Row or Delete Row options mentioned above.
The Test Results Window
Here you can see a summary of all genetic testing for a particular individual.

The columns in the Test Results window correspond to the fields in the Test Details window.
The Actions drop-down menu shows View Test Details, which gives the option to open the Test Details window for the selected test or Delete Test, which will delete the test and remove the information from your database.
Select the test name under the Test column to view the details of the test in the GTR table.
The test results from Ambry orders are linked as an icon under the Document column. You can also view documents manually uploaded to the GTR table in the Document field upload button.
Family-Based Association
Please note, LAB is only available in Progeny 10 and older versions of Progeny, which are EOL.
To create a family-based association export
- On the main window navigation bar, click the Analysis button to open the Analysis module and select the folder in which to the association export will be saved.
- On the window toolbar, click the Family Assoc button, the Specify Family-Based Association Settings dialog box opens.
Specify Family-Based Association Settings dialog box
Settings

- Name – the name or description of the export.
- Required Fields
- Unique ID – click the field button to the right to open the Select Field dialog box and select the field that represents the Unique ID for everyone that is to be included in the association export.
- Affection Status – click the field button to the right to open the Select Field dialog box and select the field that represents the Affected Status for everyone that is to be included in the association export.
- Select the fields that are to be included in the association export by doing the following:
- In the folders pane of the dialog box (middle left), select the folder that contains the individual data fields that are to be included in the association export.
- In the Fields pane (middle right) pane of the dialog, select the fields (CTRL-click to select multiple fields) that are to be included.
- Drag any fields into the Selected Fields pane at the bottom of the dialog box.
Pedigrees

- In the Folders pane of the dialog box, select the folder that contains the pedigrees for which the linkage export is being created.
- In the Pedigrees pane of the dialog, select the pedigree (CTRL-click to select multiple pedigrees) for which the linkage export is being created.
- Drag the selected pedigrees to the Selected Pedigrees pane of the dialog box.
- Include Options
- Include only selected individuals marked “Include in Analysis” – includes only those individuals in a pedigree who have been specifically marked for inclusion in an analysis.
- Include all selected individuals – includes all individuals in the selected pedigrees.
- Query within selected Individuals – includes only those individuals in the export linkage who meet specific criteria. Click the … button to open the Specify query dialog box and define a new query or load a saved query format.

- Pedigree Options
- Use pedigree IDs—Converts a text-based pedigree name into a numerical ID.
- Use pedigree names—Use pedigree names as-is.
Markers tab

- To include an entire marker set in the analysis, drag the marker set from the Sets pane to the Selected Markers
- To include all the markers for a specific chromosome in the analysis, drag the chromosome from the Chromosomes pane to the Selected Markers
- To include only specific markers in the analysis, select the marker (CTRL-click to select multiple markers) from the top right pane and drag and drop to the Selected Markers
- Marker Options
- Include all markers – includes all markers within the Selected Markers pane in the linkage export.
- Query within selected Markers – includes only those markers within the Selected Markers pane in the linkage export that meet specific criteria. Click the … button to open the Specific query dialog box and define a new query or load a saved query format.
- Include polymorphic markers only – filters the selected markers and export only those markers that have at least one heterozygous genotype.
To run a family-based association export
After you specify the necessary export settings on all three tabs, you must return to the Settings tab, and then click OK on the tab. The Export to Family Association Files dialog box opens.
- Click Browse to open the Browse for Folder dialog box and browse to and select the folder in which the association export files are to be stored.
- File Break Options.
- Break by Marker—Indicate how many markers are to be contained in each linkage file. If you select this option, you must also indicate the number of overlapping markers in each file.
- Break by Chromosome—Creates a new file for each chromosome that is exported.
- Click Export. The Export to Association dialog box opens indicating the status of the association export. When the export is complete, click Close to close the dialog box and return to the Analysis module.
Deleting a Family-Based Association Export
You can delete a family-based association export by doing one of the following:
- Right-clicking on the association export in the Analysis module and clicking Delete Export on the context menu that opens.
- Selecting the association export in the Analysis window, and then click the Delete key on your keyboard.
Saving and Loading a Family-Based Association Export Format
To save a family-based association export format
- Set up the family-based association export format but do not run the format.
- Click the Save Fmt button on the Specify Family-Based Association Settings dialog box.

- The Save Format dialog box opens. Enter a Format Name for the association export format.
- Select the folder in which to save the format and click Save.


- You can then load this saved format and run it on an as-needed basis.
To load a family-based association export format
You can a retrieve a saved family-based association export format and run it on as-is needed based.
- Open the Specify Family-Based Association Settings dialog box by clicking the Family Assoc
- Click the Load Fmt button on the Specify Family-Based Association Settings dialog box.

- Open the folder that contains the association export format that you are loading, select the format, and then click Load.

- The Specify Family-Based Association Export Settings dialog box is refreshed with the loaded format. You can modify the format as needed and export the association format.
To Select Individuals in a Pedigree for Inclusion in an Analysis
Open each affected pedigree, and manually select the appropriate individuals. You can select a single individual, or CTRL-click to select multiple individuals, and then right-click on any selected individual, and on the context menu that opens, click Analysis > Include in the analysis.
To View and Rerun a Family-Based Association Export
- In the Analysis module, select the association export that you want to view. Two tabs open in the bottom pane of the window—Pedigree Map and Allele Map.
- The Pedigree Map tab displays the mapping of the original Pedigree ID to the Pedigree Name generated for the export file. These values are not editable; however, you can sort the data by clicking on the column heading.


- The Allele Map tab displays the mapping of the original calls for each Marker to the Allele and Call generated for the export file. These values are not editable; however, you can sort the data by clicking on the column heading.


- Optionally, to rerun the association export, right-click on the selected export, and on the context menu that opens, click Open Export. The Specify Linkage Settings dialog box opens. You can now modify any of the needed settings and click OK on the Settings tab to rerun the export.
Actions
Please note, LIMS is only available in Progeny 10 and older versions of Progeny, which are EOL.
LIMS Actions
To Add a New Action
- Open one of the following windows: Samples, Inventory, Containers, or Workflows.
- Click the Actions icon located on the toolbar. The “Actions” dialog box opens. This dialog box lists all of the Actions that are available to choose from within the Progeny database that you are currently logged in to.


- Click ‘New’. The “New Action” dialog box opens.


- Enter the information for the new Action.


- In the Reactions pane, click ‘Add’ to open the “Reactions” dialog box and select the Reactions (CTRL-click to select multiple Reactions) that are to be carried out as part of the Action.
- Optionally, in the Display Fields pane, click ‘Add’ to open the “Select Fields” dialog box and select the fields that are to display information when the Reaction is carried out.
- Click ‘OK’ to close the “New Action” dialog box and return to the “Actions” dialog box. The Action is now added to the Progeny database.

To Edit an Action
- Open one of the following windows: Samples, Inventory, Containers, or Workflows.
- Click the Actions icon located on the toolbar. The “Actions” dialog box opens. This dialog box lists all of the Actions that are available to choose from within the Progeny database that you are currently logged in to.
- Select the Action that you wish to edit, and then click ‘Edit’. The “Edit Action” dialog box opens. The dialog box displays the Action as it is currently defined. Modify the Action as needed, and then click ‘OK’ to save the modified Action.

To Set Security for an Action
- Open one of the following windows: Samples, Inventory, Containers, or Workflows.
- Click the Actions icon located on the toolbar. The “Actions” dialog box opens. This dialog box lists all of the Actions that are available to choose from within the Progeny database that you are currently logged in to.
- Right-click on an Action, and select ‘Security Settings’ from the context menu that opens. The “Action Security” dialog box opens. This dialog box lists all the classes of users that have been created within the database that you are currently logged in to.


- Modify the security for ‘All Users’ or for the different classes of users.
- Delete? – Users can delete the Action.
- Modify? – Users can modify the Action.
- Read? – Users can carry out the Action.
Setting an Action as a Default Action
If needed, you can set an Action to be your default Action. A default Action is initiated every time that you open the Scan window from the Progeny main window toolbar. A default Action is very similar to a hotkey for an Action; however, you do not have to remember specific keystrokes for carrying out the Action.
To set an Action as a default Action:
- Open one of the following windows: Samples, Inventory, Containers, or Workflows.
- Click the Actions icon located on the toolbar. The “Actions” dialog box opens. This dialog box lists all of the Actions that are available to choose from within the Progeny database that you are currently logged in to.
- Right-click on the Action that is to be your default Action, and select ‘Default Action’ from the context menu that opens. The Action is marked with a black check mark in the “Actions” dialog box.


Specifying Action Barcode Settings
When you create an Action, you have the option of specifying a barcode for the Action. When you scan this barcode into Progeny or manually enter the barcode into the Scan window, the Action is initiated. A very typical use for Action barcodes is to create a “cheat sheet,” which is essentially a piece of paper that contains labels, with each label having one Action barcode printed on it. You can scan the barcodes on these labels to minimize your dependency on manually entering information to carry out a procedure in Progeny LIMS.
To specify Action barcode settings
- Open one of the following windows: Samples, Inventory, Containers, or Workflows.
- On the window main menu, click Actions > Action Barcode Settings. The “Action Barcode Settings” dialog box opens.


- Specify the print settings for your Action barcodes, and also indicate if Progeny is to use your system’s default printer to print the barcodes.
- Once the Label settings have been configured the user can then click the Actions icon located on the toolbar. The “Actions” dialog box opens. This dialog box lists all of the Actions that are available to choose from within the Progeny database that you are currently logged in to.
- For each Action barcode that is to be printed on a label, right-click on the appropriate Action, and then select ‘Print Barcode’ from the context menu that opens. The barcode is printed according to the settings that you specified in Step 3.
Reactions
Please note, LIMS is only available in Progeny 10 and older versions of Progeny, which are EOL.
LIMS Reactions
To Add a New Reaction
- A Reaction is a system or user-defined trigger that is used to update sample records. A Reaction always results in the updating or modifying of a single database field.
- Open one of the following windows: Samples, Inventory, Containers, or Workflows.
- Click the Reactions icon located on the toolbar. The Reactions dialog box opens. This dialog box lists all of the Reactions that are available within the Progeny database that you are currently logged in to. Reactions that are marked with a blue icon are system Reactions. These system Reactions exist within every database and are not editable. Reactions that are marked with a red icon are user-defined Reactions and are editable.


- Click “New” and the ‘New Reaction’ dialog box opens. Enter the name for the new Reaction, and select the Reaction type from the dropdown list.


- Update Value: Override the current value in a data field.
- Decrease Value: Subtract an amount from the current value in a data field.
- Increase Value: Add an amount to the current value in a data field.
- Print: Print the barcode label for a sample or for a batch of samples.
- Create Sample: See “Adding a Create Sample Reaction”.
- Create Aliquot: See “Adding a Create Aliquot Reaction”.
- If one of “Update Value”, “Decrease Value”, or “Increase Value” is selected, then the ‘New Reaction’ dialog box is refreshed with options for selecting the sample field on which to carry out the action, and whether the Reaction is to be a prompt, or an automatic response.


Do the following, and then click ‘OK’ to add the new Reaction.
- Click the ‘Sample’ button next to “Choose Field” to open the ‘Select Field’ dialog box and select the field on which the Reaction is to be carried out.
- Select either the ‘Prompt’ or ‘Set Value’ option.
- If ‘Prompt’ is selected, the user must enter instructions, which will appear onscreen when the Reaction is being carried out, advising what information must be entered in order to complete the Reaction. For example, if the Reaction is designed to update the sample volume, the user will select the “Volume” field and then for the “Prompt Text” might enter: “Please enter the new sample volume”.
- If ‘Set Value’ is selected, the user must enter a value here, which the system will automatically populate the linked data field with when the Reaction is run. For example, if the Reaction is designed to automatically update the volume of a sample(s) to 5ml, the user will select the “Volume” field and then enter “5” as the “Set Value”.
- When selecting “Print” as the “Reaction Type”, the ‘New Reaction’ dialog box is refreshed with various printing options, such as determining the barcode style (1D or 2 D barcode), selecting different printer settings, as well as configuring which additional fields to display on the barcode label.


Do the following, and then click ‘OK’ to add the new Reaction.
- Optionally, select “Use Default Printer”. (If you do not select this option, then every time this Reaction is run, the user is prompted to select a printer to use).
- Select the barcode style. Codes 128, 93, and 39 are standard one-dimensional barcoding languages. Data Matrix is a two-dimensional barcoding language.
Example of a 1D barcode
Example of a 2D barcode
- Select the barcode position (where the barcode is to be printed on the barcode label), font size, scale (the percentage of the barcode label that is to be used for printing the barcode), and display fields (the additional fields that are to be displayed on the barcode).
- When selecting “Create Sample” or “Create Aliquot” as the “Reaction Type”, the ‘New Reaction’ dialog box is refreshed with
To Edit a Reaction
- Open one of the following windows: Samples, Inventory, Containers, or Workflows.
- Click the Reactions icon located on the toolbar. The Reactions dialog box opens. This dialog box lists all of the Reactions that are available within the Progeny database that you are currently logged in to. Reactions that are marked with a blue icon are system Reactions. These system Reactions exist within every database and are not editable. Reactions that are marked with a red icon are user-defined Reactions and are editable.
- Select the user-defined Reaction that you are editing, and then click “Edit”. The ‘Edit Reaction’ dialog box opens. The dialog box displays the Reaction as it is currently defined. Edit the Reaction as needed, and then click “OK” to save the edited reaction.