
Videos

Click the titles below for a quick video on the subject:

Progeny Basics

Progeny Clinical Overview – An overview of Progeny.

The Learning Center – An overview of the Learning Center.

Navigation Overview – An overview of the navigation with the different modules in Progeny.

Workflows

High-Risk Colorectal Cancer Triage – Colorectal Cancer workflow.

High-Risk Breast Triage – Breast Cancer workflow.

Progeny Clinical For Cardio – Cardiology workflow.

Optimizing Progeny – Optimizing your Progeny usage, edit your default settings.

Profile Settings – Change the user profile settings.

Display All Individuals vs Only Probands – Switch your view to see only probands or all individuals.

Smart Lists – Columns that can be searched and filtered.

Switching IDS Formats – Switching between multiple IDS.

Pedigree Basics

Build a Pedigree – Build a pedigree by clicking to add individuals.

Build a Pedigree with Family Palette – Add individuals to a pedigree using the family palette tool.

Change Gender – Change the gender of an individual in a pedigree.

Change Vital Status – Change the vital status of an individual.

Mark Individual as Adopted – Mark an individual in a pedigree as adopted in or adopted out.

Change Proband – Change the proband of the pedigree to another individual.

Set Icon as Infertile or No Issue – Mark an individual on a pedigree as Infertile or No issue.

Mark Icon as asterisk plus minus – Mark an individual in a pedigree with an asterisk, plus, or minus sign.

Changing Attributes – Designate SAB – Mark the attribute of a specific individual to SAB on a pedigree.

Add Text Inside Icon – Add custom text inside an individual’s icon on a pedigree.

Add a Text-Box to Pedigree – Add your own custom free text box to a pedigree.

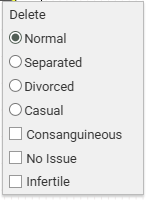
Edit Relationship Lines – Edit relationship lines on a pedigree to specify the type of relationship between two individuals.

Delete or Remove an Individual  – Delete or remove an individual from a pedigree.

Add a Patient – Adds a single patient with a pedigree in Progeny.

Select Individuals Meeting Query Criteria – Select and highlight individuals within a pedigree based on specified criteria.

Select and Move Individuals in a Pedigree – Select and move single or multiple individuals to any location within the same pedigree.

Print a Pedigree – Print a pedigree.

Save Pedigree as Image – Save a pedigree as an image to be used elsewhere.

Fit Pedigree to a Page – Makes the pedigree fit on a single page.

Copy a Pedigree – Copies a pedigree to be placed elsewhere.

Pedigree Settings

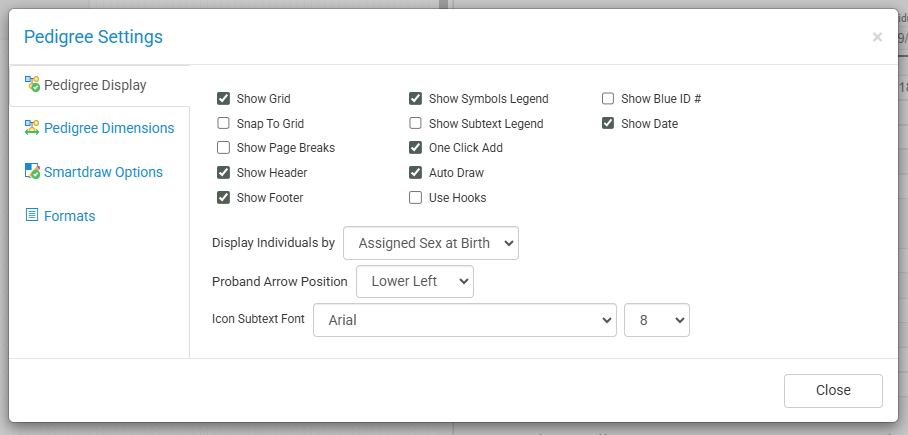
Pedigree Display Settings – Change the pedigree display settings.

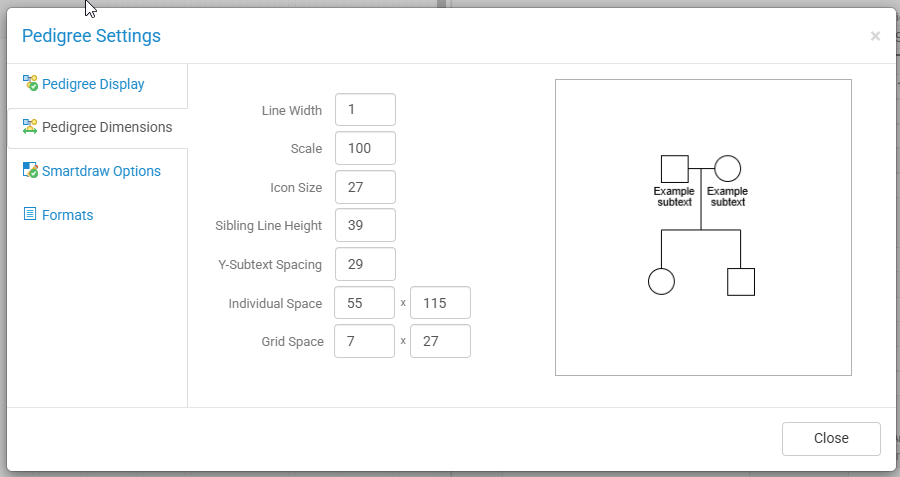
Pedigree Dimensions – Change the pedigree dimensions.

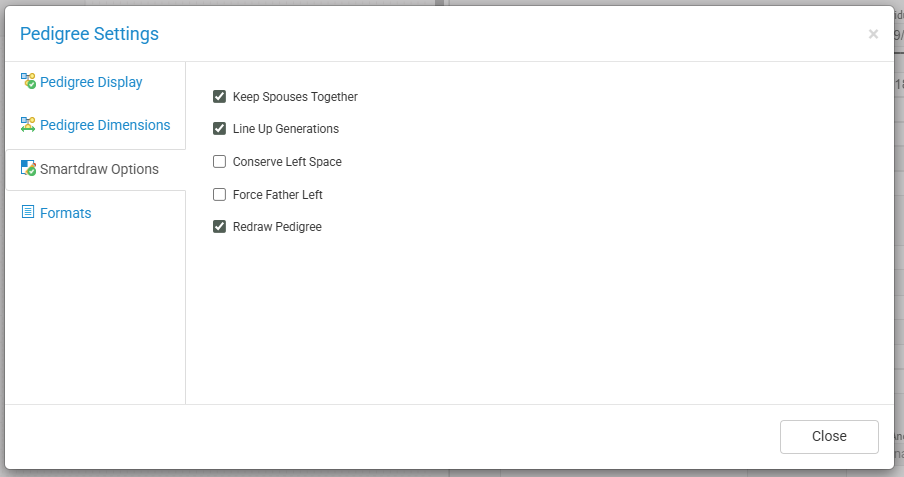
Smartdraw Option Settings – Different settings for Smart Draw

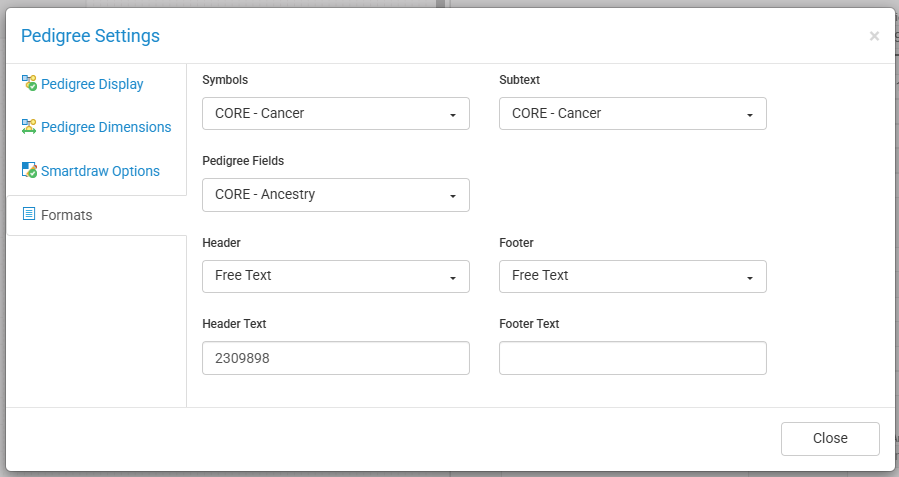
Pedigree Format Settings – Change the different formats for the pedigree.

FHQ/Invites

Invite a new Patient to Complete a Questionnaire  – Invite a new patient to fill out a questionnaire.

Invite Patient to Complete a Questionnaire  – Invite a patient, new or existing, to fill out a questionnaire.

Launch a New Questionnaire from Full View on a Tablet – Invite a patient to fill out a questionnaire from your tablet.

Invite Status – The Invite Status module and the different features.

Move Pedigree Once FHQ is Submitted – Move pedigrees to a specified folder once the FHQ is submitted.

Lock or Unlock Questionnaires – Lock or unlock questionnaires.

Send Reminders – Send a reminder to patients.

Patient Forgot Username-Password – Reset a patients password for their FHQ.

FHQ Administrative Workflows

Edit Email Templates – Edit the Email Templates for the questionnaires.

Find Questionnaire Generic Link – The location of the Generic link for questionnaires.

Edit Questionnaire Datasheet – Customize the datasheet format for the questionnaires.

Edit Questionnaire Module Overview – The Edit Questionnaire module and the different features.

Edit Questionnaire Skip Logic – Edit the Skip Logic configuration for questionnaires.

Risk

Run Risk Models – Run the Bayes-Mendel, Tyrer-Cuzick, Gail, Premm, and Claus risk models on individuals within Progeny.

Competing Mortality – Enable the Competing Mortality function when running the Tyrer-Cuzick risk model.

Genetic Testing Results

Genetic Testing Results – Using the Genetics Testing Results table.

Genetic Test Results for Non-Ambry Lab – Using the Genetics Testing Results table for a lab other than Ambry.

Letter Generation

Progeny Letter Generation demo video – The Letter Generation feature.

Create Custom Letter Template – Create your very own custom letter template, which automatically updates when using this letter for different individuals.

Edit Letter Templates – Editing and updating Progeny letter templates to include other required fields and information.

Add an Image to a Letter – Incorporate a custom image into a letter.

Edit Individual Letter – Customize an individual’s letter to add information needed before saving or exporting as a file. If selecting an existing template, the changes will not be saved to the template.

Generate Letters and Consult Notes – Generate a letter for an individual in your database.

Generate Batched Letters – Generate a letter for multiple individuals in your database.

Spreadsheets

Run a Spreadsheet – The spreadsheet module and all its features.

Enter Data on a Spreadsheet – Entering data on a spreadsheet

Pedigree Canvas

Toolbar

  • Save – saves the current pedigree and any changes that were made.
  • Show Datasheet/Hide Datasheet – displays or hides the datasheet in split view for an individual when that individual is selected.
  • Show Spreadsheet/Hide Spreadsheet – displays or hides a selected/default spreadsheet for the current pedigree.
  • Show Invites/Hide Invites – displays or hides the invite pane for the individuals on the pedigree.
  • Open Datasheet – opens the datasheet in full view for the selected individual.
  • Build Spreadsheet – builds/loads a spreadsheet for the current pedigree.
  • Undo/Redo – allows undo or redo of pedigree structure (deletions, new individuals, individual attributes, SmartDraw, moving individuals)
  • SmartDraw – applies the SmartDraw feature to redraw the pedigree depending on the customized SmartDraw settings.
  • Show/Hide Risk – opens the Risk Assessment tool.
  • Order Test – opens the Ambry Order pop-up window to order genetic tests for the selected individual.
  • Test Results – open the Genetic Test Result (GTR) module
  • Generate Letter – opens the Letter Generator module to create a letter for the selected individual based on the letter template selected.
  • Symbols/Subtext (only available to super user, administrator, or End-User Administrator users) – opens symbol/subtext format builder
  • Zoom In/Out – allows user to zoom pedigree in or out to change the scale size without having to go into ‘Settings/Pedigree Dimensions’
  • Actions – different actions to perform.
  • Settings – different options for customizing the pedigree display, pedigree dimensions, SmartDraw options, and formats.
Pedigree Display – customizes the display on the pedigree canvas.
  • Show Grid – displays a grid on the pedigree canvas.
  • Snap To Grid – snaps the individuals on the pedigree to the edges of the grid lines.
  • Show Page Breaks – displays the print boundaries as dashed blue lines.
  • Show Header – displays the header on the pedigree canvas.
  • Show Footer – displays the footer of the pedigree canvas.
  • Show Symbols Legend – displays the symbols legend for the specified symbol format.
  • Show Subtext Legend – displays the subtext legend for the specified subtext format.
  • One Click Add – activates the one-click add features for adding relatives to the selected individual (shows yellow triangles around an individual when selected).
  • Auto Draw – automatically runs SmartDraw on the pedigree when new individuals are added to the pedigree.
  • Use Hooks – enables the hooks feature to improve the visual appearance of intersecting relationship lines.
  • Show Blue ID # – displays the numerical order, from left to right, for each individual in their generation.
  • Show Date – displays the date in the upper left corner of the pedigree canvas.
  • Display Individual by – allow users to select whether the pedigree is displayed by sex or gender.
  • Proband Arrow Position – changes the position of the proband arrow on the pedigree canvas.
  • Icon Subtext Font – changes the font and font size for the pedigree subtext.
Pedigree Dimensions – changes the dimensions of the pedigree. View Video: Pedigree Dimensions
  • Line Width – changes the width of the relationship lines.
  • Scale changes the magnification level of the pedigree.
  • Icon Size – changes the size of the individual icons.
  • Sibling Line Height – changes the height of the sibling relationship lin.
  • Y-Subtext Spacing – changes the vertical spacing for the subtext.
  • Individual Space – changes the spacing between individuals
  • Grid Space – changes the width and height of the grid
Smartdraw Options – customizes the options for the SmartDraw feature. View Video: Smartdraw Option Settings
  • Keep Spouses Together – lines up spouses evenly next to each other.
  • Line Up Generations – lines up individuals on the same generation horizontally.
  • Conserve Left Space – moves the pedigree as far left on the pedigree canvas.
  • Force Father Left – keeps the father of a relationship to the left of the mother.
  • Redraw Pedigree – redraws the pedigree to best fit on the pedigree canvas.
Formats – select the different formats for the symbols, subtext, pedigree fields, headers, and footers.
  • Symbols – designates the symbol format used for pedigree.
  • Subtext – designates the subtext format used for pedigree.
  • Pedigree Fields – designates the Pedigree Fields format used for pedigree.
  • Header/Header Text – designates the Header format used for pedigree or input for Header Free Text, if selected.
  • Footer/Footer Text – designates the Footer format used for pedigree or input for Footer Free Text, if selected.

Individual Menu

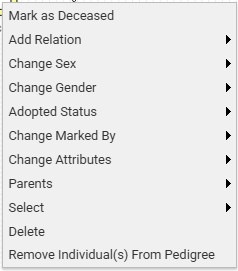
Displayed by right-clicking on an Individual in the pedigree.

Relationship Line Menu

  • Select the relationship line between two individuals (spouses) and you will see two yellow boxes on opposite ends of the line connecting the two individuals.
  • Right-click the selected line and choose the relationship type.
  • Normal
  • Separated
  • Divorced
  • Casual
  • Consanguineous
  • No Issues
  • Infertile
  • If the relationship is a twin relationship, the right click menu will allow you to select to delete the line, or “Dizygotic”, “Monozygotic” or “Unknown” as in the screenshot below

Right-Click Menu

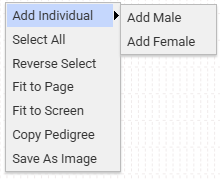
Right-click with your mouse anywhere on the empty space of the pedigree canvas to open the right-click menu.

  • Add Individual – adds a male or female to the pedigree.
  • Select All – selects all individuals on the pedigree.
  • Reverse Select – selects everyone that is not selected and de-selects those that were selected.
  • Fit to Page – fits the pedigree on the specified page orientation as well as paper size along with additional options for adjusting the margins.
  • Fit to Screen – fits the pedigree onto the full computer screen.
  • Copy Pedigree – allows copying of the pedigree to paste elsewhere.
  • Save As Image – allows saving the pedigree as an image file.

One-Click Add

  • Top arrow – left click to add a father and right click to add a mother.
  • Top right arrow – left click to add a brother, right click to add a sister, and hold ctrl and click to add a twin.
  • Bottom right arrow – left or right click to add a spouse.
  • Bottom arrow – left click to add a son and right click to add a daughter.

Pedigree Fields

Pedigree Fields are fields that are displayed on the pedigree. These fields are pedigree level and usually displays data about the pedigree. Pedigree Fields are very dynamic and customizable. Users can load a Pedigree Fields format to update the Pedigree Fields in the Formats tab of Pedigree Settings.

Symbol Legend

This legend auto-populates as you add cancers and/or other diseases that are predefined with custom pedigree symbols. Pedigree symbols can be customized and used with various data fields to display symbols on the pedigree. To add a cancer to an individual, see Individual Datasheet for more details. Users can load a symbol format to update the symbols in the Formats tab of Pedigree Settings.

End-User Administrators can create and edit symbol formats.

Subtext

This text is found under each Individual and can be edited via the Individual Datasheet. Subtext can be customized to display data on the pedigree from fields within your Individual Datasheet. Users can load a subtext format to update the subtext in the Formats tab of Pedigree Settings.

End-User Administrators can create and edit subtext formats.

Smart Headers and Footers

The header refers to the pedigree title which defaults to displaying the Pedigree Name. However, you can free type the desired header or it can be created as a format based on pre-defined data points (like proband name, date of birth, or MRN) or any other data field in the database.  

The footer refers to text applied to the bottom of each page of the pedigree canvas. Again, the footers can be entered as free text or configured to reflect any desired data point, (like appointment date or location, genetic testing status of the proband) or any other piece of data being collected in the database. 

Users can enter text or load a Header/Footer format to update the pedigree headers and footers in the Formats tab of Pedigree Settings.

End-User Administrators can create and edit smart header and smart footer formats.

Proband

The person serving as the starting point for the genetic study of a family is the Proband and is marked with a black arrow on the pedigree.

User Interface

User Profile

Users in Progeny can manage their basic user profile. On the upper right side of the page, click the drop-down arrow next to the image and select Profile or you can also click the image.

If a name and email have already been entered into a user account, it will then be displayed. Users should sign out of Progeny by clicking Logout.

Profile opens another window with the profile information. Here the user can view/edit their first and last name, email address, and their profile picture. Users can also change their password by entering their Current password, New password, and Confirm new password.

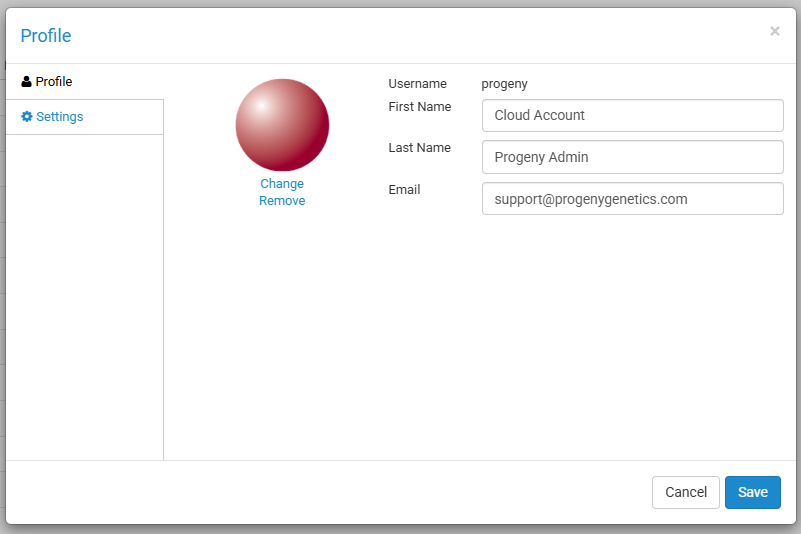
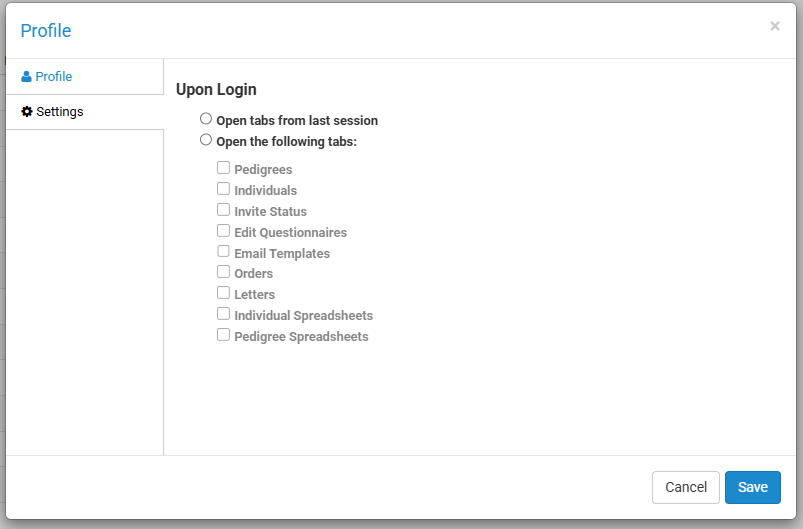
Under the Settings tab, the user can select which Progeny tabs open by default when the user logs in. We recommend you select the tabs you use most often.

Help

If you need additional assistance with using Progeny, there is a help button next to the login logo that can be clicked which then opens the Progeny Learning Center website. From there you can view helpful articles, videos, PDFs, and other reference information.

Navigation Bar

The different modules in Progeny are displayed on the top of the page. Access to certain modules will only be available depending on your institution’s licensing with Progeny as well as the user permissions for your user account. Use the toolbar by clicking on a module to open the tab to that specific module. Some modules will have a drop down to click so that additional actions pertaining to that model can be displayed.

  • Pedigrees – opens the Pedigrees module to review pedigrees in the database.
  • Individuals – opens the Individuals module to review individuals in the database.
  • Invites
    • Invite Status – opens the Invites module to review invitations.
    • Edit Questionnaires – opens the Edit Questionnaires module to customize the FHQs (FHQ3)*
    • Email Templates – opens the Email Templates module to edit the FHQ email templates.*
    • Questionnaire Design – opens the Questionnaire Design module to customize the FHQs (FHQ4)*
  • Orders – opens the Orders module to review the order status for Ambry genetic tests.
  • Letters – opens the Letters module to create and edit letter templates.
  • Spreadsheets
    • Individual Spreadsheets – opens the Individual Spreadsheets module to create and load spreadsheets for the individual level.
    • Pedigree Spreadsheets – opens the Pedigree Spreadsheets module to create and load spreadsheets for the pedigree level.
  • Datasheets – opens the Datasheet Builder to create and edit Pedigree, Individual, and Table Datasheets*
  • Fields – opens the Fields module to create and edit database Fields*

*=administrative or end-user administrator functionality

Window Panes

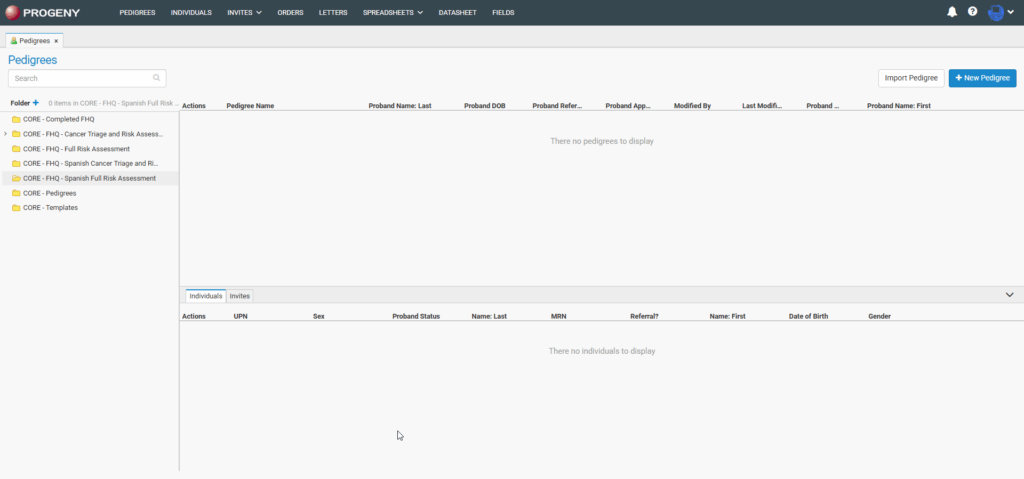
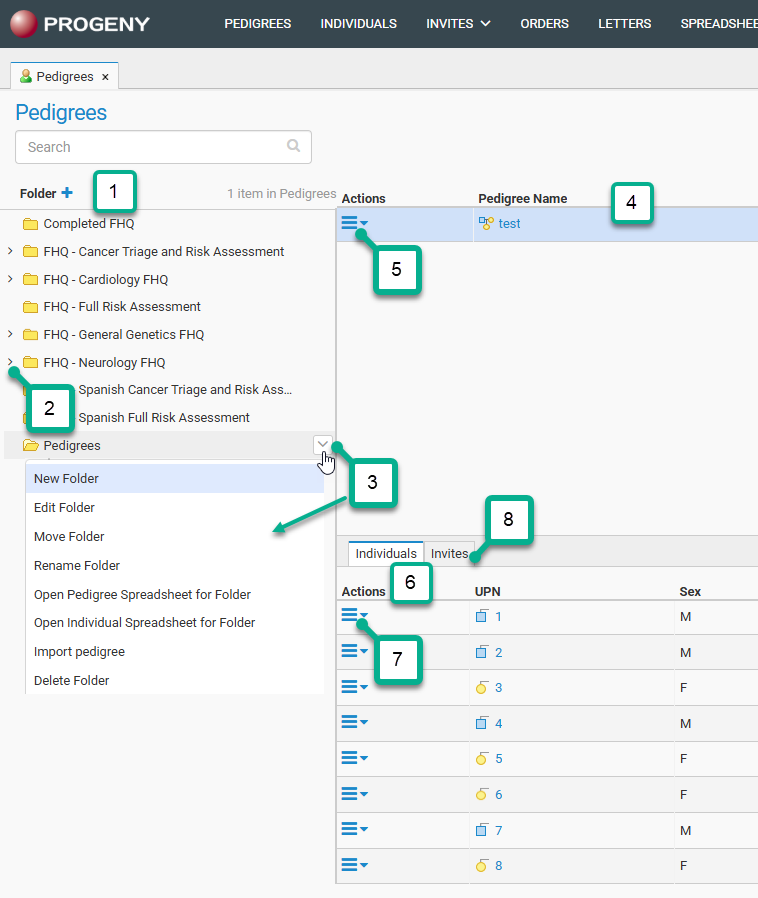
Progeny has three main window panes. The left vertical pane displays the folder organization for a particular functional area in a Windows Explorer-style structure [1]. Click on a folder in the pane to open the folder. As folders and sub-folders are opened in this pane, detailed information about the folder’s content is displayed in the upper and lower horizontal panes on the right [2, 3] (information is displayed in the bottom pane when an item is highlighted in the upper pane).

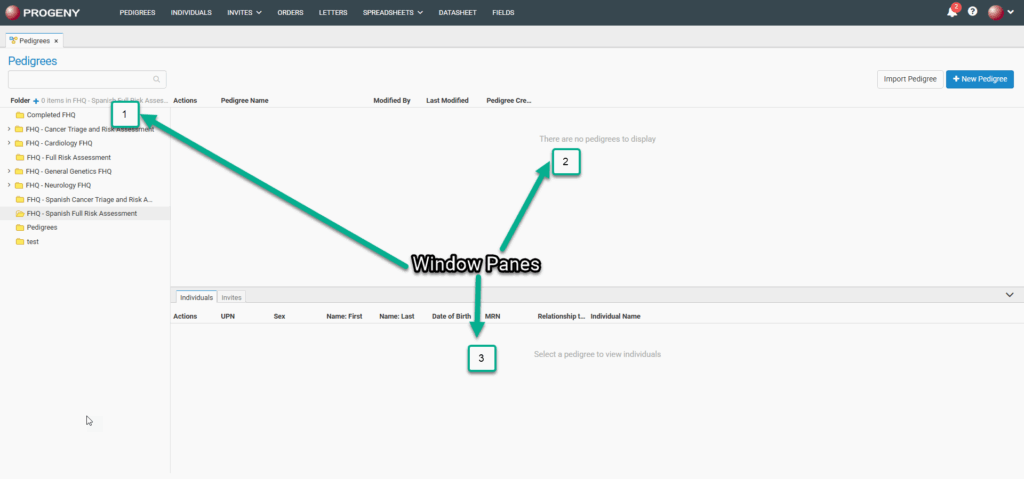
The folders displayed in the left pane will correspond with the module selected (pedigrees or individuals). The panes to the right correspond to parent items on top and sub-items below. For example, if the user is in the Pedigrees module and highlights a pedigree in the upper-right pane, all of the individuals and invites attached to that pedigree are displayed in the lower-right pane. Likewise, if the user is in the Individuals module and highlights an individual then all invites attached to that individual are displayed in the lower-right pane.

Smart List

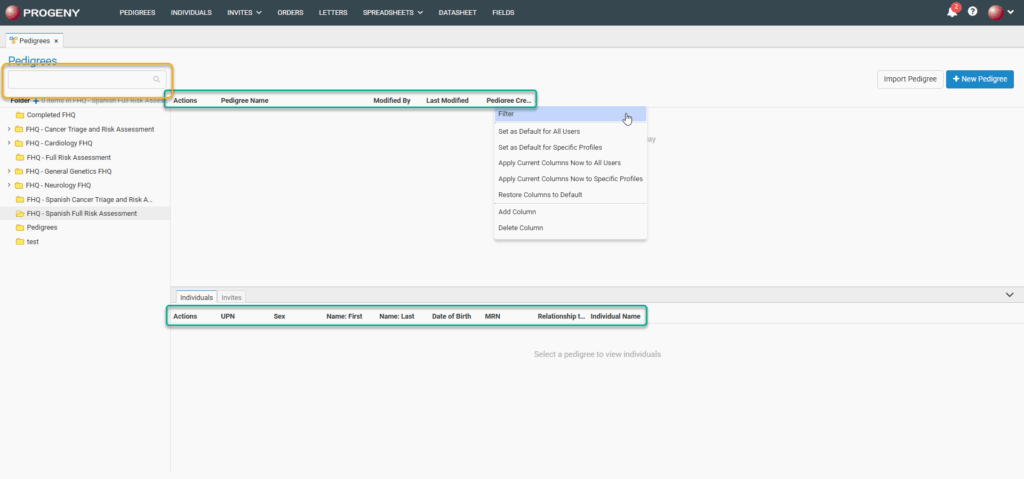
The Smart Lists feature allows you to select which columns (fields, circled in green) you wish to display in the selected module. They are used to quickly search the database from the smart search field (circled in yellow). The search results only display the data found in the selected columns (fields). You can sort the results by clicking any of the column headings.

  • Filter – filters the view of any field in the smart list so that you can specify the type of filter for that column. As in the picture below, you can choose to only show results that are either equal to, not equal to, less than, and so on.
  • Clear Filter – resets any sorting that was activated.
  • Set as Default for All Users* – sets the current smart list configuration as default for all users
  • Set as Default for Specific Profiles* – sets the current smart list configuration as default for users who are in a specific Profile Format
  • Apply Current Columns Now to All Users* – applies the current smart list configuration immediate to all users
  • Apply Current Columns Now to Specific Profiles* – applies the current smart list configuration immediate to users who are in a specific Profile Format
  • Restore Columns to Default – restores columns to default for current user
  • Add Column – smart list allows you to add any field to the database to this quick view list.
  • Delete Column – deletes any column from the list.

*=requires administrator or end-user administrator access

Smart Search

Searches the smart list database fields (displayed columns) of the module level (pedigree or individual). The search is limited to the exact order of the characters in the string.

Actions Menus

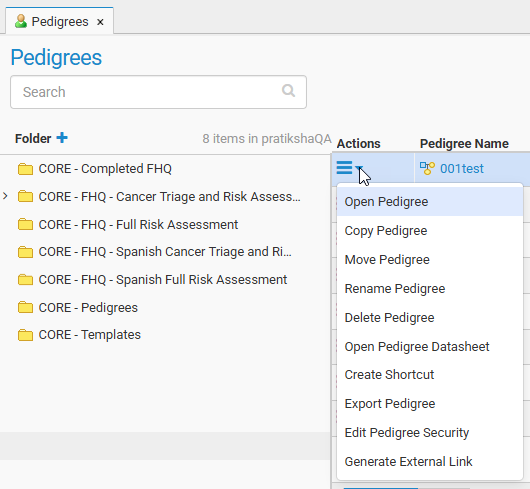
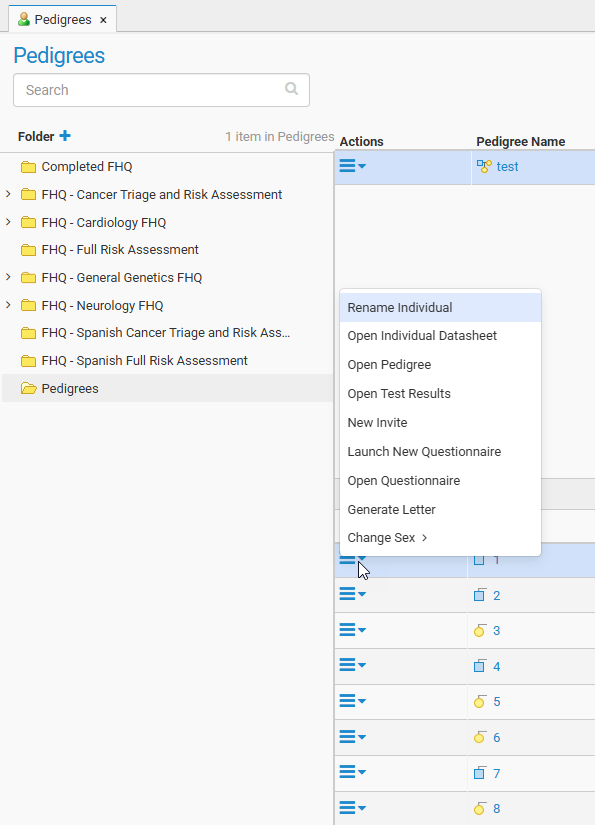
The Pedigrees Actions Menu provides quick access to functions within the pedigree module for your clinical workflow. 

  • Open Pedigree – opens the pedigree canvas for that pedigree.
  • Copy Pedigree – creates a copy of the pedigree in the specified folder.
  • Move Pedigree – moves the pedigree to another folder.
  • Rename Pedigree – renames the pedigree with the additional option to rename individuals.
  • Delete Pedigree – deletes a pedigree and the individuals in that pedigree from the database.
  • Open Pedigree Datasheet – opens the pedigree datasheet based on the default datasheet for that pedigree.
  • Create Shortcut – creates a shortcut of the specified pedigree in a specified location so that changes can be made to the shortcut to reflect on the original pedigree with an additional option to open the shortcut pedigree once saved.
  • Export Pedigree – exports the pedigree to a XML file.
  • Edit Pedigree Security – allows for individual pedigree security configuration.
  • Generate External Link – generates an external link to view the pedigree.

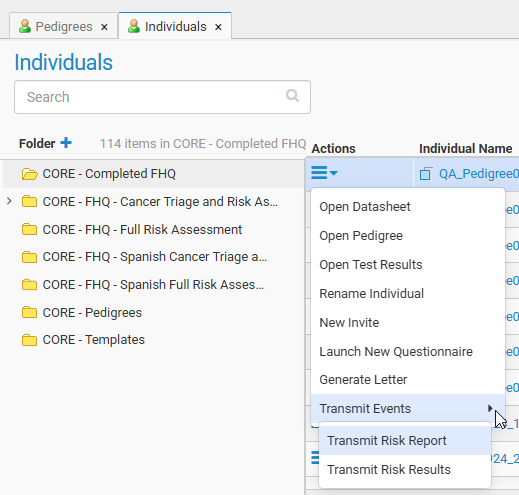
The Individuals Actions Menu provides quick access to functions within the individual module for your clinical workflow. 

  • Open Datasheet – opens the individual datasheet for individual
  • Open Pedigree – opens the pedigree canvas for pedigree in which individual lives.
  • Open Test Results – opens the Test Results module for individual
  • Rename Individual – renames the individual
  • New Invite – creates new FHQ invite for individual
  • Launch New Questionnaire – launches new FHQ for individual
  • Generate Letter – generates new letter for individual
  • Transmit Events
    • Transmit Risk Report – transmits risk report to EHR for individual
    • Transmit Risk Results – transmits risk results to EHR for individual

Pedigrees Module

Main Interface

  1. The Folder section: Lists the folders used for organizing and storing pedigrees.
  2. Show sub-folder arrow in the Folder section: Click to show/hide sub-folders.
  3. Folder Menu option: Shows Open Pedigree/Individual spreadsheet menu option for the folder.
  4. Pedigrees section: Displays the pedigrees in the selected folder.
  5. Pedigrees Actions menu: Menu options for working with pedigrees.
  6. The Individuals section shows all the individuals in the selected pedigree.
  7. The Actions menu for individuals, allows you to work with individuals more directly, see the second section below for more details.
  8. The Invites tab shows all the invites to individuals in the selected pedigree and has the same invite options as the Invites Module.

Creating a Pedigree

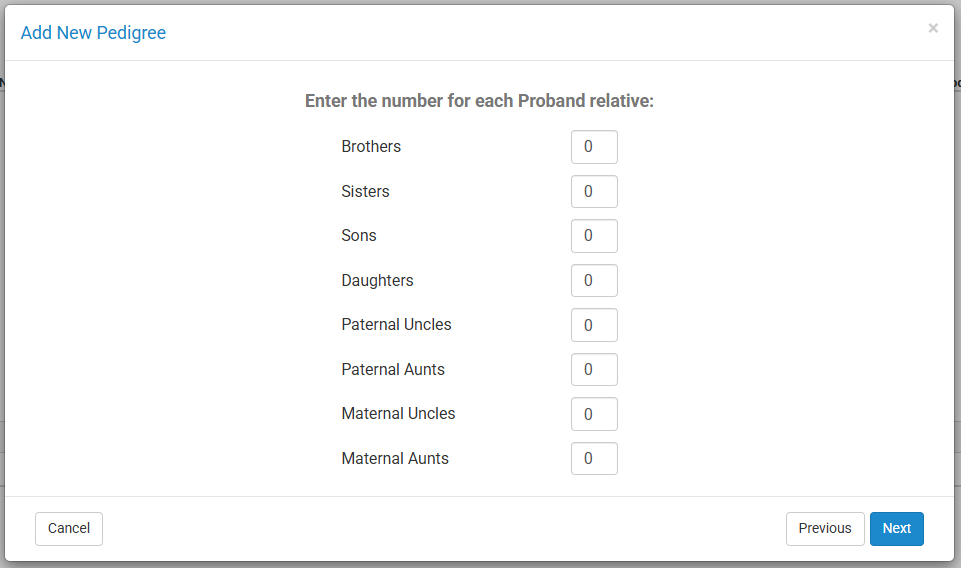
To create a Pedigree from the Progeny Web Interface, select the Pedigrees module, then click the New Pedigree button in the upper right corner of the screen.

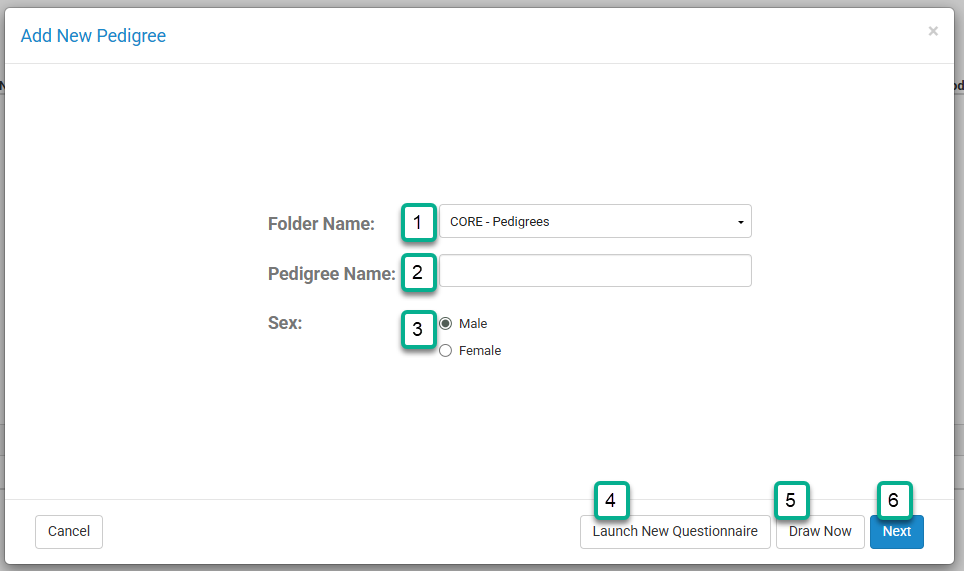
This will open the Add New Pedigree window.

  1. Select a folder to save the pedigree into.
  2. Type the name of the pedigree.
  3. Select the sex for the proband.
  4. If you would like to launch a new questionnaire for this patient, click Launch New Questionnaire.
  5. If you would like to create the pedigree right away click Draw Now.
  6. If you would like to quickly add relatives to the proband select Next. After clicking Next, you can enter the number of each relative listed for the proband.

Pedigree Actions Menu

  • Open Pedigree – opens the pedigree canvas for that pedigree
  • Copy Pedigree – creates a copy of the pedigree in the specified folder
  • Move Pedigree – moves the pedigree to another folder
  • Rename Pedigree – renames the pedigree with the additional option to rename individuals
  • Delete Pedigree – deletes a pedigree and the individuals in that pedigree from the database
  • Open Pedigree Datasheet – opens the pedigree datasheet based on the default datasheet for that pedigree
  • Create Shortcut – creates a shortcut of the specified pedigree in a specified location so that changes can be made to the shortcut to reflect on the original pedigree with an additional option to open the shortcut pedigree once saved
  • Export Pedigree – exports the pedigree to a XML file
  • Edit Pedigree Security – allows for individual pedigree security configuration
  • Generate External Link – generates an external link to view the pedigree

Individuals Action Menu (within Pedigrees Module)

  • Rename Individual – renames the individual
  • Open Individual Datasheet – opens the individual datasheet for individual
  • Open Pedigree – opens the pedigree canvas for pedigree in which individual lives
  • Open Test Results – opens the Test Results module for individual
  • New Invite – creates new FHQ invite for individual
  • Launch New Questionnaire – launches new FHQ for individual
  • Open Questionnaire – opens an existing questionnaire
  • Generate Letter – generates new letter for individual
  • Change Sex – allows user to change sex of individual

Invites Action Menu (within Pedigrees Module)

  • New Invitesends a new invitation to the individual
  • Open Questionnaire – opens existing questionnaire
  • Send Remindersends a reminder email for the individual
  • Update Status – manually changes status of the questionnaire:
    • Completed Manually
    • Inactive
    • Reviewed
  • Lock Invite – locks the invitation so that it cannot be accessed
  • View Invite History – shows a history log of the invite
  • Open Pedigreeopens pedigree for individual (not available if singlet)
  • Open Datasheetopens the individual’s datasheet for the individual
  • Generate Letter – generates new letter for individual

Pedigree Datasheets – Desktop

The pedigree datasheet is used to enter and store information about pedigrees in your Progeny database. They function the same as Individual Datasheets, except a Pedigree Datasheet can contain only pedigree database fields.

Formatting a Pedigree Datasheet

You use a pedigree datasheet to enter and store data for a pedigree. When you create a new pedigree, a pedigree datasheet is automatically created for the pedigree. All the pedigrees that are assigned to a pedigree data folder can use the same datasheet format, or each pedigree in the folder can use a unique datasheet format. You can format a pedigree datasheet at the time that you add a pedigree to a data folder, or at a later date.
To format a pedigree datasheet

  1. Create a pedigree data folder by clicking the New Folder button found in the upper left corner of the Main Progeny window.
  2. If all the pedigrees that are assigned to the folder are to use the same pedigree datasheet format, make sure to select the Pedigree Datasheet template option shown in the image below; otherwise, keep this option unchecked. After typing in the new folder name in the Folder Name field and selecting the desired Template Options, click Save.
  3. A message opens indicating the new folder was added successfully. Click OK.
  4. Create a new pedigree by clicking on the New Ped button and add the pedigree to the desired data folder.
  5. Once the new pedigree has been created, click Save. A message opens indicating the new pedigree was added successfully, click OK.
  6. To edit the datasheet of your newly created pedigree, right-click on the pedigree in the pedigree window pane, and on the context menu that opens, click Open Pedigree Datasheet.Next click Form Design on this blank datasheet and format the datasheet as needed by utilizing Style, Fields, Add Text, Add Tab, and Properties buttons shown in the image below.
  7. If the Pedigree Datasheet template option was selected for this folder when it was created, then all the pedigrees that you subsequently add to the folder will use the same datasheet format for entering and storing data; otherwise, you must manually format the datasheet for each pedigree that you add to the folder.
  8. Add all the needed pedigrees to the folder. After you have added all of the needed pedigrees to the folder, right-click on any pedigree in the folder and on the context menu that opens, click Open Pedigree Datasheet. If during the creation of this folder, the Pedigree Datasheet template option was selected, then all pedigrees that are currently added to the folder or pedigrees that you continue to add to the folder will use this same datasheet format for entering and storing data; otherwise, you must format a datasheet for each pedigree in the folder.

Fields – Desktop

Progeny Record-Level Database Fields

A database file is a collection of records. A database record is a set of fields. A database field is a single piece of information from a record. The Fields module displays the record-level fields that are contained in a Progeny database. To open this module, click the Fields button on the Navigation bar. There are four different types of record-level fields in Progeny:

  1. Individual database fields – Individual database fields are stored at the individual record level. Individual database fields are displayed on the Fields module only if your organization has purchased and installed Progeny Clinical.
  2. Pedigree database fields – Pedigree database fields are stored at the pedigree record level. Pedigree database fields are displayed on the Fields module only if your organization has purchased and installed Progeny Clinical.
  3. Sample database fields – Sample database fields are stored at the sample record level. Sample database fields are displayed with all products of the Progeny Suite.
  4. Marker database fields – Marker database fields are stored at the marker record level. Marker database fields are displayed on the Fields module only if your organization has purchased and installed Progeny Lab.
Database Field Types

When creating database fields in a Progeny database, you must specify the type for the field. The field type determines the type of data that a user can enter into the field (alphanumeric, numeric, date, and so on) or determines how the field functions in the database, for example, an image displays in the field when a user selects an image file for an image field, dropdown fields provide a custom pick list, and date fields provide a date and time picker when end users are doing data entry for those field types. By default, each field type is marked with a unique icon in the application. Not all field types are available for all record levels. The table below lists the field types that are available for each record level field in a Progeny database. It also provides a description of each field and the records for which the field type is applicable.

Text field

A text field is for alphanumeric data (all digits and printable characters). You can enter up to a maximum of 32,000 characters in a text field. A text field is the most generic and least restrictive of all the available field types. Examples of text fields include First Name, Last Name, Address, City, Notes and so on.

Date field

A date field contains a calendar. You can use the calendar to enter a date in a date field, or you can simply enter the date in the field. The first time that you click on a date field, the checkbox for the field is not selected, which means that the field is not editable. To make the field editable, you can do one of the following:

  • Press the spacebar on your keyboard.
  • Select the checkbox in the date field.
  • Use the calendar by clicking on the drop-down arrow in the field, and then scrolling to and clicking on the appropriate date.

A date is stored in the database in a four digit format (M/D/YY) regardless of the date’s display when you use the calendar (MM/DD/YYYY) or if you manually entered a four-digit year. Dates are displayed in a date field based on the regional settings of the client workstation.

Numeric field

You can enter only the digits 0 through 9 in a numeric field. Decimals and negative numbers are allowed; however, no other characters, either alphabetic or special (such as commas) are allowed. If you want to sort data based on numeric values, then you must use a numeric field. You cannot sort based on numeric values if the data is entered in a text field.

Yes/No field

A Yes/No field is a checkbox field that holds a value of either 1 (to indicate Yes) or 0 (to indicate No). Progeny always stores a value in a database for a checkbox field whether or not the field is checked. If the field is checked, Progeny stores a value of “1” in the database. If the field is not checked, Progeny stores a value of “0”.

Dropdown field

A drop-down field displays a pre-defined list of items from which you can make a selection. To open the list, simply click in the field. You can scroll through the list and select one item at a time. The items are mutually exclusive. For example, you might create a dropdown field named “Race” and the available items are African American, American Indian, Asian, and so on. When you are adding/editing a drop-down field, the order in which you enter the items on the Add New Field/Edit Field dialog box is the order in which the items are displayed in the dropdown list. You can use the

arrow keys on your keyboard to move up and down the list of available values for the field. If you are selecting from a lengthy dropdown list on a datasheet, you can enter the first few letters of the name of the item that you want to select and the list is dynamically updated with the items that meet your search criteria.

Image field

An image field can display an image file in one of the following formats—.bmp, .gif, .png, .tiff, and .jpg/.jpeg. When you click on an image field, you are prompted to enter the type of image file that you want to display. You then navigate to the appropriate image file and select it. After you select the image file, the image is displayed in the Image field.

Table

A table allows you to enter multiple values for the same set of data fields. For example, you might add a table called Cancer History that would allow a user to enter cancer diagnosis information.

Lookup Table

A lookup table contains a dropdown list of fields that are related in some way. Each row within the drop-down contains a predefined “lookup” value which refers to a set of data fields that can be updated so as to remain current. For example, you might create a lookup table called Referring Physician that would allow a user to simply select a

physician’s name from the list, thereby associating all of the physician’s current contact information such as the physician’s phone number, the physician’s pager number, institution, and ID. To enter data in a lookup table field, simply click in the field to open the table, and select the appropriate value from the drop-down table.

Computed field

You cannot enter data into a computed field. Instead, a computed field contains an expression that yields a value that is automatically calculated each time the window that contains the field is opened. For example, a computed field for Current Age is defined as the difference in years between the date that is in the Current Date field and the date that is in the Date of Birth field.

Summary field

The purpose of a summary field is to summarize the data of object sub items (individuals or samples) of a database object (a pedigree, individual or sample). A summary field provides summary information for any selected data field and displays a summary value as a maximum value, minimum value, average, sum, or count. Summary functions can be carried out on all fields that are not contained in tables and conditional queries can be employed to populate precise summary values. Pedigree level summary fields summarize individual-level data of the individuals within each pedigree. Individual-level summary fields summarize sample level data of the samples associated with each individual. And sample level summary fields summarize sample level data of the sub-samples and aliquots of each sample. For example, a pedigree level summary field might provide a count for the total number of cancer diagnoses in the pedigree. An individual level might provide a count of the number of available DNA samples. And a sample level summary might provide a total available volume of all non-exhausted aliquots of each sample.

Table Summary field

Similar to a summary field, a table summary field is a computed field that summarizes a given column of a table. For example, you might create a table called Cancer Diagnosis with a field in it called Diagnosis Age and you want to see when the patient was diagnosed for the first time with a specific type of cancer. You can create a table summary field called Minimum age Colorectal or Minimum age Endometrial that displays the age of the patient when they were first diagnosed with these specific types of cancer.

Hyperlink field

A hyperlink field contains a hyperlink to an external file, program, or website. Simply click on the link in the field to open the file, program, or website. For example, a hyperlink field named Email Address could contain an individual’s email address. When you click on the email address in the field, an untitled email addressed to the individual opens in the available email client such as Microsoft Outlook. Hyperlink fields can also be used to load and view documents.

Adding, Editing, and Deleting Database Fields

You can add, edit, and delete record-level database fields only from the Fields module. When adding record-level fields in a Progeny database, you must specify the field type. You can set a default value for the field, add validation rules to the field, and set security for the field. You can create folders for storing and organizing database
fields. You can also delete a database field. When you delete a database field, it deletes not only the field but also, any data that is stored in the field.

To Add a Database Field
  1. On the Progeny main window navigation bar, click the Fields module.
    • The Fields module opens.
  2. Determine the record type for which you are creating the field (Individual, Pedigree, Sample, or Marker). In the left pane of the window, open the database folder to which you are adding the field.
    • A list of the fields that are already contained in the folder is displayed in the right pane of the Fields module.
  1. On the Progeny toolbar, click the New Field button.
    • The New Data Field dialog box opens. The Settings tab is the active tab for the dialog box. All the fields that are contained in the selected folder are displayed alphabetically in the lower pane of the dialog box.
  1. In the Field Name field, enter the name for the new field.
  2. On the Type of Field drop-down list, select the field type for the new field.
    • The field type determines the type of data that a user can enter into the field and determines how the field functions in the database. Not all field types are available for all record types (see Database Field Types). In addition, if you are adding any of the following field types—Table, Lookup Table, Computed, Summary, or Table Summary field—then you must carry out additional steps to add the database field. For additional information refer to:
  1. Optionally, do one or more of the following:
    1. If available, in the Default Value field, enter the default value for the field. A user can always edit this value.
    2. Open the Validations tab and set the validation rules for the field.
    3. Open the Security tab and set the security for the field.
  2. Click Add. A message opens indicating that the new field was added successfully.
  3. Click OK. The message closes. The Add New Field dialog box remains open in case you want to create another field. The new field is displayed in the lower pane of the dialog box.
To edit a database field

You can edit a database field only if no datasheets are open. If one or more is open, right-click on the tab(s) and click Close Tab. You can then continue with editing the database field.

  1. On the navigation bar, click the Fields button. The Fields module opens.
  2. In the left pane of the module, select the folder that contains the field that you wish to edit.
    • A list of the fields that are contained in the folder is displayed in the right pane.
  3. Double-click the field that you wish to edit, or right-click it and select Edit Field….
    • The Edit Field dialog box opens. The dialog box displays all the current information for the field.
  4. Click Change.
    • A message opens asking you if you are sure that you want to change the field. Click Yes. The message and Edit Field dialog box closes. You return to the Fields module with the fields listed in the right pane.
To delete a database field

You can delete a database field only if no datasheets are open. If one or more is open, right-click on the tab(s) and click Close Tab. You can then continue with deleting the database field.

  1. On the navigation bar, click the Fields module. The Fields module opens.
  2. In the left pane, select the folder that contains the field that you wish to delete. A list of the fields that are contained in the folder is displayed in the right pane of the Fields window.
  3. Right-click on the field that you wish to delete and on the context menu that opens, click Delete Field, or CTRL-left click to select multiple fields, then right click and select Delete Field. A message opens asking if you are sure that you want to delete the selected fields and that the operation will delete the fields and the data.
  4. Click OK. The message closes and the field (and the data stored in the field) is deleted from the database.
Adding a Table

Before you add a table, you must confirm that the fields that are to be added to the table already exist in the database, otherwise, you must add them. For example, before adding a table called Visit Information, you need to confirm that the fields Visit Date, Visit Type, and Visit Purpose already exists in the database, otherwise, you must add them.

To add a table
  1. On the New Field dialog box, enter the name for the field and select Table for the field type.
  2. In the Data Folders pane, open the folder that contains the fields that are to be added to the Table. The fields that are contained in the data folder are displayed in the Fields pane at the bottom of the dialog box.
  3. Drag each field that you are adding to the table from the Fields pane into the Define the Table Structure pane (upper-right pane) of the dialog box.
  4. In the Data Folders pane, select the folder where you would like to save your table.
    • Click Add. A message opens indicating that the new field was added successfully. Click OK. The message closes.
  5. Click Close to close the dialog box and return to the Fields module.
Adding a Lookup Table

Before you add a lookup table, you must confirm that the fields that are to be added to the lookup table already exist in the database, otherwise, you must add them to the database. For example, before adding a lookup table called Referring Physician, you need to confirm that the fields Ref Phy Phone and Ref Phy Pager already exist in the database, otherwise, you must add them. After you add a lookup table, you can add the data to the fields in the table from scratch, or you can import data from a text file into the fields.

To add a lookup table
  1. On the New Field dialog box, enter the name for the field and select Lookup Table for the field type.
  2. In the Data Folders pane, open the folder that contains the fields that are to be added to the lookup table. The fields that are contained in the data folder are displayed in the Fields pane at the bottom of the dialog box.
  3. Drag each field that you are adding to the lookup table from the Fields pane into the Define the Lookup Table Structure pane (upper-right pane) of the dialog box.
  4. In the Data Folders pane, select the folder where you would like to save your lookup table.
  5. Click Add to add the field the database. After you have added the lookup table, you can add data to the fields, either from scratch or by importing a text file that contains the necessary data.
To add data to an existing lookup table
  1. On the navigation bar select the Fields module.
  2. On the main menu, click Fields > Lookup Table Maintenance. The Lookup Maintenance tab opens. This tab displays every lookup table (by folder) that currently exists in the database.
  3. In the left pane of the Lookup Maintenance tab, select the lookup table to which you are adding data.
  4. On the Lookup Maintenance toolbar, click the Add Row button to enter data into the lookup table.
To import data into a lookup table

You can import data into a lookup table from a delimited file. The file can be a comma or tab delimited file, or you can specify another delimiter type.

  1. On the navigation bar, select the Fields module.
  2. On the main menu, click Fields > Lookup Table Maintenance. The Lookup Maintenance tab opens. This tab displays every lookup table (by folder) that currently exists in the selected database.
  3. In the left pane of the Lookup Maintenance tab, select the lookup table into which you are importing the data.
  4. On the Lookup Maintenance toolbar, click the Import button. The Import Lookup Data dialog box opens. Comma Delimited is selected by default.
  5. Select the type of delimited file that you are importing. (If the file is not comma or tab delimited, then you must specify the delimiter that the file uses.)
  6. Specify the values for the following:
    1. The number of Matched Columns – Enter the number of columns in the text file that you are importing that match the number of columns in the lookup table. No data in the matched columns is overwritten. Only data from the matched point forward is overwritten. For example, if your lookup table and import text file have three columns, and you indicate “1” for the number of matched columns, then when the data is imported into the lookup table, the data in Column 1 of the lookup table is not overwritten; however, the data in Columns 2 and 3 of the lookup table is overwritten by the data in Columns 2 and 3 of the import file.
    2. Ignore column headings—The first row of the import file is treated as a column heading row during the import process. If you do not want the first row to be treated as a column heading row, then select Ignore column headings.
    3. Allow import to add additional rows—Importing from an import file does not over-write existing rows. It either adds all rows in the import file to the existing lookup table or adds the additional number of rows in the import file above the number of rows in the lookup table.
  7. Click Import. The Open File dialog box opens.
  8. In the Open File dialog box, browse and select the file that you are importing, and then click Open. A message opens indicating the Import operation was successful.
  9. Click OK. The message closes. You return to the Lookup Maintenance tab. The imported information is displayed in the lookup table.
  10. Adjust the column widths as you would like them to appear during data entry and select File | Save Format from the Main Menu.
Adding a Computed Field

You cannot enter data into a computed field. Instead, when you add a computed field, you must define an expression for the field that yields a non-editable value that is automatically calculated each time the window that contains the field is opened. For example, a computed field for Current Age is defined as the difference in years between

the dates in the Current Date field and the Date of Birth field. The expression can use functions, constants, and values in other fields for the calculation of the value. For example, a computed field can display the Body Mass Index (BMI) for an individual by calculating BMI based on the values in the Height and Weight fields. You can also specify the parameters for a computed field so that the field displays data only if another field is null (no data has been entered in the field). A computed field can be displayed in spreadsheets, pedigrees, and datasheets without displaying the fields on which its

calculation is based. For example, the Current Age field can be displayed without displaying the Current Date and/or Date of Birth fields.

Computed field expressions

An expression is a group of characters or symbols that represent either a quantity/value or an operation. Table 2-2 lists the expressions that are allowed for a computed field.

You can include other computed fields, summary fields, and/or system fields when you are defining the expression for a computed field. An example of including system fields when you are defining the expression for a computed field is the expression {Global ID} + 1000, which is a computed field that would display the value in the system field {Global ID} plus 1000 in the field. When you are defining the expression for a computed field, all references to database fields must be enclosed in curly brackets {}. For example, the sum (SUM) of the two database fields NUM1 and NUM2 is defined as {NUM1} + {NUM2}. To make data entry easier, you can drag a database field from the Fields pane at the bottom of the Add New Field dialog box into its correct location in the expression. The database field is automatically enclosed in curly brackets when you add it to the expression.

NULL values in computed field expressions

A NULL field is a field in which no data has been entered. Any expression that receives a NULL parameter returns NULL, and this is often not an acceptable result. For example, the following expression returns the sum of three numeric fields:

{Field1} + {Field2} + {Field3}

However, if either Field1 or Field2 and/or Field3 is null, the expression returns NULL.

You can use the IFNULL function to return a value of one of the fields in the expression, or a zero value. For example, if you use the IFNULL function to define the allowed returned value:

IFNULL({Field1},0,{Field1}) + IFNULL({Field2},0,{Field2}) + IFNULL({Field3},0,{Field3})

then the field will return an acceptable result.

To add a computed field

The following example is simply a high-level example of the typical approach used to define a computed field expression.

  1. On the New Field dialog box, enter the name for the computed field and select Computed for the field type.
  2. In the Computed Field Definition pane, enter the expression for the computed field that results in the difference between the Date of Birth and the Current Date (in years) being displayed in the Current Age field. For example:
    1. Enter the YEARDIF function followed by an open left parenthesis: YEARDIF (
    2. In the Data Folder pane, open the Demographics folder, and drag and drop the Date of Birth field after the open left parenthesis. The expression now looks like this: YEARDIF ({Demographics\Date of Birth}
    3. After the right curly bracket, enter a comma followed by a space and then the system constant CURRENT DATE. Complete the expression with a closing right parenthesis. The complete expression now looks like this: YEARDIF ({Demographics\Date of Birth}, CURRENT DATE)
  3. Click Test.
    1. If the definition is acceptable, then a message opens stating that the expression is OK.
    2. If the definition is not acceptable, then a message opens indicating that there is an error in the expression.
    3. Click OK to close the message.
  4. If the expression is acceptable, then continue to any other necessary tasks for the field, or click Add to add the field to the database.
  5. If the expression has an error, continuing modifying and testing the expression until it is acceptable, then continue to any other necessary tasks for the field, or click Add to add the field to the database.
Adding a Summary Field

A summary field provides summary information for a given column on a per pedigree basis. Summary functions can be carried out on all fields that are not contained in tables. (The fields can be contained in lookup tables). When you add a summary field, you must specify the type of summary value (Average, Count, Maximum, Minimum, or Sum) that is to be returned in the field. Summary fields allow you to summarize data from the database field type directly below it – for example:

  • Pedigree-level fields summarize Individual-level data
  • Individual-level fields summarize Sample-level data
  • Sample-level fields summarize Sample-level data (for sub-samples)
To add a summary field
  1. On the New Field dialog box, enter the name for the summary field and select Summary for the field type.
  1. In the Define the Summary Field pane, do the following:
    1. Select the Summary type. All summaries are calculated on a per pedigree basis. Available values are:
      • Avg—Calculate the average value of a field.
      • Count—Return the total count of items in a field.
      • Max—Return the maximum value in a field.
      • Min—Return the minimum value in a field.
      • Sum—Return the sum total of a numeric field.
    2. Select the field in the pedigree that you are summarizing.
  2. Define a query to filter the data:
    1. Right-click the dark grey area inside the query window and choose Add Row. A field chooser window will open.
    2. Select the desired field and choose OK.
    3. Back in the query window, choose the query function and enter the query value.
    4. Add additional rows to the query window as needed.
  3. Continue to any other necessary tasks for the field, or click Add to add the field the database.
Adding a Table Summary Field

A table summary field is a computed field that summarizes the data for a given column in a given table. For example, you might add a table called Visit Record with a field in it called Visit Date and you want to see what the most recent visit date is for a specific patient. You can add a table summary field called Most Recent Visit Date that displays the most recent visit date for a patient who has five distinct visit date entries in the Visit Record table.

To add a table summary field
  1. On the New Field dialog box, enter the name for the table summary field and select Table Summary for the field type. Choose the table field you want to summarize and click OK.
  2. In the Define Table Summary field pane, select the Summary Function. Available values are:
    • Avg – Calculate the average value of a field.
    • Count – Return the total count of items in a field.
    • Max – Return the maximum value in a field.
    • Min – Return the minimum value in a field.
    • Sum – Return the sum total of a numeric field.
  3. Select the field in the table that you are summarizing from the Based on Field drop-down.
    • If you choose the Count function, this dropdown will disappear. Count functions are configured entirely in the Query window.
  4. Optionally you can define a query to further filter the data:
    • Drag a field (you can select multiple subfields by using CTRL + click) from the Table SubFields pane to the Query pane then choose a Query Operator type and enter the Query Value.
  5. Continue to any other necessary tasks for the field, or click Add to add the field the database.
Copying Fields between Databases

When you are creating a new database or modifying an existing database, you have the option of adding new fields “from scratch” to the database; however, if an existing database already contains the needed fields, you can simply copy these fields. When you copy fields between databases, if any fields have the same name and are of the same or different type, then a prompt opens asking you if you want to overwrite the original field and all of the data in the field. You can select to overwrite the original field and all its data, or you can leave the original field and its data as is.

To copy fields between databases
  1. Log in to the database from which you are copying the fields.
  2. On the Progeny main window navigation bar, click the Fields button. The Fields module opens.
  3. If you are copying all the data fields for all the record types, go to Step 4; otherwise, do one of the following:
    1. To copy only selected fields, in the left pane of the Fields window, open the folder that contains the fields that are to be copied, and then in the right pane of the main window, select the fields (CTRL-click to select multiple fields).
    2. To copy all the fields for a level (pedigree, individual, sample, marker), in the left pane of the Fields window, select the record type. For example, to copy all the Individual data fields, then select Individual Data Fields.
  4. On the main menu, click Fields > Save Fields as Text, and then select one of the following:
    1. Save Selected Fields.
    2. Save All < > Data Fields, where < > can be Individual, Pedigree, Sample Data, or Marker Data, for example, Save All Individual Data Fields.
    3. Save All Data Fields.
  5. In the Open dialog box, browse to the location where the copied fields are to be saved, enter a name for the file that contains the copied fields, and then click Open. A pop-up window will confirm the fields were successfully saved.
  6. Log out of the database from which you are copying the fields, and then log in to the database into which you are copying the fields.
  7. On the navigation bar, click the Fields button. The Fields module opens.
  8. On the main menu, click Fields > Load Fields from Text. The Open dialog box opens.
  9. Browse to and select the text file that you saved, and then click Open.
    • If none of the fields in the text file has the same name as any of the fields in the database into which you are importing the fields, then the Import Fields dialog box opens. The dialog box indicates the number and type of fields that were successfully imported into the database; otherwise, for each matching field, a prompt opens that asks you if you want to overwrite the original field and all its data. Click Yes to overwrite the original field and all its data, or click No to leave the original field and all its data as-is. After you have responded to the prompt for each matching field, the Import Fields dialog box opens.
  10. When the import is complete, click Close to close the Import Fields dialog box.
Setting Validations for a Database Field

When you are adding or editing a database field, you have the option of setting validations for the field. Validations guarantee that every data value that is entered into the field is correct and accurate. Three types of field-level validations are available—data entry rules, field validation settings, and dependent validations. If field validation settings and/or dependent validations are violated when you attempt to save data, then validation errors are generated.

To set validations for a database field
  1. If the field is already open in the Add New Field dialog box, then go to Step 3; otherwise, on the navigation bar, click the Fields button to open the Fields module.
  2. In the left pane of the Fields module, open the folder that contains the field for which you are setting the validations, and then in the right pane of the window, double-click the field to open the field in the Edit Field dialog box.
  3. Open the Validations tab on the Add New Field/Edit Field dialog box.
  4. Set the validations for the field.
    • Data Entry Rules—these rules are applied only at data entry time. (Data entry in a datasheet, spreadsheet, and the Update Workflow window.)
    • Required Field—you must enter a value in the field before you can save the data for the individual.
    • Must Confirm Data Entry—You are prompted to re-enter the data in the field before you can save the data. If a field has the Must Confirm Data Entry validation assigned to it, then a Confirm New Value dialog box opens for repeating the entry.
    • Field Validation Settings—these settings are applied at the database level and are applied at all times (data entry, imports, and so on).
    • Unique value—you must enter a unique value in the field wherever it is used (pedigree, individual, or sample).
    • Within Specific Range—Indicates the allowed range of values (numbers, dates, and so on) for the field.
    • Specific Mask—Defines how you must enter data into the field maintain consistency and to make your database easier to manage. For example, with the underscore character (_) representing a single character, an input mask of (___) ___-____ would require a phone number like this: (574) 968-0822.
    • Maximum Number of Characters—indicates the maximum number of characters that you can enter into the field.
    • Dependent Validation Settings—these settings are applied at the database level and are applied at all times (data entry, imports, and so on).
    • Use Dependent-Validation – specify the relation that the field must have with another field of the same type.
  5. Continue to any other necessary tasks for the field, or click Add to add the field the database.
Data validation errors

If field validation settings and/or dependent validations are violated when you attempt to save data, then the fields with the validation errors are highlighted in red on the affected datasheet and spreadsheet and a Validation Errors dialog box opens. This dialog box lists the validation errors on a field by field basis. You can double-click on a field that is listed in error to go the field in the open datasheet or spreadsheet.

Adding, Editing and Deleting Database Folders

Folders provide a means of organizing your database fields. You can add as many folders and subfolders as needed to support your business needs. After you add a folder, you can set the security for the folder as well as for fields that are in the folder. You can also edit the security for a database folder. The default security settings for a folder are set to Read and Write for All Users. You can add more classes if needed. After you add additional user classes, all the user classes will be displayed. You can delete a folder only if the folder is empty (contains no database fields).

To add a database folder
  1. On the navigation bar, click the Fields button to open the Fields module.
  2. On the Fields module toolbar, click the New Folder icon. The New Folder dialog box opens.
  3. In the Folder Name field, enter the name for the new folder.
  4. Select the location for the new folder. For example, to create a folder at the root level for Individual data, select Individual Data Fields. To create a folder that is a subfolder of Individual Demographic data, under Individual Data Fields, select the Demographics folder.
  5. Click Save. A message opens indicating that the folder was successfully added.
  6. Click OK. The message closes. You return to the Fields module. The newly added folder is displayed in the window.
    • When you create database fields, you typically set the security for the fields on a field by field basis; however, if you want to apply the same security settings for every single field that is contained in the same database folder in a single step, then you can apply the settings at the folder level.
To edit a folder

You can rename a folder, and you can change the security settings for a folder.

  • To rename a folder, triple-click on the folder in the Fields window to select it, or right-click the folder and select Edit Folder Security…, and then modify the name as needed.
To delete a database folder

You can delete a selected database folder only if the folder is empty (contains no database fields). If you want to delete a database folder that contains fields, you must first delete all of the fields in the folder.

  1. On the navigation bar, click the Fields button to open the Fields module.
  2. In the left pane of the Fields window, right-click on the folder that you are deleting, and on the context menu that opens, select Delete Folder.
    • A message opens asking you to confirm the deletion of the folder.
  3. Click OK to close the message and delete the folder
Setting Database Field Security for New Fields
  1. From the Fields module, click the New Field menu button
  2. On the New Data Field dialog box, select the Security
  3. Do one or more of the following:
    • Modify the security for All Users or for the different classes of users.
    • Click Add Class to open the New User Class dialog box to create a new user class, and then set the security for the class.
Setting Database Field Security for Existing Fields

Using database field security we can specify which users will have access to certain fields. It gives us the flexibility to differentiate between the users that can view and enter data into fields for which they have been given permission.

  1. On the navigation bar, select the Fields
  2. In the left pane open the folder that contains the field for which you are setting the security, right-click on the field, then click Field Security Level on the context menu that opens up.
  3. The Field Security dialog box opens.
  4. Do one or more of the following:
    • Modify the security for All Users or for the different classes of users.
    • Click Add Class to open the New User Class dialog box to create a new user class, and then set the security for the class.
To set database Field folder security
  1. On the navigation bar, select the Fields module button to open the Fields
  2. On the Fields window toolbar, right-click on the folder for which you are setting the security, and on the context menu that opens, click Edit Folder Security.
  3. The Modify Data Folder Settings dialog box opens. The name of the selected database folder is displayed in the Folder Name field.
  4. Do one or more of the following:
    • Modify the security settings for All Users or for the different classes of users.
      • Read D Folder?—Open and view the contents of the database folder.
      • Add Field?—Add database fields to the folder.
      • Del Field?—Delete database fields from the folder.
      • Modify Field?—Modify database fields in the folder.
    • Click Add Class… to open the New User Class dialog box to create a new user class, and then set the folder security for the new class being added.
    • If you have assigned field-level security to one more field in the folder, and you want to override the security settings for these fields based on the security settings at the folder level, click Override Field Level Security, and then set the appropriate field-level security for the different classes of users.
      • Field Read? – View the data in the field.
      • Field Write? – Write data to the field.
  5. Click Save once the proper security settings have been assigned in the Modify Data Folder Settings window, then a message opens indicating the settings for the folder were successfully changed. Click OK to close the message and return to the Fields window.

System Fields

Individual Fields

  •  Adopted
    • 0 = not adopted
    • 1 = adopted in
    • 2 = adopted out
  • Deceased Status – the vital status of the individual
    • 0 = living
    • 1 = deceased
  • Degree of Relation – degree of relation to the proband
    • 0 = infinity
    • 1 = 1st degree
    • 2 = 2nd degree
    • [3-x] = 3 to xth degree, depending on the number
  • Degree of Relation2
    • 0 = unknown
    • 1 = proband
    • 2 = sibling
    • 3 = child
    • 4 = parent
    • 5 = paternal grandparent
    • 6 = paternal uncle/aunt
    • 7 = maternal grandparent
    • 8 = maternal uncle/aunt
    • 13 = nephew/niece
    • 14 = spouse
    • 15 = brother/sister in law
    • 16 = identical twin
  • Father ID – the UPN of the father
  • Folder – the folder that the individual is saved in
  • Folder Path – the full path of the folder that the individual is saved in
  • G:P – generation number:person number
  • Gender
    • M = male
    • F = female
    • U = unknown
  • Gender Unknown
    • 0 = gender is known
    • 1 = gender is unknown
  • Genotyped – Genotype data; whether genotypes have been imported for this individual (LAB feature)
    • 0 = no genotype data for individual
    • 1 = yes
  • Global ID – the unique number given by Progeny to each individual in the database
  • Individual Created By – the user who created the individual
  • Individual Created Date – the date the individual was created
  • Individual Last Modified –  the date the individual was last modified
  • Individual Modified By – the user who last modified the individual
  • Individual Name – the default individual name; pedigreename_UPN
  • Invite Count – counts the number of invitations that were sent to the individual
  • Marked By – the Marked by symbol of the individual
    • 0 = none
    • 1 = Plus (+)
    • 2 = Minus (-)
    • 3 = Asterisk (*)
  • Maternal-Paternal – maternal/paternal relation
    • Both
    • Pat = Paternal
    • Mat = Maternal
  • Mother ID – the UPN of the mother
  • No Issues – no children by choice vs because of infertility
    • 0 = no data
    • 2 = no issue
    • 3 = infertile
  • Pedigree name – the name of the pedigree
  • Primary Sample – the name of the primary sample for the individual
  • Proband status
    • 0 = not proband
    • 1 = proband
  • SAB – Spontaneous Abortion
    • 0 = no spontaneous abortion
    • 1 = spontaneous abortion
  • Sample Count – the number of samples that are attached to the individual
  • Twin Relationship
    • Dizygotic
    • Monozygotic
    • Unknown
  • Twin status – value for identifying twins/multiples
    • 0 = not twin/multiple
    • 1 = 1st set
    • 2 = 2nd set
    • [3-x] = 3rd or xth set
  • UPN – unique person number within a pedigree
Pedigree Fields
  • Audit Status – Whether or not this pedigree and its individuals are being audited
    • 0 – audit if off
    • 1 – audit is on
  • FHQ Completed Date – the date the questionnaire was completed
  • FHQ Last Invite Created By – the user who last sent a questionnaire to the proband
  • FHQ Last Invite Sent Date – the date the last questionnaire was sent
  • FHQ Num Invites Sent –  the number of invites that have been sent
  • FHQ Status – the status of the questionnaire
    • In Progress
    • Complete
  • Folder – the family that the pedigree is located in
  • Folder Path – the full path for the location of the pedigree
  • Last Modified – the date the pedigree was last modified
  • Modified By – the user who last modified the pedigree
  • Pedigree Created By – the user who created the pedigree
  • Pedigree Created Date – the date the pedigree was created
  • Pedigree name – the name of the pedigree
Sample Fields
  • Barcode
  • Container Barcode
  • Container Name – the name of the container that the sample is located
  • Container Path –  the full location of where the sample is located
  • Container Type
  • Order Number
  • Parent Sample Name
  • Position – the well position of the sample
  • Sample Audit Status
    • On
    • Off
  • Sample Created By – the user who created the sample
  • Sample Created Date – the date the sample was created
  • Sample Folder – the folder where the sample is located
  • Sample Folder Path – the full folder path where the sample is located
  • Sample Last Modified –  the date the sample was last modified
  • Sampled Modified By – the user who last modified the sample
  • Sample Name – the name of the sample
  • Volume
  • Workflow – the name of the workflow that the sample is located
  • Workflow Stage – the specific stage of a workflow that the sample is located

Ambry Order

Progeny has integrated the ability to order genetic tests from Ambry Genetics through Ambry Port. Through Progeny, users can:

  • Complete an insurance Pre-Verification form
  • Order genetic tests
  • Check the status of orders
  • View the genetic test results report
  • Save the genetic test results report as a file on your computer

This eliminates the necessity of switching to another application for these tasks.

Registering

To be able to use the order feature, clinicians need to contact us at https://progenygenetics.com/support/contact/ 

Once the form has been submitted, you will be contacted by Progeny Support to setup and activate the Ambry button in Progeny.

Setup in User Maintenance

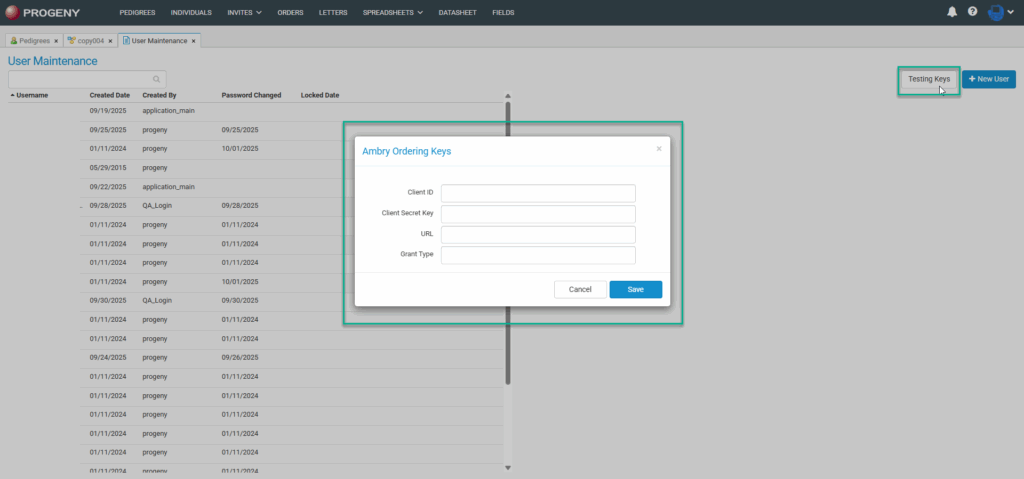
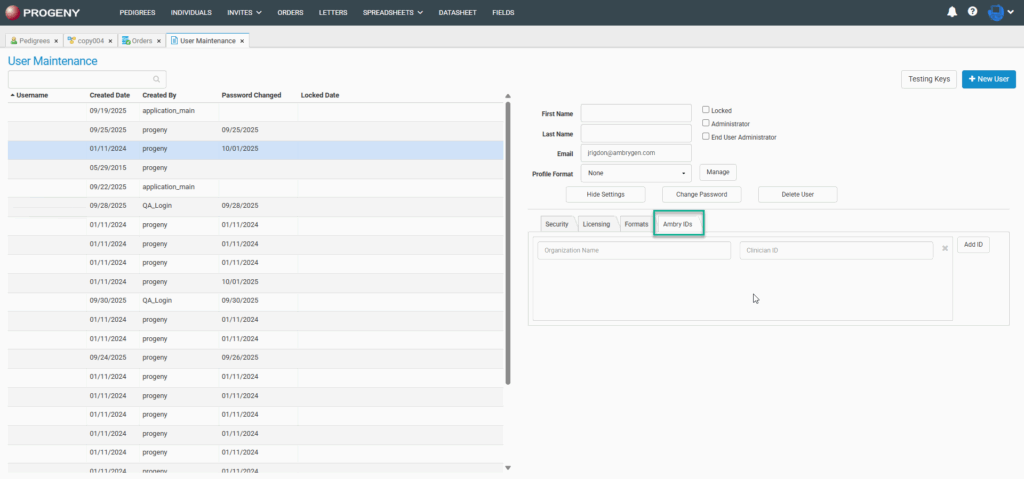
When going into User Maintenance, click on ‘Testing Keys’ and input Ambry Ordering Keys, exactly as provided by Progeny Support.

From here choose the user you would like to add the Ambry credentials for. Once the user is chosen, click the Ambry IDs tab, and from here enter the Organization Name and Clinician ID.

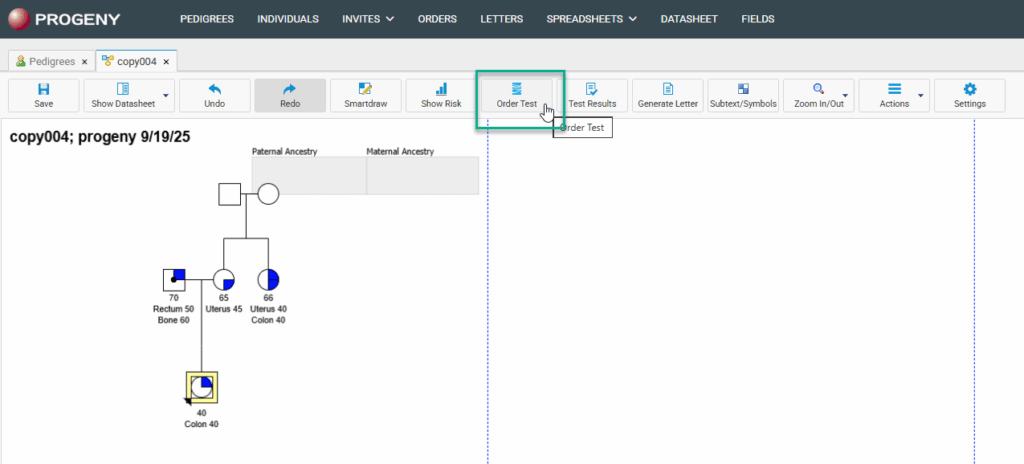
After adding the credentials to the user, open a pedigree. From the pedigree choose the Order Test button. From here select the Map Fields button, mapping these fields will allow the data to auto-fill for the selected individual.

When clicking map fields you will be brought to this page, and have the ability to map the fields you are using to capture the data for each field.

Placing Orders

You can select the individual you would like to order a test for from the individual’s pedigree or the individual’s datasheet. To order from the pedigree, first, click the individual you would like to order the test for, then click the Order Test button.

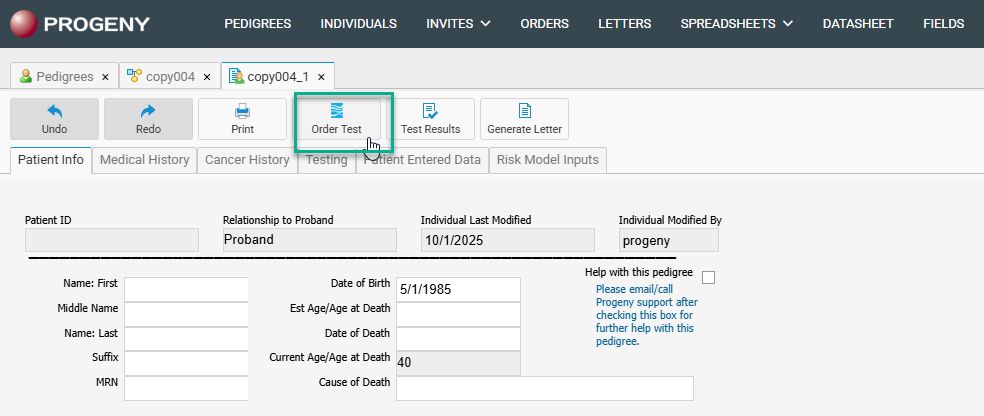
To order from the individual’s datasheet, go into the individual’s datasheet and choose the Order Test button at the top.

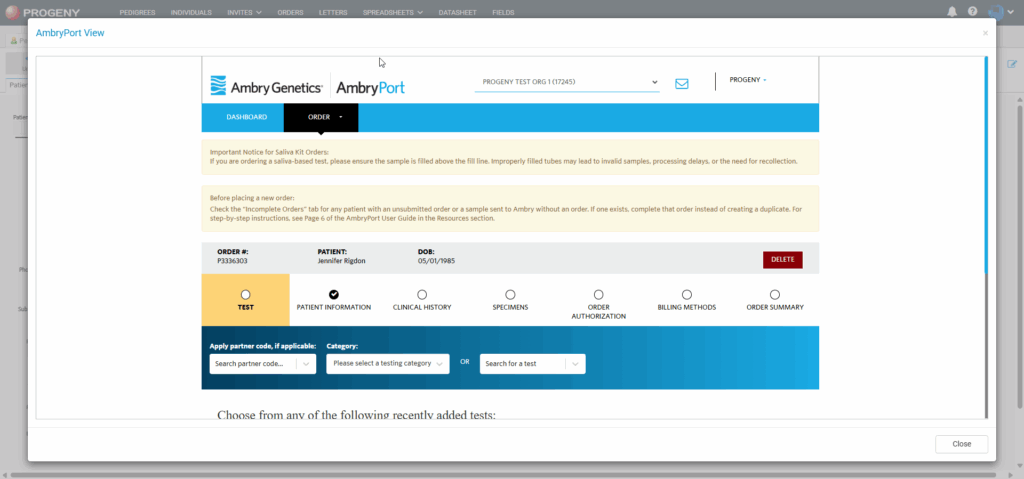
When selecting Continue with Pre-verification or Continue with Order, you will be taken to the Ambry Port view, and be prompted to fill out the TRF (Test Requisition Form).

Spreadsheets Module

Spreadsheets

Spreadsheets and Queries are used for searching for specific field data and displaying the results in a spreadsheet. You can search either your individual or pedigree level fields.

  1. To get to the Spreadsheets module, first choose Spreadsheets at the top of the page. You may then choose whether you would like to run an Individual or Pedigree Spreadsheet.
  2. The folders pane allows you to see the different folders for saving and loading spreadsheet formats.
  3. Once a folder has been selected, all your saved spreadsheet formats in that folder will populate.
  4. The New Spreadsheet button allows you to build a new Individual or Pedigree Spreadsheet, depending on which Spreadsheet module was chosen. Once you build a spreadsheet you can save it as a format, then re-run and edit as needed.

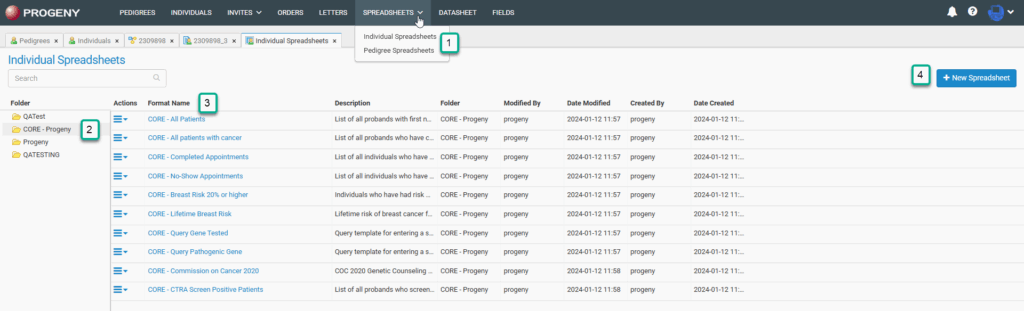
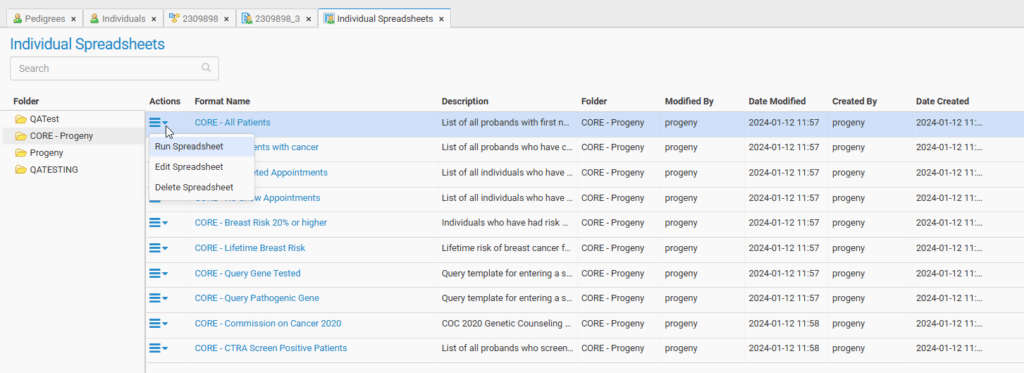
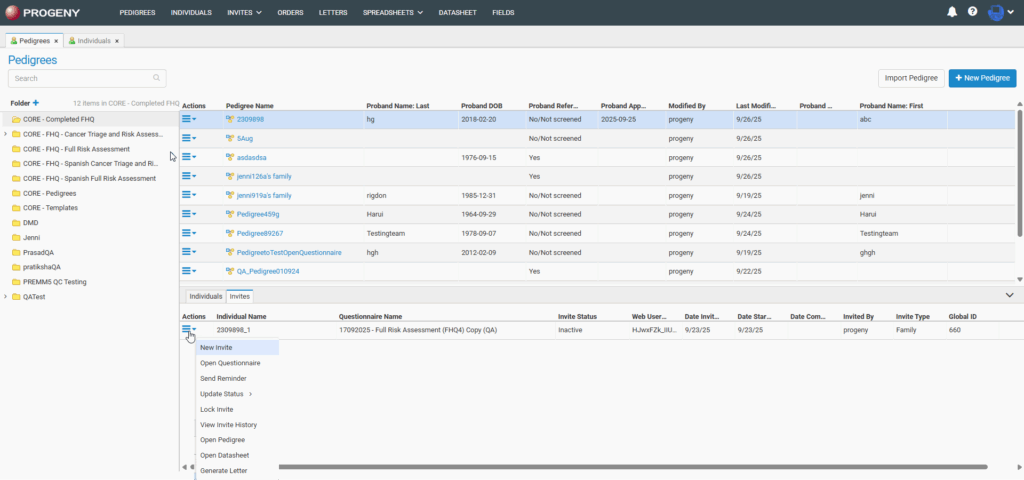
The actions menu, which can be accessed by clicking the three bars in the Actions column, gives the option to run, edit, and delete a spreadsheet.

  • Run Spreadsheet – runs the specified spreadsheet.
  • Edit Format – allows you to edit the current format of the spreadsheet.
  • Delete Spreadsheet – deletes the specified spreadsheet.

When selecting Edit Format you will be brought to the following page, which will allow you to add any fields to the spreadsheet that you would like.

Editing Spreadsheets

To edit an existing format click the Edit Format option from the Actions menu. Here you can select which fields you wish to query, add logical operators to your search, and specify how the results are sorted.

  1. The menu buttons located at the top, allow you to run the current spreadsheet, load a new format, or save the current spreadsheet as a new format.
  2. The Fields pane lists the fields in your database. You can search for fields by typing a portion of the field name into the search bar.
  3. The Columns pane is used to list the columns (fields) you wish displayed on the spreadsheet. The top to bottom ordering of fields in this pane will reflect as left to right columns on the spreadsheet results. You can change the order of the spreadsheet result columns by dragging each field to your desired location, or moving each field up or down using the green arrows located to the right of the column pane.
  4. You can add these fields to the Sort pane or Query pane using the three icons located on the same line as the field when you mouse-over the field. To add to the Sort pane, click the icon with three lines and the arrow facing down. To add to the Query, choose the icon with the magnifying glass. To delete the field, click the red X.
  5. The Sort pane determines the sort order of your query results. Drag fields from the Fields pane into this pane or use the Add to sort icon to copy the field into the Sort pane.
  6. The Query pane is where you can add specific conditions to a field, e.g. the Last Name equals Smith.
Building Queries

Follow these steps to build a Spreadsheet Query:

  1. Select which field(s) you want shown on the spreadsheet results – You can use the search field to quickly find the field you are looking for. Just type in any portion of the field name and click the magnifying glass icon on the right side of the search field.
  2. Drag the field into the Columns and/or Query panes.
  3. From the fields you have dragged into the Columns pane, use the icons available in the mouse-over menu to add it to the Sort or Query panes.
  4. Select whether you would like to sort in Ascending (default) or Descending. You may sort by several fields. The first field will be the primary sort column, the second field the secondary, and so on.
  5. Configure the logical operators, values, Boolean operators, and parentheses (to apply an order of operations) in the Query pane.

When carrying out a multiple fields query, use parentheses to define the order of operations for a query. The order of operations determines the queries that must be carried out first in a series of queries. For example, the below image shows a query that first filters individuals who were diagnosed with Breast cancer at the age of 45. The query then filters individuals who were diagnosed with Fallopian Tube cancer. Because this query uses the OR operator, the query returns individuals who meet either query criteria.

Logical Operators

The following logical operators are available to target your search results:

OperatorDescription
begins withSearch for an item where the specified field contains data that begins with the search criteria. For example, if the query field for individuals is the Weight field, and you specify Weight begins with 17, then only those individuals for whom the weight begins with a 17 (17 or 170-179) are returned in the search.
containsSearch for an item where the specified field contains any instance of the search criteria. For example, if the query field for individuals is the Weight field, and you specify Weight contains 75
does not begin withSearch for an item where the specified field contains data that does not begin with the search criteria. For example, if the query field for individuals is the Weight field, and you specify Weight does not begin with 17, then only those individuals for whom the weight does not begin with a 17 (0-16, 18 -169, and so on) are returned in the search.
does not containSearch for an item where the specified field does not contain any instance of the search criteria. For example, if the query field for individuals is the Weight field, and you specify Weight does not contain 75, then all individuals who have a weight in which 75 does not appear (0-74, 76-174, 176-274, and so on) are returned in the search.
does not end withSearch for an item where the specified field contains data that does not end with the search criteria. For example, if the query field for individuals is the Weight field, and you specify Weight does not end with 75, then only those individuals for whom the weight does not end with a 75 (0-74, 76-174, 176-274, and so on) are returned in the search.
does not equalSearch for an item that meets any criteria other than the specified value. For example, if the query field for individuals is the Weight field, and you specify Weight ≠ 175, then only those individuals whose weight does not equal 175
ends withSearch for an item where the specified field contains data that ends with the search criteria. For example, if the query field for individuals is the Weight field, and you specify Weight ends with 75, then only those individuals for whom the weight ends with a 75 (75, 175, 275, and so on) are returned in the search.
equalsSearch for an exact match. For example, if the query field for individuals is the Weight field, and you specify the search criteria as Weight = 175, then only those individuals whose weight is exactly 175 are returned in the search.
inAllows for comma separated values to be entered into a field so that multiple items can be searched and returned in the search results. For example, if the query field for individuals is the Weight field, and you specify Weight in 75, 80, 85, 90, then all individuals whose weight is exactly 75, 80, 85, or 90 are returned in the search.

Note: You can copy and paste a list of values from .csv file into a query of this type.

is blankSearch for an item where the specified field contains absolutely no data. For example, if the query field for individuals is the Weight field, and you specify Weight is blank, only those individuals for whom data has not been entered into the Weight field are returned in the search.

Note: A zero (0) is an actual data value. This means that if a zero (0) has been entered into the Weight field for an individual, then the individual is not returned in the search.

is greater thanSearch for an item that is greater than the specified value. For example, if the query field for individuals is the Weight field, and you specify Weight > 175, then only those individuals whose weight is greater than 175 are returned in the search.
is greater than or equal toSearch for an item that is greater than the specified value or is an exact match for the specified value. For example, if the query field for individuals is the Weight field, and you specify Weight > 175, then those individuals whose weight is exactly 175 or greater are returned in the search.
is less thanSearch for an item that is less than the specified value. For example, if the query field for individuals is the Weight field, and you specify Weight < 175, then only those individuals whose weight are less than  175 are returned in the search.
is less than or equal toSearch for an item that is less than the specified value or is an exact match for the specified value. For example, if the query field for individuals is the Weight field, and you specify Weight < 175, then those individuals whose weight is exactly 175 or less are returned in the search.
is not blankSearch for an item where the specified field contains any valid data. For example, if the query field for individuals is the Weight field, and you specify Weight is not blank, all individuals for whom data has been entered into the Weight field are returned in the search.

Note: A zero (0) is an actual data value. This means that if a zero (0) has been entered into the Weight field for an individual, then the individual is returned in the search.

is not inAllows for comma separated values to be entered into a field so that multiple items can be searched and excluded from the search results. For example, if the query field for individuals is the Weight field, and you specify Weight is not in 75, 80, 85, 90, then all individuals whose weight is not exactly 75, 80, 85, or 90 are returned in the search.

Note: You can copy and paste a list of values from a .csv file into a query of this type.

is not like

A pattern matching search based on the keyword “like.” An underscore (_) is used to match exactly one character, and the percent sign (%) is used to indicate any number of characters. For example, if the query field for individuals is the Weight field, then to search for all individuals whose weight is not like 75, select “is not like” as the operator and enter %75 in the Value field. The % indicates that any number of characters can come before 75, for example, 0 -74, 176 – 184, 186 – 274, and so on.

Note: You can use the % anywhere in the search criteria, for example, 75% or 7%5.

like

A pattern matching search based on the keyword “like.” An underscore (_) is used to match exactly one character, and the percent sign (%) is used to indicate any number of characters. For example, if the query field for individuals is the Weight field, then to search for all individuals whose weight is like 75, select “like” as the operator and enter %75 in the Value field. The % indicates that any number of characters can come before 75, for example, 75, 175, 275, and so on.

Note: You can use the % anywhere in the search criteria, for example, 75% or 7%5.

Spreadsheet Results

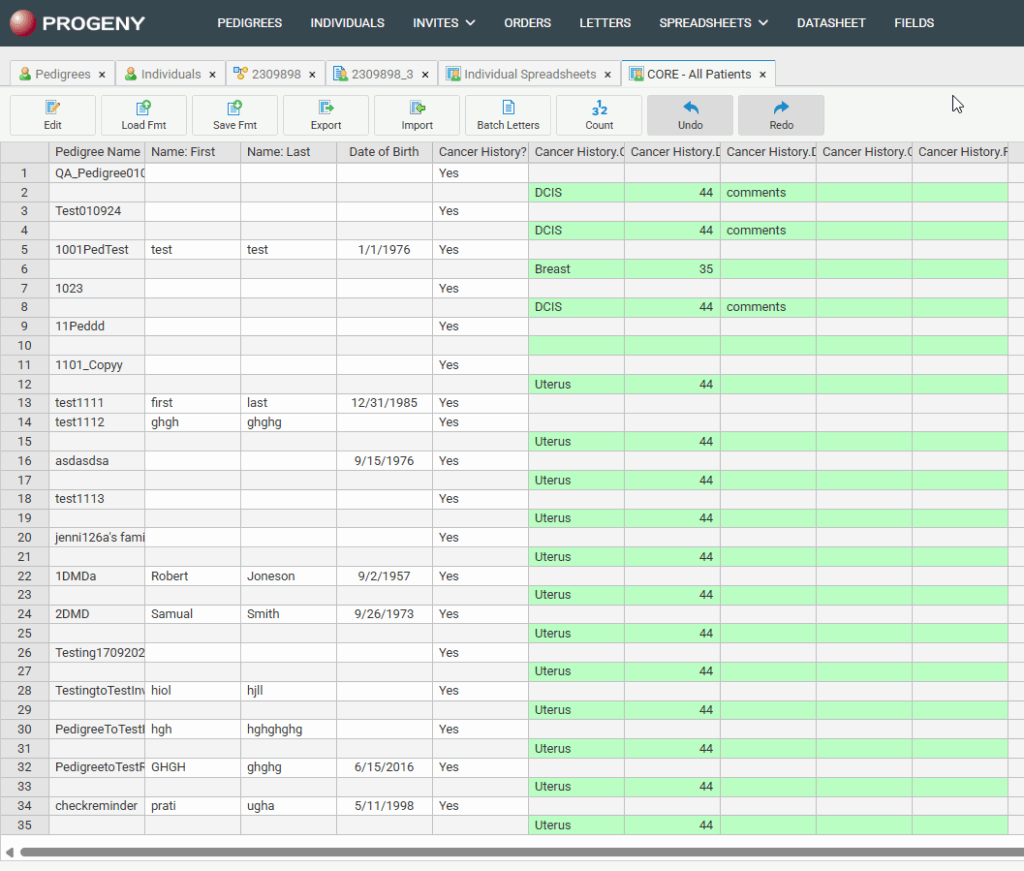
The Menu Buttons give you many different options.

  • Edit – edits the format of the current spreadsheet
  • Load Format – loads a different spreadsheet format
  • Save Format – saves the current spreadsheet format
  • Export – allows you to export the current spreadsheet data
  • Batch Letters – allows you to generate letters to everyone in the spreadsheet
  • Count – counts all the individuals, pedigrees, or samples (depending on the selected type) in the spreadsheet
  • Undo – allows any changes to be undone if any data was added through the spreadsheet
  • Redo – allows you to redo any changes you made

When right-clicking on an individual, if it is an individual spreadsheet, you will be given the option to open the pedigree or the individual datasheet.

You can resize the column headings by hovering over the line between column headings until a vertical line icon with arrows appears, and dragging the icon to the column width you would like. If you right-click a column heading, you can filter the data using the specified column.

Editing Data within the Spreadsheet

From the spreadsheet you have the ability to edit the field. You can do this by going to the individual you would like to add data for, and going to the field and inputting the data.

Loading, Saving, and Exporting Formats

To load a different spreadsheet while in another spreadsheet, first click Load Fmt. A pop-up screen will then appear with previously saved spreadsheet formats to choose from.

To save a format, first, click Save Fmt. A pop-up screen will then come up giving you the ability to save the spreadsheet.

  1. In this box, enter the name you would like the spreadsheet to have.
  2. In this box, you have the ability to enter a description of the spreadsheet

To export a spreadsheet, first, click Export. The following pop up will then come up, giving you different options for exporting the spreadsheet.

View Video: Run a Spreadsheet

View Video: Enter Data on a Spreadsheet