Individuals Module can be drilled down to display Only Probands, or All Individuals.
New Individual Button
An individual who is not a member of a pedigree is referred to as a singlet. After creating a singlet, the singlet can be moved to an existing pedigree or to a new pedigree. To add individuals to your database without attaching them to a pedigree, click the + New Individual button.
The Add New Individual dialogue box opens. Enter the name of the new individual, select the gender for the individual, then select the data folder to which the individual is being added. Once you click Save, a message will then indicate that the individual was successfully created.
This will open the Add New Individual window.
Select a folder to save the individual into.
Type the name of the individual.
Select the sex for the individual.
If you would like to launch a new questionnaire for this individual, click Launch New Questionnaire.
If you would like to just create the individual, select Create.
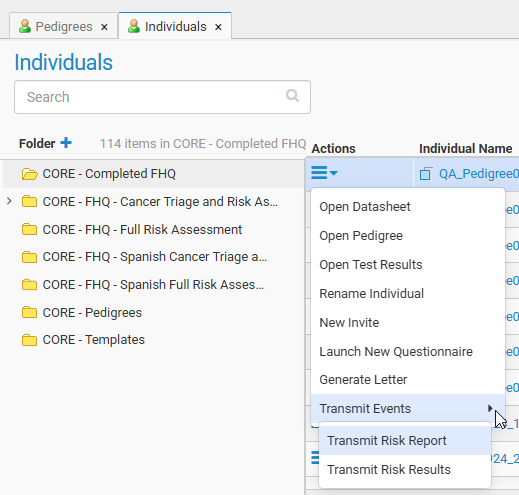
Individuals Action Menu (Individual that is within a pedigree)
Open Datasheet – opens the individual datasheet for individual
Open Pedigree – opens the pedigree canvas for pedigree in which individual lives
Open Test Results – opens the Test Results module for individual
Rename Individual – renames the individual
New Invite – creates new FHQ invite for individual
Launch New Questionnaire – launches new FHQ for individual
Generate Letter – generates new letter for individual
Transmit Events
Transmit Risk Report – transmits risk report to EHR for individual
Transmit Risk Results – transmits risk results to EHR for individual
Individuals Action Menu (singlet, individual not within a pedigree)
Open Datasheet – opens the individual datasheet for individual
Open Test Results – opens the Test Results module for individual
Move to pedigree – allows user to select to move individual to an existing pedigree or a new pedigree
Rename Individual – renames the individual
Change Sex – allows user to change sex for individual
Delete Individual – allows user to delete individual
New Invite – creates new FHQ invite for individual
Launch New Questionnaire – launches new FHQ for individual
Edit Individual Security – allows for individual security configuration
Generate Letter – generates new letter for individual
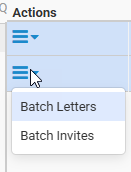
Multiple individuals selected – Actions Menu
Batch Letters – generates a letter for all selected individuals
Batch Invites – sends a new invitation to all selected individuals
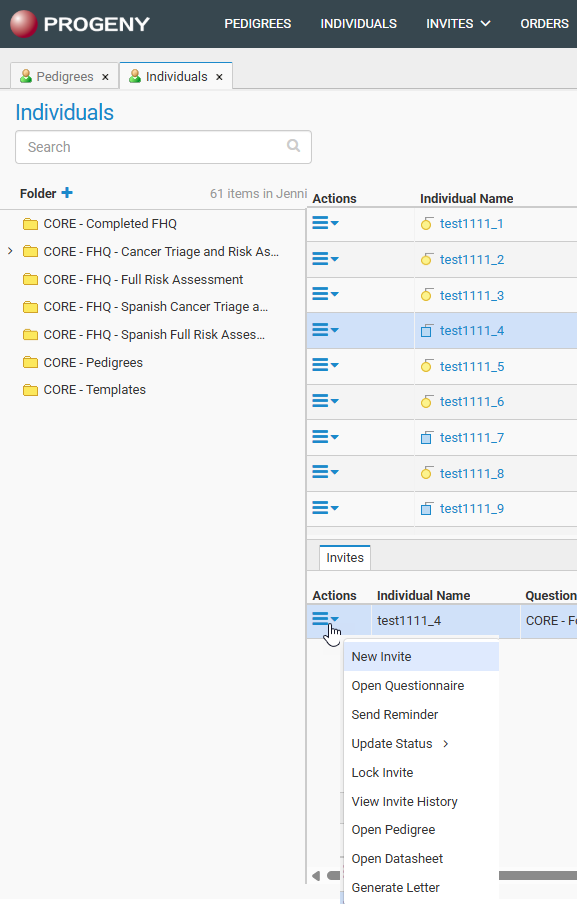
Invites Action Menu
New Invite – sends a new invitation to the individual
Open Questionnaire – opens existing questionnaire
Send Reminder – sends a reminder email for the individual
Update Status – manually changes status of the questionnaire:
Completed Manually
Inactive
Reviewed
Lock Invite – locks the invitation so that it cannot be accessed
View Invite History – shows a history log of the invite
Open Pedigree – opens pedigree for individual (not available if singlet)
Open Datasheet –opens the individual’s datasheet for the individual
Generate Letter – generates new letter for individual
A spreadsheet is a table of values that are arranged in rows and columns. In Progeny, you use spreadsheets to organize multiple individuals, pedigrees, samples, or markers by rows and the fields for entering the corresponding data by columns.
Spreadsheet Types
Unlike a datasheet, which displays the data for a single individual, pedigree, sample, or marker, a spreadsheet displays the data for all individuals, all pedigrees, all samples, or all markers. You can create four different types of spreadsheets in Progeny: Individual spreadsheets – Individual spreadsheets are used to enter and store information about individuals. An individual spreadsheet can contain individual, pedigree, and marker fields.
Pedigree spreadsheets – Pedigree datasheets are used to enter and store information about pedigrees. A Pedigree datasheet contains only pedigree database fields.
Sample spreadsheets – Sample spreadsheets are used to enter and store information about samples. A Sample datasheet contains all four types of Progeny database fields—individual, pedigree, sample, and marker fields.
Marker spreadsheets – Marker spreadsheets are used to store information about markers. A Marker datasheet can only contain marker fields.
Generating a Spreadsheet
Unlike a datasheet, which displays the data for a single individual, pedigree, sample, or marker, a spreadsheet that you generate from the Progeny main window displays the data for all individuals, pedigrees, samples, or markers in a Progeny database. A spreadsheet that is generated for all individuals, all pedigrees, and so on in a Progeny database is sometimes referred to as a global spreadsheet.
To generate a spreadsheet
From the Progeny main screen, click the down arrow next to the Indiv SS You can choose either Create New Individual Spreadsheet or Individual Spreadsheet Formats.
If you choose Create New Individual Spreadsheet, a new tab opens with Fields, Columns, Sort, and Query panes.
If you choose Individual Spreadsheet Formats, a new tab opens allowing you to search for, edit, and run saved spreadsheet formats.
In the Create New Individual Spreadsheet menu, drag fields into the Columns, Sort, or Query panes.
The search bar above the field chooser on the left provides a full-text search across your fields. You can enter a whole or partial field name and the search function will display all possible matches.
If you add a field to the Columns pane and hover over its row, you will see these three icons on the right side:
Adds the row to the Sort pane.
Adds the row to the Query pane.
Deletes the row from the Columns pane.
To the right of the Columns, Sort, and Query panes are three buttons stacked vertically:
Moves the selected field/row up one position in the order
Moves the selected field/row down one position in the order
This button will delete all fields/rows within the selected pane.
For all fields, other than table fields, the order in which the fields are dragged is the order in which they will appear in columns (from left to right) in the spreadsheet.
Optionally, to sort the data in the spreadsheet, drag fields from the left side into the Sort pane or click the Sort button on one or more of the rows in your Columns pane.
Use the following two buttons to change the sort order.
For each row in the sort order, you can choose between Ascending (A-Z) or Descending (Z-A) order.
Click the Run button to generate the spreadsheet. If any data is entered into the spreadsheet, click the Save button to commit the changes. Lastly, if you have run the spreadsheet and want to make changes to the columns, sort order, or query, click the Edit button to return to the Create New Individual Spreadsheet section.
If you want to view the pedigree of an individual within the spreadsheet or see an individual’s datasheet, right click on the first column displayed for that person’s row and choose either Open Pedigree or Open Individual Datasheet.
Tables in spreadsheets
When you build a spreadsheet, tables are no longer displayed as an individual entity but are broken apart with each of their table subfields being displayed as a distinct entity.
Above is a group of subfields from a table within the Create New Individual Spreadsheet section.
In previous versions of Progeny, you would add the table to the Columns pane then check the boxes for each table subfield you wanted on the spreadsheet – in Progeny 10 you merely need to drag the individual table subfield into the Columns pane to add it to the spreadsheet format.
In Progeny 10, Lookup Table fields are handled the same way as Table fields (see previous section). Each subfield of the lookup table is displayed in the fields list as a separate entity and you merely need to drag the specific subfield you wish to use in the spreadsheet into the Columns pane.
Entering Data into a Spreadsheet
There are a variety of options for entering data into a spreadsheet, including manually entering data, copying and pasting data, finding and replacing data, using the Fill feature, and importing data. Regardless of the method used, after you have completed data entry in a spreadsheet, click the Save button on the spreadsheet toolbar to save the data.
To manually enter data into a spreadsheet cell
Data entry for the fields in a spreadsheet is very straight forward. Click in the cell and enter the needed data or select the data from a dropdown list. It is possible to enter data into a spreadsheet cell that has no highlighting or one that is highlighted in yellow (a table field). Fields that are highlighted gray are read-only fields, such as system fields or lookup table subfields, and you cannot enter data directly into these fields.
To move from one field to the next within the same row, press the Tab key on your keyboard. To move back a field within the same row, press and hold the Shift key and then press the Tab key. To move from one row to the next, press the Enter key. (Pressing the Enter key does not delete the data in a spreadsheet cell.)
To add more rows to a table in a spreadsheet
Select the individual, sample, pedigree, or marker for which you are adding the data, and on the spreadsheet toolbar, click the Add Row button.
Click in each table cell of the blank row to add the necessary data.
To add data to a lookup table field in a spreadsheet
Click on the lookup table field and select the appropriate value for the field.
On the spreadsheet toolbar, click the Save button.
On the spreadsheet toolbar, click the Run button to populate the table subfields for the lookup table.
To copy and paste data
It is possible to use standard keyboard commands and/or menu commands to copy text data or numeric data from one cell into another. To copy text in a range of cells, click and hold the left mouse button and drag the mouse to select the region that is to be copied. Once selected, you can copy the data using Edit > Copy, right-click Copy or CTRL + C on the keyboard. To paste the copied data, select the area where the data will go then use Edit > Paste, right click Paste or CTRL + V on the keyboard to paste the data.
To find and replace data
The Edit menu contains Find and Replace options that you can to search for data in a spreadsheet, and if needed, replace text or numeric data with another value.
To use the Fill feature
The spreadsheet Fill function can fill blank cells with data from adjacent cells as long as the cells are the same field type. The Fill function is found under the Edit menu and has four options:
Fill Down – fills cells that fall below a selected cell.
Fill Right – fills cells that all to the right of a selected cell.
Fill Up – fills cells that are located above a selected cell.
Fill Left – fills cells that are located to the left of a selected cell.
When filling blank fields that are dropdown list fields, the filled values are stored only in the spreadsheet and not at the database level. For example, the available values for a filled dropdown list field in the spreadsheet are Yes, No, and Pending and then you set all the fields to Pending. Although Pending is displayed in these filled fields, when editing any of these fields, the only available values will be Received, Due, and N/A, which are the values stored in the database for the field.
To fill in Amy Brown as the Referring Physician for Patients2 through 12, select the column that includes Amy Brown as the Referring Physician for Patient 1 and the blank Referring Physician cells for Patients 2 through 12, and on the Edit menu, click Fill > Fill Down.
To fill in the daytime phone as the evening phone number for Patients 1 through 9 select the column that includes the daytime phone number for Patients 1 through 9 and the column that includes the evening phone number for the same patients, and on the Edit menu, click Fill > Fill Right.
To import data into a spreadsheet
It is possible to import data into a spreadsheet from a delimited file. The file can be a comma delimited text file, a tab-delimited text file, or you can specify another delimiter type. You can import flat fields (standard fields) or you can import into table rows. If you are importing flat (standard) fields then the data that is in the spreadsheet and the data that you are importing must be the same field type. If importing dropdown fields, and the data that is being imported has different values than the data in the spreadsheet, then the imported values are stored only in the spreadsheet and not at the database level. For example, if the available values for a dropdown list in the spreadsheet are Yes, No, and Pending and the available values for the corresponding dropdown list in the import file are Received, Due, and N/A, and you set the value in the import file to Received, then after the import, Received will indeed be displayed in the spreadsheet field; however, when editing the field, the only available values will be Yes, No, and Pending, which are the values stored in the database for the field. If importing data into table rows, then the spreadsheet can contain only the table and its subfields. You can import new rows of table data, however, you cannot import into existing rows of table data.
On the spreadsheet toolbar, click the Import The Import Data dialog box opens. Tab Delimited is selected by default.
Select the type of delimited file that you are importing. (If the file is not tab delimited or comma delimited, then you must specify the delimiter that the file uses.)
Specify the values for the following:
Number of Unique Identifiers in the Import File that match columns in the spreadsheet – enter the number of columns in the text file that you are importing that match to the number of columns in the spreadsheet. No data in the matched columns is overwritten. Only data from the matched point forward is overwritten. For example, if your spreadsheet and import text file have three columns each, and you indicate “1” for the number of matched columns, then when the data is imported into the spreadsheet, the data in Column 1 of the spreadsheet is not overwritten; however, the data in Columns 2 and 3 of the spreadsheet is overwritten by the data in Columns 2 and 3 of the import file.
Data options:
Import into tables only – select this option only if you are importing data into table cells in the spreadsheet.
Import blank cells over existing data – allows data in the spreadsheet to be replaced by blank cells.
Ignore blank cells – if the import file contains blank cells, do not replace the data in the spreadsheet with blank cells.
Click Import. The Open File dialog box opens.
In the Open File dialog box, browse and select the file that you are importing, and then click Open. If there are no errors with the import, a message opens indicating the import operation was successful.
Click OK. The message closes. You will return to the spreadsheet tab and see the imported information displayed in the spreadsheet.
Exporting Spreadsheet Data
Just as you can import data into a spreadsheet from a text file, you can export data from a spreadsheet to a text file. The file can be a comma delimited file, a tab-delimited file, or you can specify another delimiter type. You can export any user-created field as well as system fields.
To export spreadsheet data
On the spreadsheet toolbar, click the Export button. The Export Data dialog box opens.
Select the Export Format.
If the file is not tab delimited or comma delimited, then you must specify the delimiter that the file uses.
If you select Linkage, then the data is exported to a pedigree file format (.PED). In addition to the exported data, the first five columns of file also contains the following pedigree relationship fields in the order indicated – UPN, Father ID, Mother ID, and Gender. You must also specify the way in which the individuals in the pedigree are to be identified. The default value is the UPN (Unique Person Number) for each person in the pedigree, but you can select a different value.
If you select BRCAPRO, then the data is exported in a format that can be used in the BRCA Risk Analysis application.
Select the data that is to be exported.
Export Table Rows Only –If you are exporting table data, and want to export only the table rows that contain data (and not the blank row that indicates a table), then select this option.
Export One Row Per Individual –If you are exporting table data, and want to maintain a single row per individual (or sample), then select this option.
Click Export. The Save As dialog box opens. The Save as type field is automatically populated with the file type of text (.txt) and you cannot change this value.
Browse to the location in which the exported file is to be saved, and then in the File name, enter a name for the file.
Click Save. A message opens indicating, The export operation was successful.
Click OK. The message closes. You will then return to the spreadsheet tab.
Saving and Loading a Spreadsheet Format
After you have generated a spreadsheet with a specific format, you can save the format. You can then retrieve this saved format and load it into another spreadsheet of the same type.
To save a spreadsheet format
Format and generate the spreadsheet as needed.
On the spreadsheet toolbar, click the Save Format button.The Save Format dialog box opens.
Enter a name for the spreadsheet format and optionally, a description of the spreadsheet format then do one of the following:
Select an existing folder.
Click New Folder and on the Format Folder dialog box that opens, do the following:
Enter the name of the new folder in which to save to format.
Select the location for the new folder. The folder can be stored at the root level (the same level as the default folders), or it can be a sub-folder of one of the default folders, or of another folder.
Click Save.
Click Save on the Save Format dialog box.
To load a spreadsheet format
There are two primary methods for loading a saved spreadsheet:
Click the dropdown icon next to the Indiv SS button on the main screen and choose Individual Spreadsheet Formats. This opens a new tab with the Individual SS Formats menu.
Within the Individual SS Formats menu you can first search for existing formats using the search bar at the top. This is a full-text search across both format names and format descriptions.
The left-side pane will show your spreadsheet format folders while the right-side pane will display a list of formats saved within a selected folder.
The right-side pane will display the format name in black text and the description in grey text. You will additionally be shown the user account that created the format (with timestamp) and the user account that last modified the format (with timestamp)
Click the Run button to launch the spreadsheet or click the Edit button to open the New Individual Spreadsheet menu prepopulated with the selected saved spreadsheet format’s parameters.
Click the Query button on the main interface.
The Query menu offers a shortcut into your saved spreadsheet formats. Choose a saved format from the dropdown menu under Query Criteria and the fields configured for the format’s query section will be displayed. You can then make changes to the query parameters.
Click the Query button in the top right to launch the spreadsheet format with your modified query parameters.
Running Spreadsheet Queries
You can query the Progeny database to retrieve a specific subset of data. You can run a query one time from within a given spreadsheet, or if you need to run the query frequently, you can save the query as part of the spreadsheet format, and then run the query on as-needed basis. When you set up the spreadsheet for the query, the spreadsheet does not have to contain the fields against which the query was run. For example, you could set up a query for all female individuals under the age of 50 that have been diagnosed with bilateral breast cancer and the spreadsheet is to display the demographic information for the individuals who meet the query criteria. You would set up the spreadsheet with the following fields—First Name, Last Name, Age at Diagnosis, Current Age, and so on, but you would not need to include the Gender field and the BRCA Diagnosis1 field as these fields would display the same value (Female or BL BR, respectively) for all the individuals who are retrieved by the query.
To run a spreadsheet query
Create a new spreadsheet or go into your Individual Spreadsheet Formats and choose the Edit button for your desired spreadsheet format.
If creating a new spreadsheet, add fields to your Columns pane to generate the query output formatting
Either drag and drop fields from your Fields pane into the Query pane or click the Query button for a field within your Columns pane.
If you need to remove a row from your Query pane, either right-click the field and choose Delete Row or click the Delete button on the right side of the query row.
Click the Run button to run the query. The results of the query are displayed onscreen in the spreadsheet.
If needed, you can now save this query as a spreadsheet format if you will be using it again in the future.
Sorting and Filtering Spreadsheet Data
Sorting determines the order of the data that is displayed in a spreadsheet. For example, do you want to display your data based on a birth date that is sorted in reverse chronological order? You can sort the data in a spreadsheet at any time – immediately after you create a spreadsheet, or after you query the spreadsheet data to retrieve a subset of the data. Different sorting options are available for the different types of data columns (text, date, and numeric). After you select a sorting option, the spreadsheet display is dynamically updated.
You can also filter spreadsheet data. Filters retrieve a specific subset of the spreadsheet data based on specific constraints (or filters) that you set. For example, you might want to filter spreadsheet data to show only those individuals that were born in the 1970s. You can set multiple filters for a spreadsheet. Multiple filters are mutually inclusive. Only those individuals, pedigrees, samples, or markers that meet all the filtering criteria are displayed in the spreadsheet. As with sorting, you can filter the data in a spreadsheet at any time – immediately after you create a spreadsheet, or after you query the spreadsheet data to retrieve an initial subset of the data.
Although sorting and filtering spreadsheet data are two completely separate actions, you can combine them as needed to produce a customized dataset that best fits your business needs. For example, you can sort spreadsheet data based on reverse chronological birth dates, and you can then filter the sorted data to show only those individuals that were born in the 1970s.
To sort spreadsheet data
Click in the column header for any text, date, or numeric data column. A menu opens with a Filter option and sorting options that are specific to the column type.
Select a sorting option for the column.
To filter spreadsheet data
Click in the column header for any text, date, or numeric data column. A list opens with a Filter option and sorting options that are specific to the column type.
Select Filter. The Filter column dialog box opens.
Set the filter for the column. For example, the image below shows how to filter spreadsheet data to show only those individuals who were born in the 1970s.
In another example, the image below shows how to filter spreadsheet data based on multiple filter values. The values are separated by a semi-colon (;) which acts as an OR operator for the filter. The filter shown below would filter the spreadsheet data based on Medical Released Received that have been have a value of Yes or Pending.
Click OK. The spreadsheet display is updated based on the filters that you have set. Any column for which you have set a filter is marked with a Filter icon.
Optionally, at any time, clear a filter by right-clicking on the column header for the filtered column, and on the context menu that opens, click Clear Filter.
The spreadsheet display is dynamically updated to include all of the data in the column.
Printing Spreadsheet Data
After you generate a spreadsheet, you can print the spreadsheet. You can print all the pages in a multipage spreadsheet or you can print selected pages.
To print a spreadsheet
On the spreadsheet toolbar, click the Print The Print dialog box opens.
On the Print dialog box, select the needed printing options, and then click Print.
Counting Spreadsheet Data
After you generate a spreadsheet, you can click the Count button on the spreadsheet toolbar to count the number of individuals, pedigrees, samples, or markers (that is, the number of rows) in the spreadsheet. A Count dialog box opens, indicating the number of items (rows) that the spreadsheet contains.
A pedigree, also known as a genogram, is a diagram that depicts individuals who are related by blood or another factor. Different icons represent different types of individuals. For example, a square icon indicates a male individual, a circle icon indicates a female individual, and a diamond icon indicates an individual of unknown/undetermined gender. Symbols are applied to icons to graphically represent data about the individual, such as individuals with a cancer diagnosis that equals Breast. A legend identifies each symbol. The lines connecting individuals identify the relationship between two individuals, such as marital status. The icon subtext, which is the text that is displayed above or below an individual icon on a pedigree, is specific for the individual. Figure 5-1 below shows a pedigree that details the cancer history for the members of a family.
Overview of Pedigree Icons
Although there are no definitive standards when drawing pedigrees, there are published guidelines for the human genetics market. Progeny uses pedigree icons based on the guidelines published in the American Journal of Human Genetics (1995) Bennet, et al.
Pedigree Properties
The Properties dialog box displays all the options that you can set for controlling the drawing and display of a pedigree. It is important for you to become aware of the different options so that when they are referenced later in this chapter, you are able to correctly modify and apply the properties when you are drawing pedigrees. You can open the Properties dialog box by clicking on the Properties button on the toolbar for any opened pedigree.
The dialog box has five tabs – Progeny, Pedigree, Individual, Line, and Dimensions. By default, the Progeny tab is the active tab when the dialog box first opens.
Option
Description
Show Grid
Displays a grid on the pedigree canvas.
Snap to Grid
When moving an icon on the pedigree, aligns (or “snaps”) the icon to the nearest intersection of lines in the grid, even if the grid is not visible.
Show Page Breaks
Displays print boundaries on the pedigree as blue dashed lines.
AutoDraw
Automatically runs Smart Draw every time you add an individual to a pedigree. You can then define your Smart Draw options.
Live Dragging
Relationship lines move with the icon when you reposition it.
Show Symbols Legend
Displays a legend for the symbols shown on the pedigree.
Show Subtext Legend
Displays a legend for the icon subtext displayed in the pedigree.
Show Markers Legend
Displays a legend for the icon markers displayed in the pedigree.
One-click Add
Allows you to click on specific handles on an individual icon to automatically add a relationship to the individual. (You do not have to manually add relationships from the palette or drag lines between icons to create relationships).
Show Header/Show Footer
Displays a header or footer on each page of the pedigree. Customizable from the Pedigree tab of Properties menu.
Show Haplotypes
Displays a color-coded legend for markers that are displayed on a pedigree.
Display Translated SNP Allele Values (read-only)
Displays the SNP allele values next to the individual’s icon.
Show Linkage Selections
Displays sample status (Sample/Plate/Genotype) on the pedigree and indicates whether an individual has been “Included in Analysis.”
Autosize Subtext based on Data
Dynamically resizes the icon subtext based on the quantity of text entered for an individual.
Show Invite Status
Displays questionnaire invite status
Show Generation Number
Displays numbers next to each individual in the pedigree indicating which generation they belong to
Pedigree tab
Option
Description
Icon Subtext Font
Ability to change subtext font and size.
Line Width
Allows adjusting the thickness of the relationship lines used in the pedigree.
Pedigree Scale
Allows the user to change the Pedigree scaling size.
Horizontal & Vertical Grid Spacing
Allows the user to change the Horizontal and Vertical spacing on the grid.
Proband Arrow Position
Ability to move the proband arrow position to one of the four corners of the proband’s icon.
Show LOD Scores
Displays a table with LOD (logarithm of the odds) scores for the markers that are listed for each individual.
Use Hooks
Displays hooks on pedigrees to differentiate relationship lines.
Show Blue ID#
Displays blue numbers for individuals in each generation of pedigree.
Show Date
Displays date on pedigree.
Header & Footer
Allows users to customize Headers and Footers.
Smart Draw Options
Gives user ability to change Smart Draw settings. (Match Spouses, Change Vertical Positions, Conserve Left Space, Recalculate All Positions, and Force Father to Left)
Individual tab
Option
Description
Gender
Change the gender of the selected individual.
Attributes
Select the attributes for the selected individual.
Adopted
Indicate the adoption status for the selected individual.
Marked By
Place the indicated symbol next to the selected individual.
Individual Name
Every individual in Progeny is assigned an individual name (a system field). When you are drawing a pedigree in Progeny the software automatically assigns an individual name to an individual. The default format for the Individual Name is ‘pedigree name’ + ‘_UPN’ with the UPN (unique person number) being an incremented number for each person added to the pedigree. If needed, you can edit this default name here.
Icon Text
Enter a text that is to be displayed inside the individual icon. The text can be alphanumeric or special characters.
Line tab
Spouse Relationship – Applicable only to a selected spouse relationship line. The displayed line indicates the relationship between the spouses.
Normal
Separated
Divorced
Casual
Consanguineous
No Issues
Infertile
Twin Relationship – Applicable only to a selected twin relationship line. The displayed line indicates the relationship between the twins.
Dizygotic
Monozygotic
Unknown
Dimensions tab
Option
Description
Individual Space
The space between individual icons in a pedigree.
Icon Size
The size of the icons that represent individuals in a pedigree. The Square Icons option locks icon height and width to identical values.
Dimensions manual adjust window
You can also manually adjust the individual space and icon size. To adjust the size of the individual icons, the spacing between them, and the distance from the subtext, simply click and hold your left mouse button on the corresponding line in the manual adjust window until the cursor changes to a double-headed arrow, drag the line to the desired distance, and then release the button.
Right-click on the Pedigree canvas to see these options:
Option
Description
Add Individual
Adds a new individual to the pedigree
Smart Draw
Match Spouses – Keep spouse pairs as close to each other as possible.
Change Vertical Positions – Aligns all individuals of the same generation horizontally. Converse Left Space – Moves the pedigree as far to the left as possible. Recalculate All Positions – Forces Smart Draw to disregard the existing positions of individuals when redrawing the pedigree. Force Father to the Left – The male member of a spouse pair will always be positioned to the left of the female.
Individual Palette
Uses the palette to add individuals to the pedigree and assign relationships between individuals
Save
Saves the pedigree.
Select All
Selects all individuals in the pedigree.
Reverse Select
Deselects individuals that were selected and select individuals that were not selected.
Copy/Paste
Copy & paste from the pedigree into another document.
Add text
Adds free text to pedigree.
Print Setup
Opens printing options for the pedigree.
Print
Prints the pedigree.
Fit to Page
To automatically scale the pedigree to print on a single page.
Show Thumbnail
Displays smaller window of the pedigree.
Save as XML
Saves the pedigree as an XML file.
Load from XML
Loads a pedigree from an XML file.
Save as Picture
Saves the pedigree as an image (JPEG, TIFF, PNG, GIF, or BMP).
Risk Analysis
Exports the pedigree to Risk Analysis models for testing.
Properties
Open the properties window.
Mark Pedigree
Option to turn on/off Auditing for the pedigree.
Add Sample
Option to add a sample individual.
To print a pedigree
Open the pedigree you want to print then click the Print button in the top-left corner of the icon menu.
You can optionally set one or more of the following options:
Turn on the Show Page Breaks option within the Progeny tab of the Properties dialog box. (See Properties dialog box, Progeny tab) If this option is selected, blue lines will be displayed on the pedigree viewer to show where the page breaks into another page. Page numbers are displayed in the bottom right corner of each page once printed.
Landscape is the default mode for printing. To change this, on the main menu, in the upper left-hand corner, click File > Printer Setup, and on the Print Setup dialog box, select Portrait.
To automatically scale the pedigree to print on a single page, right-click on the opened pedigree and choose Fit To Page. To return the pedigree to its original scale, enter the appropriate value for the Pedigree Scale option on the Pedigree tab of the Properties dialog box. (See Properties dialog box, Pedigree tab)
On the pedigree toolbar in the upper left corner, click the Print button. The Print dialog box opens.
On the Print dialog box, select the needed printing options, and then click OK.
To create a sub-pedigree
Open the pedigree for which you are creating a sub-pedigree.
Select the individuals you would like to create a sub-pedigree for.
On the Pedigree Drawing window toolbar, click the New SubPed button. The New Pedigree dialog box opens.
Enter the name of the new sub-pedigree and choose the folder where it will be added to.
Optionally, click Open on Save. If you select this option, then after you save the pedigree, the sub-pedigree opens in the Pedigree Drawing window.
Once the new pedigree has been created click OK to close the message and open the sub-pedigree in the Pedigrees Drawing window.
Icon Subtext
Click the Icons button from the top menu then click the Fields button inside the Subtext tab of the new Icons window, which is displayed to the left, to open the Fields dialog box.
Drag each field that is to be displayed in the icon subtext from the Fields dialog box to the lower part of the Subtext tab. When you are dragging the fields, note the following:
The order in which you drag the fields into the subtext configuration menu does not matter. You can use the Row column to the left of the field to configure the vertical placement (1 = top row) and the Order column to configure the horizontal placement (1 = left-most).
You can use negative values in the Row column (e.g. -1) to have a subtext row display above the pedigree icon.
You can display table fields in icon subtext. When you drag a table field from the Field dialog box to the Subtext tab, all the table subfields are included under the table name. To include a table subfield in the icon subtext, enter a number into the Order column for that particular subfield. If you drag a lookup table to the Subtext tab, then only the lookup table field is displayed on the tab. The lookup table subfields are not displayed.
If your data is too long/verbose to display under an icon, you can either turn on the Autosize Subtext based on Data option within the Properties dialog box, Progeny tab, or adjust the pedigree’s Smart Draw dimensions to allow for the extra horizontal spacing from the Properties dialog box > Dimensions tab.
If you add a field in error or decide that you do not want a field incorporated into your subtext, select the field, and click the Delete button.
After you have ordered the icon subtext, click the Apply button.
When you have finished constructing your subtext format, click the Save button within the subtext configuration window to save this as a subtext format
Icon Symbols:
Click the Icons button from the top menu.
Click the Symbols tab within the Icons window
Click the Fields button inside the Symbols tab to open the Fields dialog box.
Drag each field that is to be represented by a symbol from the Fields dialog box to the blank Symbols tab. When you are adding fields, note the following:
You can create symbols for any database field (including System Fields) and/or define a symbol to represent ranges or queries such as individuals with a current age > 50.
The order in which you drag the fields is the order from top to bottom in which the symbols are applied to the icon. You may need to experiment a bit with your field orders because when an individual has too many active symbols, they can cover each other.
If you select a table field, then the Select Symbol Row Field dialog box opens. This dialog box lists all the table subfields. You must select the table subfields that are to be used as symbol rows. If you select a lookup table field, then only the lookup field is added to the Symbols tab. The lookup table subfields are not.
You can select the same table field multiple times in order to apply symbols for each individual subfield that is within that same table field. For example, if you are creating a pedigree that shows the cancer history for a family you could drag the Cancer History field multiple times to apply the symbols for Cancer Diagnosis subfields: Cancer Diagnosis = Colon, Cancer Diagnosis = Prostate, and Cancer Diagnosis = Breast
After you have determined which fields you want to display symbols for and have added them to your Symbols configuration menu, do the following for each field:
Click on the left-most column (Symbol) to open a dropdown list from which you can select the symbol to be displayed for each field.
Click on the Operator column to open a dropdown list from which you can select the logical operator for the field.
Enter into the Field Value column the data you want a symbol displayed for.
If you have specific requirements for the Symbols Legend or just do not like the default Symbols Legend display schema (e.g. Cancer History.Cancer Diagnosis = Breast OR Current Age >30) you can use the Custom Legend Label column on the far right to enter a personalized label which will be displayed on the pedigree Symbols Legend Using the two examples in the previous sentence, we could set up our Symbols Legend to instead display easy to understand language for the symbols like Breast Cancer instead of Cancer History.Cancer Diagnosis = Breast or you could configure Patient over 30 instead of Current Age > 30.
If you add a field in error or decide that you want to delete a field, select the field and click the Delete button.
After you have selected all the necessary icon symbols, click the Apply button.
To add free text to a pedigree, you can Right click on the pedigree canvas and select Add Text from the drop-down menu. You can also select the Add Text menu button to add free text to your pedigree canvas.
Headers & Footers:
To change the Header or Footer for pedigrees, select the Properties button in the pedigree.
Under Properties, select the Pedigree Here you will see the option to change the pedigree’s header/footer.
The User Maintenance window is used for creating, deleting, editing, and managing users and their permissions within Progeny.
On the main menu, click Administration → User Maintenance.
Click the Add User button. The NewUser dialog box opens.
Enter the user name and password for the user account.
The user name must adhere to the following rules:
The first character cannot be a number. Instead, it must be an alphabetic character or a special character.
The user name can only contain alphabetic characters, numbers, and special characters.
The user name cannot contain a reserved word for an SQL database.
The password is case-sensitive and it must adhere not only to the same rules as the user name, but also, these two rules:
The password must be a minimum of eight characters and contain at least one number, one lowercase and 1 uppercase letter, contain at least one special character.
The password cannot contain the user name.
In the Retype Password field, enter the password again exactly as you entered it in the Password field.
Click Add. The new user account is displayed in the Users pane of the User Maintenance You can now set security levels for the user account.
In the User Info pane there are 4 check box options:
Locked: Enabling this option will lock the selected user’s account and prevent them from having any access to the Progeny database.
If a user makes too many attempts to login to a Progeny account with the wrong password, the account will be locked. Unselect this option to unlock the account.
Integrated Login: This configuration enables the user to log into their Progeny account with authentication from their Windows profile.
Enable Web Client Access: This option will allow the selected user to be able to login to Progeny through a web browser (provided that Progeny Web Server is installed).
Administrator: This option will make the selected account an administrator within Progeny.
To Delete a User
You can delete a user only if the user is not currently logged in to the Progeny database.
On the main menu, click Administration → User Maintenance. The User Maintenance window opens.
In the Users pane, select the user that is being deleted.
Click Delete. A message opens asking you if you are sure that you want to delete the selected user.
Click Yes. A message opens indicating that the user was successfully deleted.
Click OK to close the message and return to the User Maintenance window.
To change the administrator password
As the Progeny administrator you should change the default password. After you change your password, you must record it in a secure location. The password is encrypted and if you lose it or do not remember it, Progeny cannot recover it for you.
On the main menu, click Administration → Change Password. The Change Password dialog box opens.
Enter the new administrator password. The new password must adhere to the rules that apply to any Progeny user password.
In the Retype New Password field, enter the password again exactly as you entered it in the New Password field.
Click OK. The Change Password dialog box closes, and you remain logged in to the current Progeny session with your old password. The next time that you log in to Progeny, you must log in using your new password.
To change a user password as the Progeny Administrator
On the main menu, click Administration → User Maintenance. The User Maintenance window opens.
Select the user for whom you are changing the password.
Then click the Change Pwd The Change Password dialog box opens.
Enter the new user password. The new password must adhere to the rules that apply to any user password.
In the Retype New Password field, enter the password again exactly as you entered it in the New Password field.
Click OK. The Change Password dialog box closes. The user remains logged in to the current Progeny session with their old password. The next time that they log in to Progeny, they must log in using their new password.
To change your password as a user
As a current user, it is possible to change your password once logged into Progeny.
On the main menu, click Administration → Change Password. The Change Password dialog box opens.
Enter your new user password. The new password must adhere to the rules that apply to any user password.
In the Retype New Password field, enter the password again exactly as you entered it in the New Password field.
Click OK. The Change Password dialog box closes. You remain logged in to the current Progeny session with your old password. The next time that you log in to Progeny, you must log in using your new password.
To set the security levels for a user account
On the main menu, click Administration → User Maintenance to open the User Maintenance window.
In the Users pane, select the user account for which you are setting the security levels. These security levels can be enabled in the Settings pane using two methods: assigning classes or assigning specific and individual functions for the user on the Security tab and the Licensing tab.
When assigning permissions to users there are two methods for configuring permissions: using either the Profile Formats, or using the Security, Licensing, ClientInterface, Formats, and Ambry ID’s tabs.
Profile formats allow you to pre-select all options within the first four tabs (Security, Licensing, Client Interface, and Formats) and tie these to a single format for fast permissions assignment. In order to create a new format within Progeny please refer to the following steps:
In the User Maintenance window click on the “Manage…” button. This will open the Profile Management window.
Click on the Add Format button.
In the New User Profile Format window, enter the name for this new profile format in the Profile Name field.
Click Add.
In order to select permissions for this profile format, first, select the profile format then work through the five tabs at the bottom of the menu choosing any permissions that you wish to assign. The five tabs are detailed below.
To assign this Profile Format to a user, select the user then check the Use Profile Format box and choose this format from the associated dropdown field.
To make manual permission assignments, select a user then work through the five tabs at the bottom of the menu choosing any permissions that you wish to assign. The five tabs are detailed below.
Security Tab
In the security tab, you can assign a user to a user class or create a new user class. To assign a user to a class click on the user then click the checkbox next to the user class you want to assign them to. To create, modify or delete a user class:
Click Add Class… to create a new class, then follow the instructions in the To Add a User Class section.
Select a user class then click Edit Class… and make any desired modifications.
Select a user class then click Delete Class… to remove it.
To add a User Class
A Class groups users based on the access that users have to database folders and fields. All users who are in the same class have the same level of access to the same database folders and/or fields.
On the main menu, click Administration → User Maintenance. The User Maintenance window opens.
Within the Settings window pane select the Security tab, then click the Add Class The New User Class window opens.
Enter the name for the new user class, select the desired functions that you would want this class to contain, and then click OK.
A message opens indicating that the user class was added successfully.
Click OK to close the message and return to the User Maintenance window.
You can now add users to the class.
To Add Users to a User Class
By default, as the Progeny administrator, when you add a new user class, you are automatically added to the class. Only non-administrator users must be explicitly added to a user class.
If you have not already done so, on the main menu, click Administration → User Maintenance to open the User Maintenance window.
In the Users pane, select the user that you are adding to a class.
Under the Security tab within the Settings pane, select the checkbox next to the class or classes to which you are adding the user.
Click Exit to close the User Maintenance window. The changes are saved when the window closes. This process can be used to carefully assign each user to their appropriate class. All users who are in the same class have the same level of access to the same database fields and/fields.
To delete a user class
When you delete a class, you delete only the class and not any users who have been assigned to the class; however, all the users who are assigned to the class will lose any security privileges for database folders and fields that were set for that class.
On the main menu, click Administration → User Maintenance. The User Maintenance window opens.
In the Users pane, select any user other than the Progeny administrator.
In the Security tab within the Settings pane, select the class that you are deleting. (Do not select the checkbox next to the class.) CTRL-click to select multiple classes.
Click Delete. A message opens asking you if you are sure that you want to delete the selected class.
Click Yes. A message opens indicating that the class was successfully deleted.
Click OK to close the message and return to the User Maintenance window.
Licensing Tab
To assign specific permissions to a user without using Classes click on the Licensing tab within the Settings pane and uncheck the Use class-based options as seen in the figure below:
Select which permissions you want to assign to this user – the table below will explain each of the permissions options.
Client Interface Tab
This tab allows you to choose whether the user will access Progeny using the classic Full Progeny Client interface, the new lightweight Patients View (web interface only), or the user-friendly Dashboard interface. The options listed in this screen allow the administrator to grant the user limited access to specific Progeny functions.
Formats Tab
In this tab an administrator can assign formats to a user – in cases where the folders have default formatting assigned, assigning a format to a user in this tab will force Progeny to override the folder configuration and display the user’s defaults from this menu instead.
The useful item here is Toggle Spreadsheet. If configured, when the user clicks the Toggle Spreadsheet button within the client application Progeny will automatically and immediately display the format configured here without prompting or otherwise delaying the user.
Launch the Progeny Desktop application using the Progeny 10 icon.
On the Login window, first, select Local Database and then click Create.
The Save As dialog box opens. The Save as Type field is automatically populated with the file type of database (.db) and you cannot change this value.
Browse to the location in which the database is to be saved, and then in the File name field, enter a name for the database.
Click Save.
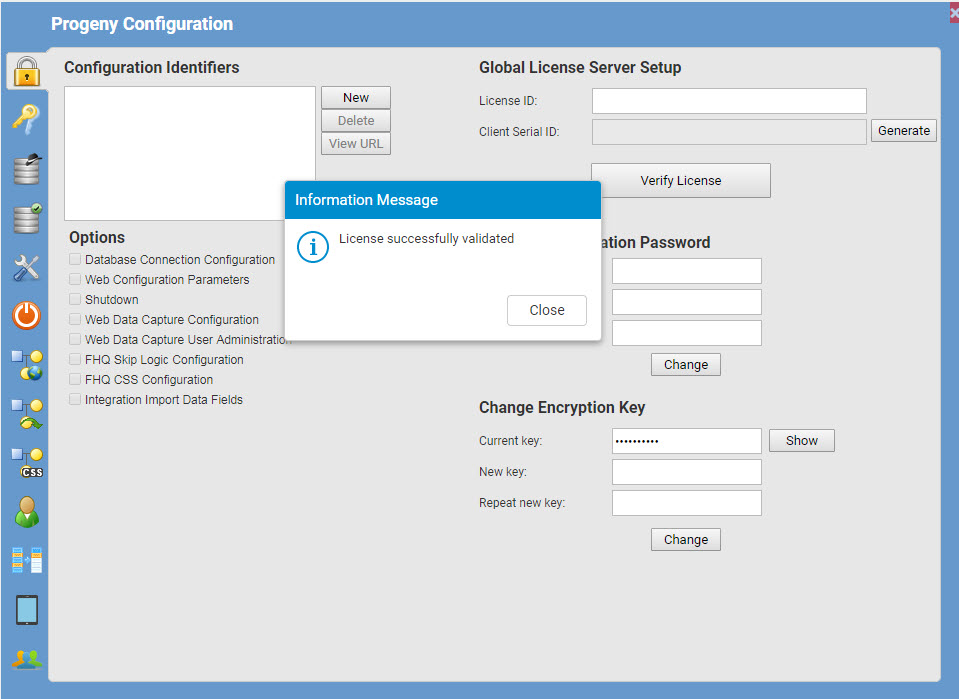
To encrypt a Progeny database
In the next pop-up window, you have the option of encrypting your new database using either simple or strong encryption.
Simple Encryption: equivalent to Simple Obfuscation. Simple Obfuscation is intended to make it difficult, but not impossible, for someone using a disk utility to casually inspect the contents of your database. Simple Obfuscation does not require a key (password) to encode the database.
Strong Encryption: uses Advanced Encryption Standard (AES) method. Strong encryption makes a database unusable without a key (password). The data in the database is secure from inspection. An algorithm encrypts the information contained in your database and transaction log files so it cannot be read. The algorithm used to implement strong encryption is AES: a block encryption algorithm chosen as the new Advanced Encryption Standard for block ciphers by the National Institute of Standards and Technology (NIST). This encryption technology is included and does not require a separate license. Please remember that if you lose the encryption key you will not be able to unencrypt the contents of the database.
Click OK to create the database.
Once it completes the creation process you will receive a message letting you know it completed successfully. Click OK.
Please remember if you enable Strong Encryption with a key, you will need to enter the key value when configuring the Database Service. Please refer to the Progeny Application Installation article for more information on that topic.
Progeny also has the ability to enable Transport Layer Security (TLS) encryption on the database communication level. Sybase’s implementation of TLS secures communications between your Progeny database server and your Progeny clients. It enables encryption, tamper detection, and certificate-based authentication. It uses a combination of public-key and symmetric-key encryption for authentication and communication. Please refer to the Advanced Usage article for more information on this topic.
Configuring the icon subtext can only be done in the Desktop Client
On the Progeny Main window navigation bar, click the Pedigrees module.
Select a folder and double-click on a pedigree to open it.
On the pedigree canvas main menu, click Icons.
The Icons window opens on the left side of the Pedigree canvas. The window has three tabs—Subtext, Symbols, and Markers. By default, the Subtext tab is the active tab.
Click the Fields button inside the Subtext tab to open the Fields dialog box.
From the Fields dialog box, drag each field that is desired to be displayed in the Icon Subtext onto the Subtext tab. When you are dragging the fields, note the following:
The order in which you drag the fields into the subtext configuration menu does not matter. You can use the Row column to the left of each field to configure the vertical placement (1 = first row) and the Order column to configure the horizontal placement (1 = first column).
You can use negative values in the Row column (ex. -1) to have a subtext row display above the individual icon.
You can display table fields in icon subtext. When you drag a table field from the Field dialog box to the Subtext tab, all the table subfields are included under the table name. To include a table subfield in the icon subtext, enter a number into the Order column for that particular subfield. If you drag a lookup table to the Subtext tab, then only the lookup table field is displayed on the tab. The lookup table subfields are not displayed.
If your data is too long/verbose to display, you can either turn on the Autosize Subtext based on Data option within the Properties dialog box on the Progeny tab, or adjust the pedigree’s Smart Draw dimensions to allow for the extra horizontal spacing from the Properties dialog box on the Dimensions tab.
If you add a field in error or decide that you do not want a field incorporated into your subtext, select the field, and click the Delete button.
After you have set the desired order for the icon subtext, click the Apply button.
When you have finished constructing your subtext format, click the Save button within the subtext configuration window to save this as a subtext format.
Enter the desired name for this new format or replace an existing format, then select the folder that you would like to save it in, then click Save.
Customizing the Symbols format
Configuring the icon symbols can only be done in the Desktop Client
On the Progeny Main window navigation bar, click the Pedigrees module.
Select a folder and double-click on a pedigree to open it.
On the pedigree canvas main menu, click Icons.
The Icons window opens on the left side of the Pedigree canvas. The window has three tabs—Subtext, Symbols, and Markers. By default, the Subtext tab is the active tab.
Click the Symbols tab, then click the Fields button inside the Symbols tab to open the Fields dialog box.
From the Fields dialog box, drag each field that is to be represented by a symbol to the Symbols tab. When you are adding fields, note the following:
You can create symbols for any database field (including System Fields) and/or define a symbol to represent ranges or queries such as individuals with a current age > 50.
The order in which you drag the fields is the order from top to bottom in which the symbols are applied to the icon. You may need to experiment a bit with your field order as when an individual has too many active symbols, they can cover each other.
If you select a table field, then the Select Symbol Row Field dialog box opens. This dialog box lists all the table subfields. You must select the table subfields that are to be used as symbol rows. If you select a lookup table field, then only the lookup field is added to the Symbols The lookup table subfields are not.
You can select the same table field multiple times in order to apply symbols for each individual subfield that is within that same table field. For example, if you are creating a pedigree that shows the cancer history for a family you could drag the Cancer History field multiple times to apply the symbols for Cancer Diagnosis subfields: Cancer Diagnosis = Colon, Cancer Diagnosis = Prostate, and Cancer Diagnosis = Breast.
After you have determined which fields you want to display symbols for and have added them to the Symbols tab, do the following for each field:
Click on the left-most column (Symbol) to open a dropdown list from which you can select the symbol to be displayed for each field.
Click on the Operator column to open a dropdown list from which you can select the logical operator for the field.
Enter into the Field Value column, the data you want a symbol to display.
If you have specific requirements for the Symbols Legend or just do not like the default Symbols Legend display schema (ex. Cancer History.Cancer Diagnosis = Breast OR Current Age >30) you can use the Custom Legend Label column on the far right to enter a personalized label which will be displayed on the pedigree Symbols Legend instead. Using the two examples in the previous sentence, we could set up our Symbols Legend to instead display easy to understand language for the symbols like Breast Cancer instead of Cancer History.Cancer Diagnosis = Breast or you could configure Patient over 30 instead of Current Age > 30.
If you add a field in error or decide that you want to delete a field, select the field and click the Delete button.
After you have selected all the necessary icon symbols, click the Apply button.
When you have finished constructing your symbols format, click the Save button within the symbols configuration window to save this as a symbols format.
Enter the desired name for this new format or replace an existing format, select the folder that you would like to save it in, then click Save.
Customizing the Markers format
Configuring the markers can only be done in the Desktop Client
On the Progeny Main window navigation bar, click the Pedigrees module.
Select a folder and double-click on a pedigree to open it.
On the pedigree canvas main menu, click Icons.
The Icons window opens on the left side of the Pedigree canvas. The window has three tabs—Subtext, Symbols, and Markers. By default, the Subtext tab is the active tab.
Click on the Markers tab, then click the Fields button to open the Fields dialog box.
The left pane of the dialog box lists available marker sets in the Progeny database. Select All Markers to open the list of available sets, and then select one of the sets to view the information for the markers contained in that set. The middle pane is the Chromosome List pane, which lists the chromosomes on which you can view or add markers. Select a chromosome to display an image of the chromosome above the top of the right pane. A list of the markers and SNPs that are found in the selected chromosome is displayed below the image in the right pane.
Drag each marker that is to be displayed on the pedigree from the Fields dialog box to the blank Marker tab. As you select the markers that are to be displayed on the pedigree, note the following:
Make sure to drag the markers in order of ascending bps. The order in which you drag the markers is the order in which they are displayed under each icon in the pedigree.
If you add a marker in error, or you decide you want to delete a specific marker or all markers, then right-click on the marker name on the Markers tab, and on the context menu that opens, click Remove selected marker. To remove all markers in a singlet, right-click anywhere on the Markers tab, and on the context menu that opens, click Remove all markers.
After you have selected all the necessary marker symbols, click the Apply button.
When you have finished constructing your markers format, click the Save button in the markers configuration window to save this as a markers format.
Enter the desired name for this new format, select the folder that you would like to save it in, then click Save.
You can always change the format that is currently loaded into the format that you desire. In order to load this or any other markers format, click Icons, Markers tab, Load, search for the desired format, then click on the Load button.
Customizing the Pedigree Fields format
Configuring the pedigree fields can only be done in the Desktop Client
Open the pedigree for which you would like to change the Pedigree Fields Format.
Click on the Fields button on the top menu bar to open the Fields dialog box.
Search for the pedigree level fields you would like to display and drag them on to the pedigree canvas.
Close the Fields dialog box.
In order to save this new format please refer to the following steps:
Click on the Pedigree Fields Format drop down.
Click on the Save Format… option in order to open the Save Format dialog box.
Enter the name of the format, select the folder you would like to save it in, and then click on the Save button.
Setting the default formats for specific folders
Right-click the pedigree folder that you want to set default formats for, then click Edit Folder.
In the Modify Folder Settings dialog box, select which formats you want to enable a template for. Format options are Individual Datasheet, PedigreeDatasheet, IconSubtext, IconSymbols, IconMarkers, and PedigreeDropFields. The other options refer to various settings on a pedigree.
Once you have checked the desired Template Options, click the Formats… button to open the Template Formats dialog box. Select the specific default template formats for the folder by clicking the … button. Once completed, click OK.
Be sure to click Save on the Modify Folder Settings dialog box to ensure your settings are saved and applied.
Setting the default formats for specific users (overrides folder level formats)
Head to the Administration – User Maintenance section to manage users.
If you do not see the User Maintenance option, you are not an administrator in the database. Check with your administrator to make these changes.
Select the user whose default format you would like to add/modify, then click on the Formats tab.
Click on the … buttons to add each specific format for the user or the X button to remove formats. Once completed, changes will be made immediately. The user will need to log out and log back into Progeny to see the changes.
What are the username and password rules for Progeny users?
Progeny usernames and passwords must conform to the following conventions:
Usernames and passwords can use any of the following characters: uppercase letters, lowercase letters, numbers, and symbols.
The first character must be a letter or symbol.
Usernames can be of any character length, but passwords must be a minimum of 8 characters long.
Passwords must contain at least one character from each of the four types – Uppercase letters, Lowercase letters, Numbers, and Symbols.
For Standard Login: What are my username and password?
After your Progeny administrator assigns you your temporary password, you will be prompted to change it upon your first login. Please note that Progeny Software does not keep track of any password changes. Contact your Progeny administrator for your username and temporary password.
What is the Integrated Login feature? How do I set it up for my installation?
An Integrated Login is a mapping from one or more Windows users or Windows user group profiles to an existing user in a Progeny database. A user who has successfully logged in to that user profile or group at that workstation can connect to a database without providing an additional username or password. It allows you to maintain a single username and password for database connections and operating systems and/or network logins.
Using Integrated Login is more convenient for the user and permits a single security system for database and network security. Its advantages include:
When connecting to Progeny using Integrated Login, the user does not need to type a username or password.
If you use Integrated Login, the user authentication is done by the operating system, not the database: a single system is used for database security and machine or network security.
Removing the username from the operating system automatically prevents the user from logging into the Progeny database.
Caution:Integrated Login offers the convenience of a single security system, but there are important security implications that database administrators should be familiar with.
Setting up Integrated Login
To set up the Integrated Login feature, go to the Administration menu in Progeny.
Choose the User Maintenance menu option.
Click the Add User button to begin the process.The username that is created in Progeny must be the same as the username for the Windows sign-on. It is not important what the Progeny password is set to. The authentication is done at the operating system level.
Make sure that you check the Integrated Login checkbox for this user.
What is LDAP?
Lightweight Directory Access Protocol (LDAP) can be used with Progeny to pass its login authentication to your LDAP server. When implemented, users can use their domain password (the same one they use to login into Windows on your network) to log into Progeny. The advantage is if you have other applications that are using LDAP authentication, then you can use the same password to log into these applications. Also, your organization’s password policy can be centrally managed.
Progeny’s LDAP authentication is implemented from within the Progeny Desktop client with an administrative user account and can be turned on separately for Progeny Web, which is turned on from the Progeny Web configuration page.
We cannot guarantee the performance on Mozilla Firefox, Microsoft Edge, and Apple Safari, but to get the best possible experience, Progeny recommends using a browser that has full HTML-5 compatibility (Chrome, Firefox, Edge). Progeny Web is not compatible with mobile devices.
Apple Safari for Windows is not supported. Internet Explorer (all versions) is not supported. Internet Explorer mode in Microsoft Edge is not supported.
The remainder of this article outlines the hardware, software, and storage requirements for deploying Progeny on Windows Server 2019/2022 and Rocky Linux 9 for on-premise installations. It includes partitioning recommendations, security best practices, and deployment guidelines for both consolidated and separated deployments.
Support Operating Systems
Windows Server: 2019, 2022
Linux: Rocky Linux 9
Software Requirements
Web Server Components and Pre-Installation Requirements
Apache Tomcat: Version 9.0.xx (for web application hosting)
Java Runtime Environment (JRE): Version 8 (Required for Tomcat)
SSL Certificate: Required for secure connections (no support for non-SSL installations)
Ports:
443 (HTTPS) (Required)
8080 (Internal for Tomcat, redirected to 443 externally)
Database Server Components
MySQL: Latest stable version (Primary database engine)
MySQL Workbench: Latest stable version (Recommended for DB management)
Ports:
3306 (MySQL, allow only from trusted sources)
Hardware Requirements
Windows Server 2019/2022:
CPU: 2-core 2.0 GHz+ (x64)
RAM: 4 GB minimum
Storage: 40 GB HDD/SSD
Network: 1 Gbps NIC
Rocky Linux 9:
CPU: 2-core 1.8 GHz+ (x86_64)
RAM: 2 GB minimum
Storage: 20 GB HDD/SSD
Network: 1 Gbps NIC
Recommended Hardware Based on User Load (Web Environment)
Consolidated Installation (Web and Database on the Same Server)
Best for smaller deployments or customers without a dedicated database server.
Small Deployment (1-5 Users)
CPU: 4-core (Windows) / 2-core (Linux)
RAM: 8 GB (Windows) / 4 GB (Linux)
Storage: 100 GB SSD or 300 GB 15K HDD
Medium Deployment (5-15 Users)
CPU: 6-core (Windows) / 4-core (Linux)
RAM: 16 GB (Windows) / 8 GB (Linux)
Storage: 250 GB SSD or 500 GB 15K HDD
Large Deployment (15+ Users)
CPU: 8-core (Windows) / 6-core (Linux)
RAM: 32 GB (Windows) / 16 GB (Linux)
Storage: 500 GB SSD or 1 TB 15K HDD
Separated Installation (Web and Database on Different Servers)
Best for performance optimization, scalability, or larger deployments. With Separated deployments focus can be placed on larger Database needs with smaller user requirements. A mix of Web and Database server options can be utilized to best suit the need.
Harden MySQL by disabling remote root login and enforcing strong passwords.
Running Services with Domain Service Accounts on Windows Server (Best Practices & Implementation Guide)
This guide provides step-by-step instructions and best practices for configuring domain service accounts to run Apache Tomcat and MySQL on a Windows Server that is part of a domain.
Overview
In a Windows Server domain environment, it is best practice to run services using domain-based service accounts instead of local system accounts. This approach:
Enhances security by granting only necessary permissions.
Supports centralized management via Active Directory (AD).
Allows easier auditing and password management.
Creating Domain Service Accounts for Tomcat & MySQL
Recommended Service Accounts
Service
Domain Service Account
Purpose
Apache Tomcat
DOM\tomcat_svc
Runs the Apache Tomcat service
MySQL
DOM\mysql_svc
Runs the MySQL Database service
Note: Replace DOM\ with your actual domain name.
Creating the Service Accounts in Active Directory
Log into your AD Domain Controller.
Open Active Directory Users and Computers (dsa.msc).
Right-click on the Organizational Unit (OU) where you want to create the service accounts → New → User.
Enter the following details:
User logon name: tomcat_svc (for Tomcat) or mysql_svc (for MySQL).
Full name: Tomcat Service Account (or MySQL Service Account).
User logon name (pre-Windows 2000): tomcat_svc or mysql_svc.
Set an initial password, then select:
User cannot change password
Password never expires (Recommended for service accounts)
Finish the setup and repeat for the mysql_svc account.
Assigning Proper Permissions to the Service Account
Permissions for Apache Tomcat Service Account (DOM\tomcat_svc)
The tomcat_svc account needs permissions to:
Run as a service
Access the Tomcat installation directory (D:\WebApp)
Read SSL certificates (if stored in the Windows certificate store)
Steps to Grant ‘Log on as a Service’ Permission
Open Local Security Policy (secpol.msc) on the Windows Server.
Navigate to Local Policies → User Rights Assignment.
Find Log on as a service → Right-click → Properties.
Add DOM\tomcat_svc → Click OK.
Steps to Set File System Permissions
Navigate to D:\WebApp\ (or wherever Tomcat is installed).
Right-click → Properties → Security → Edit.
Add DOM\tomcat_svc and grant:
Read & Execute (for security)
Modify (if Tomcat writes logs to its installation directory)
Steps to Assign the Service Account to the Apache Tomcat Service
Open Services (services.msc).
Find Apache Tomcat → Right-click → Properties.
Under the Log On tab:
Select ‘This account’
Enter DOM\tomcat_svc and its password.
Click Apply → OK.
Restart the Tomcat service to apply changes.
Permissions for MySQL Service Account (DOM\mysql_svc)
The mysql_svc account requires:
Log on as a service permission
Full control of MySQL data directory (E:\MySQLData)
Access to the MySQL executable (C:\Program Files\MySQL)
Steps to Grant ‘Log on as a Service’ Permission
Follow the same steps as Tomcat (secpol.msc → User Rights Assignment → Log on as a service).
Add DOM\mysql_svc.
Steps to Set File System Permissions for MySQL
Navigate to E:\MySQLData\ (or MySQL’s data directory).
Right-click → Properties → Security → Edit.
Add DOM\mysql_svc and grant:
Full Control (required for MySQL to write data).
Navigate to MySQL installation directory (C:\Program Files\MySQL).
Repeat step 3, but grant only:
Read & Execute permissions.
Steps to Assign the Service Account to MySQL
Open Services (services.msc).
Find MySQL → Right-click → Properties.
Under the Log On tab:
Select ‘This account’
Enter DOM\mysql_svc and its password.
Click Apply → OK.
Restart the MySQL service to apply changes.
DOM\mysql_svc
Log on as a service, Full Control on E:\MySQLData\, Read/Execute on C:\Program Files\MySQL\
Best Practices for Managing Service Accounts in Active Directory
General Security Guidelines
Use a dedicated OU for service accounts in Active Directory to apply Group Policy settings.
Deny interactive logon to prevent these accounts from being used to log into servers interactively.
Use long, randomly generated passwords (if you’re not using managed service accounts).
Monitor service account logins using Event Viewer (Event ID 4624, 4625, 4776).
Enable Kerberos authentication instead of NTLM where possible.
Using Group Policies to Enforce Restrictions
To prevent unauthorized login, apply a Group Policy Object (GPO):
Open Group Policy Management (gpmc.msc).
Create a new GPO (e.g., Service Account Restrictions).
Navigate to Computer Configuration → Policies → Windows Settings → Security Settings → Local Policies → User Rights Assignment.
Deny log on locally → Add DOM\tomcat_svc and DOM\mysql_svc.
Apply the policy to servers where these accounts exist.
Additional Considerations
Using Managed Service Accounts (MSAs) Instead of Traditional Service Accounts
Group Managed Service Accounts (gMSAs) eliminate the need for manually updating passwords.
If Windows Server 2012+ and AD 2012+, consider using gMSAs for MySQL and Tomcat.
Enable audit policies in AD and Windows Security Logs.
Set up alerts for failed login attempts on service accounts.
Use SIEM tools to detect unusual service account activity.
Following this guide ensures secure, scalable, and well-managed domain service accounts for Apache Tomcat and MySQL. By following least privilege access principles, using dedicated service accounts, and applying audit policies, you can maintain security while optimizing performance.
Streamlined Family History Management for Smarter Patient Care
Progeny provides an all-inclusive tool for you to leverage the wealth of family history information as you nurture your patient from diagnosis to cure. Progeny is a web-based application adopted by genetic communities around the world to track, analyze, and maintain family history data. Progeny’s workflow simultaneously allows your clinical team more efficient productivity.
Progeny registrations are monitored by the concurrent license usage, which allows your facility to have as many named users as needed for your convenience. For example, if you have purchased 10 licenses (as comes with our Premium Cloud accounts) when the 11th user attempts to log in to Progeny, they would receive a License Usage Exceeded notification and would not be allowed to log into the software until another user logs out.
How does it work?
Progeny communicates with the Global License Server (GLS) with a simple handshake to let the server know that one of the users of a specific license is using the software. The same thing happens when a user closes or logs out of the software.
Is this secure?
Absolutely, the handshake between your web client and the GLS does not pass any data or private information from your database. It uses your license registration number to let the server know when a user logs in and logs out. The transactions are completely encrypted between the client and the GLS.
What is required from my facility in order for Global Licensing to work?
The GLS will choose any random port open on the client side and will connect on port 443 (TLS). In the event, your firewall blocks this connection attempt, a static route from the client to the GLS would be required to allow the connection to the host address: gls.progenygenetics.com.
How to Register Progeny Web Client:
Please note: the following instructions should only be performed by your Progeny Genetics software administrator and/or the IT personnel.
Log into the web-client configuration portal on the server where the web-client is installed.
Make sure you use the localhost to log in, not a domain or server name.